Welcome to our community

Be a part of something great, join today!

  • Hey all, just changed over the backend after 15 years I figured time to give it a bit of an update, its probably gonna be a bit weird for most of you and i am sure there is a few bugs to work out but it should kinda work the same as before... hopefully :)

First Look: Interchangeable OLPF on Dragon

Phil,

Thank you for all your help. Speaking of ISO and OLPF combos, if Fincher and Cronenweth could go back in time and shoot the Social Network on Dragon, how would they expose? To me, a lot of Cronenweth's work on MX looks like lower ISO and expanded DR in the shadows. How this translates to Dragon, my best guess would be LLO at ISO 500.

My question is, what would be your advice on shooting low key for expanded shadow DR on Dragon?
socialnetwork-005.jpg
 
As someone who has "Exposed to the right" throughout almost all the versions of RDC cameras (R-1, Epic X, Epic Dragon) I was resistant when Mark L. Pederson suggested in order to get the MOST out of the Dragon sensor, we needed a Light meter and lighting skills... two things that aren't in my kit.

But with the Gio Scope, I can see how one CAN maximize an image in camera should the need arise. I'll still shoot most of my daylight shots using ETTR, but I'm thinking more and more to go specialized lighting rather than simple illumination for low-light shots.

Sounds like a good plan Elsie. If you're going to use lights you may as well use them properly.

I haven't actually tried it yet, but for me anyway, the thing that makes the Gio Scope so cool is the clear and easy way it can show you your lighting/contrast ratio. Instead of using an incident light meter to read your key light, then your fill light, then adjusting the lights to maintain your contrast ratio throughout a scene, the Gio Scope tool shows you those lighting values, in f-stops, right there on your monitor. And instead of pulling out a spot meter to see how bright or dark some other element in a scene is in relation to everything else, that info is right there in your viewfinder already too, allowing you to decide what exposure value you want to give to that element. It doesn't get easier than that.

The next step would be to allow you to change those values in camera, with selective exposure of different areas of the sensor, but that would be something for some future camera.
 
Sounds like a good plan Elsie. If you're going to use lights you may as well use them properly.

I haven't actually tried it yet, but for me anyway, the thing that makes the Gio Scope so cool is the clear and easy way it can show you your lighting/contrast ratio. Instead of using an incident light meter to read your key light, then your fill light, then adjusting the lights to maintain your contrast ratio throughout a scene, the Gio Scope tool shows you those lighting values, in f-stops, right there on your monitor. And instead of pulling out a spot meter to see how bright or dark some other element in a scene is in relation to everything else, that info is right there in your viewfinder already too, allowing you to decide what exposure value you want to give to that element. It doesn't get easier than that.

The next step would be to allow you to change those values in camera, with selective exposure of different areas of the sensor, but that would be something for some future camera.

Les, maybe I'm misunderstanding what you are asking for... but aren't we able to selectively choose specific parts of DR by epigentically turning on or off a division of the DR?
 
Phil,

Thank you for all your help. Speaking of ISO and OLPF combos, if Fincher and Cronenweth could go back in time and shoot the Social Network on Dragon, how would they expose? To me, a lot of Cronenweth's work on MX looks like lower ISO and expanded DR in the shadows. How this translates to Dragon, my best guess would be LLO at ISO 500.

My question is, what would be your advice on shooting low key for expanded shadow DR on Dragon?
socialnetwork-005.jpg


I was fortunate to be at Gone Girl Light Iron Panel at the Arclight recently and was able to speak to Jeff Cronenweth afterwards. They were more or less shooting on "older tech" which would be similar to what we know as the "V1 OLPF". However, Jeff stated that Dragon has come a long, long way from back then. The new Low Light Optimized OLPF is improved slightly from this previous iteration.

A good chunk of Gone Girl was shot at ISO 800 and occasionally going outside of that rating.

I'd likely say shooting somewhere in the 500-1280 range is "ideal" for film/cinematic use. Personally I find ISO 250 sometimes unnervingly clean. Especially on the Low Light Optimized OLPF.

It's really more about how you want your piece to feel at the end of the day.

One of the things to note is "how" Jeff is exposing for these films as often he's exposing skin a bit under what we would traditionally expose at. This isn't by accident, but rather is the textured look he is trying to achieve.


why 250 ISO is more plastic and lack of details compared to others?

Because when you shoot at lower and lower ISO ratings the cleaner the image gets. The detail is still there, but it's cleaner. What you are seeing in the example is the lens being at T2 and the frame is out of focus (the image is focused on a chart outside of that crop, this was to show highlight retention). However, this points out something as well as having a little texture does "enhance" detail slightly overall.

ISO 250 is great to have if you want really clean images. For many of the people focused on narrative or "films" in general, it's a bit too clean. And like I said above, especially clean on the Low Light OLPF when you're that low in the ISO Rating. There's a bit more texture on the STH OLPF at ISO 250, but it's still on that boarder of being too "glass like".
 
I was fortunate to be at Gone Girl Light Iron Panel at the Arclight recently and was able to speak to Jeff Cronenweth afterwards. They were more or less shooting on "older tech" which would be similar to what we know as the "V1 OLPF". However, Jeff stated that Dragon has come a long, long way from back then. The new Low Light Optimized OLPF is improved slightly from this previous iteration.

A good chunk of Gone Girl was shot at ISO 800 and occasionally going outside of that rating.

I'd likely say shooting somewhere in the 500-1280 range is "ideal" for film/cinematic use. Personally I find ISO 250 sometimes unnervingly clean. Especially on the Low Light Optimized OLPF.

It's really more about how you want your piece to feel at the end of the day.

One of the things to note is "how" Jeff is exposing for these films as often he's exposing skin a bit under what we would traditionally expose at. This isn't by accident, but rather is the textured look he is trying to achieve.


Because when you shoot at lower and lower ISO ratings the cleaner the image gets. The detail is still there, but it's cleaner. What you are seeing in the example is the lens being at T2 and the frame is out of focus (the image is focused on a chart outside of that crop, this was to show highlight retention). However, this points out something as well as having a little texture does "enhance" detail slightly overall.

ISO 250 is great to have if you want really clean images. For many of the people focused on narrative or "films" in general, it's a bit too clean. And like I said above, especially clean on the Low Light OLPF when you're that low in the ISO Rating. There's a bit more texture on the STH OLPF at ISO 250, but it's still on that boarder of being too "glass like".

This is why I've come to believe that the LLO (or at least, the first release as V-1) was more for those shooting video-like while the V-2, later dubbed the STH, is more in tune with making feature content.

Just my way of defining the two OLPFs.
 
Last edited:
Sorry Elsie, I was just daydreaming and probably shouldn't have mentioned that. I meant having the Gio Scope tell you for example that the side of someone's face is being exposed at f/4, then you tapping on the screen and changing that and only that area to some other value, and having the camera track that area, keeping it at the adjusted value you selected, instead of having to adjust the actual lighting instrument that was illuminating that area. Kind of like using a power window in post, but in-camera, by having the ability to increase or decrease the sensitivity of not just the whole sensor, but selected groups of photo-sites within it. As far as I know that's not possible.
 
Sorry Elsie, I was just daydreaming and probably shouldn't have mentioned that. I meant having the Gio Scope tell you for example that the side of someone's face is being exposed at f/4, then you tapping on the screen and changing that and only that area to some other value, and having the camera track that area, keeping it at the adjusted value you selected, instead of having to adjust the actual lighting instrument that was illuminating that area. Kind of like using a power window in post, but in-camera, by having the ability to increase or decrease the sensitivity of not just the whole sensor, but selected groups of photo-sites within it. As far as I know that's not possible.

That would be a very desirable feature. Good imaginative thinking on your part!

And what isn't possible today... well, who knows? Tomorrows are just other days of discovery.
 
Thanks Phil,

I am working on a script that takes place in a church with a lot of low key practicals. I want to emulate the SN/GWTDT "low key look." Gone Girl looked lovely but it's not the style I'm going for.

If you were tasked with filming a low key shot with no need for highlight roll off, and, keeping in mind the "textural noise/grain" look for features, which combo OLPF with ISO would you use? Low ISO obviously for expanded DR in the shadows, but which OLPF?

The problem with the LLO to me is it's too clean, thus you have to pump up the ISO to get your texture back, but the higher you go the more DR you lose in the shadows. If you go with the STH, do you automatically lose DR in the shadows? - that's what my question boils down to... balancing low key DR but with a pleasing amount of grain and texture. I don't have the Dragon yet so I can't do any testing. Sorry if this is complicated, but I'm torn.
 
Thanks Phil,

I am working on a script that takes place in a church with a lot of low key practicals. I want to emulate the SN/GWTDT "low key look." Gone Girl looked lovely but it's not the style I'm going for.

If you were tasked with filming a low key shot with no need for highlight roll off, and, keeping in mind the "textural noise/grain" look for features, which combo OLPF with ISO would you use? Low ISO obviously for expanded DR in the shadows, but which OLPF?

The problem with the LLO to me is it's too clean, thus you have to pump up the ISO to get your texture back, but the higher you go the more DR you lose in the shadows. If you go with the STH, do you automatically lose DR in the shadows? - that's what my question boils down to... balancing low key DR but with a pleasing amount of grain and texture. I don't have the Dragon yet so I can't do any testing. Sorry if this is complicated, but I'm torn.

Personally I'd have both OLPFs on hand, but the vast majority of my professional work with Dragon thus far has been on the STH OLPF and in the ISO 500-1280 range and that provides the "fat digital negative" and film-like effect really. If I was shooting in darker conditions or perhaps working more with practical and ambient light I'd aim for ISO 1000-2000 with LLO OLPF. I've shot up to ISO 4000 with "decent" results even. Kinda cool. Just depends on what the shot is and where values land really.
 
Personally I'd have both OLPFs on hand, but the vast majority of my professional work with Dragon thus far has been on the STH OLPF and in the ISO 500-1280 range and that provides the "fat digital negative" and film-like effect really. If I was shooting in darker conditions or perhaps working more with practical and ambient light I'd aim for ISO 1000-2000 with LLO OLPF. I've shot up to ISO 4000 with "decent" results even. Kinda cool. Just depends on what the shot is and where values land really.

But doesn't the lower portion of the DR suffer when you shoot at higher ISO? Or was this only an MX problem?
 
But doesn't the lower portion of the DR suffer when you shoot at higher ISO? Or was this only an MX problem?

There's considerably more Dynamic Range on Dragon compared to Mysterium-X. MX was more prone to clipping and clipping rather "not-so-ideally". Dragon has a bit more going on than that.

You can certainly shoot at a lower ISO if you find you are getting the look you desire and maybe producing more subtle tones in the darks. I would say if anything do a quick test day prior to shooting and develop a few looks and that will help guide you in your ISO Rating.
 
Yes. The bulb itself should clip "at some point no matter what". However, you are incorrect on your assessment here. Remember these examples in terms of variations of exposures was performed by precisely exposing at 18% Gray for each ISO Rating, so visually the exposures are "spot on". The ISO Rating difference reveals how the Dynamic Range is used at each rating. So what's being revealed in the comparison:

Is that the lower ISO Rating creates a cleaner image and places more tonal range in the shadows. And in the higher ISO Rating you will get a more textured image and have better highlight retention as you are using more of the "sensors total available dynamic range". The shift of Middle Gray when adjusting ISO effects the entire image and how the tones are mapped. In this particular stress test the light bulb is showing exactly how that can reveal itself as well as the shadow and texture implications.
Yeah, I didn't realize they were all separate exposures at 18% Gray (assuming different apertures to maintain consistent exposure). Makes more sense now. Gotta get used to thinking this way. Thanks.
 
Just read through all 25 pages of this. Phil- you are my hero. Brilliant concrete examples of different scenarios for each OLPF.

Thank you so much for hours and days and weeks and months worth of testing and sharing it with us all.

You deserve some sort of e-medal... :)
 
Thanks for the continuing patience and the detailed explanations, Phil.
Always greatly appreciated!

Now that I've been shooting Dragon "a while and a lot" I can safely say that this system works a whole lot like working with film.

These days I'm having fun doing stranger things like rating at ISO 500 and pushing one stop (a very film thing to do) and developing out at ISO 1000 for that effect on skin tones. I've done the reverse as well and pulled a stop out from higher ISO ratings like shooting at ISO 1600 and developing out at ISO 800.

The cool thing is that I'm doing this for the same reasons you'd do this aesthetically with film. It has a wonderful controlled effect on skin tones and general image character.

This sound really, really interesting. Can you detail a bit the technique, and the results you can achieve this way?
Especially the effect on the skin that you mentioned.

Thanks!
 
Now that I've been shooting Dragon "a while and a lot" I can safely say that this system works a whole lot like working with film.

These days I'm having fun doing stranger things like rating at ISO 500 and pushing one stop (a very film thing to do) and developing out at ISO 1000 for that effect on skin tones. I've done the reverse as well and pulled a stop out from higher ISO ratings like shooting at ISO 1600 and developing out at ISO 800.

The cool thing is that I'm doing this for the same reasons you'd do this aesthetically with film. It has a wonderful controlled effect on skin tones and general image character.

You're probably in Japan already having fun :-)

I'll do some experiments pulling and pushing in the coming days. Let us know more details about the controlled effect you are mentioning - especially on skintones and general texture.

Thanks and good luck in Tokyo!
 
I've been asked to make a big summary post by a user with all the useful test images in there as the Interchangeable OLPF System is now making it's way out into cameras.


Color Consistency

The color difference between the Low Light Optimized OLPF and the Skin Tone - Highlight OLPF is fairly minimal:


OLPF Texture Comparison

Below is a sample video showing the texture comparison between both the STH and LLO OLPFs:


There are a few 100% crops from that video here:
http://www.reduser.net/forum/showthread.php?122074-First-Look-Interchangeable-OLPF-on-Dragon&p=1420118&viewfull=1#post1420118

And here:

http://www.reduser.net/forum/showthread.php?122074-First-Look-Interchangeable-OLPF-on-Dragon&p=1423024&viewfull=1#post1423024

As well as some of the "pretty shots" here:

http://www.reduser.net/forum/showthread.php?122074-First-Look-Interchangeable-OLPF-on-Dragon&p=1420342&viewfull=1#post1420342


Notes on Improvements and Artifacts

The general concept is that the texture/noise/grain is 1 to 1.3 stops cleaner on the Low Light Optimized OLPF versus the Skin Tone - Highlight OLPF. Meaning the general "energy" and characteristics of the noise is about 1 to 1.3 stops better. So essentially if you like the Skin Tone - Highlight OLPF at ISO 400, you'd likely feel the same way about the Low Light Optimized OLPF at ISO 800-1000.

Red's recommended "cinema ready" ISO range is ISO 250-2000. However, I've found under some circumstances that ISO 4000-5000 is rather usable in certain situations with the Low Light Optimized OLPF:


A note on potential artifacts.

The LLO OLPF produces this Red Dot Grid at smaller apertures like T16, which is similar to what Mysterium-X does:


Where as the STH OLPF eliminates the undesirable qualities of the Red Dot Grid with it's own unique look:


Additionally and occasionally on super hot sources pointed into the lens you may get Highlight Orbs around the source, which is almost like an extreme lens flare when it happens:


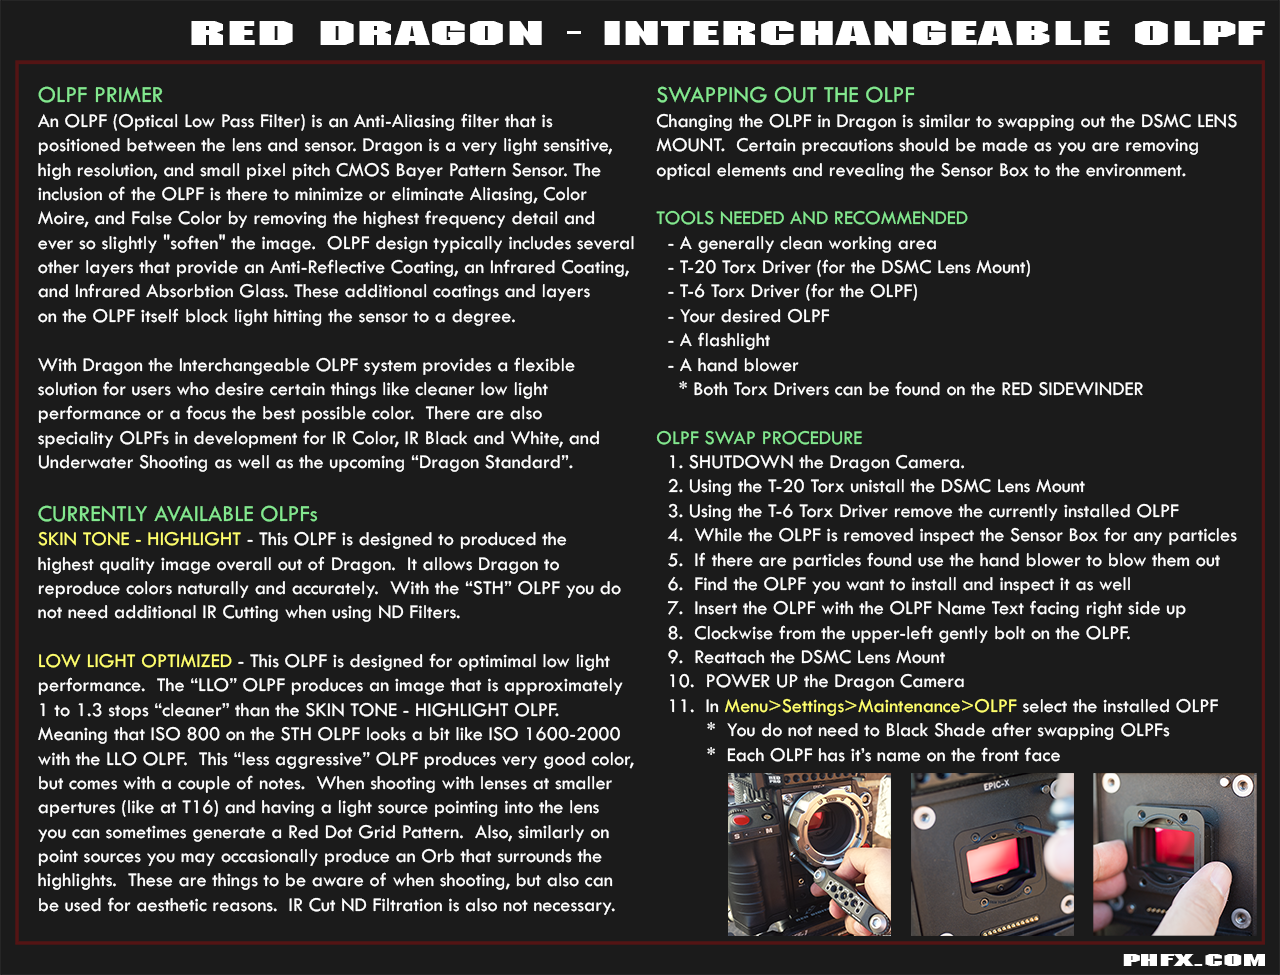
OLPF Swap Process

A quick overview of the OLPF Swap Process, which are now apart of my Dragon Data Sheets:


So my overall assessment here. If you are interested in the "highest quality image" out of Dragon and understand the texture that comes along with the ISO ratings of the Skin Tone - Highlight OLPF it produces the best image. The Low Light Optimized OLPF has pretty damn good color and still fairly nice highlight roll-off, but with the potential to produce certain artifacts under specific conditions. If you are familiar shooting with Mysterium-X you'll be familiar when those artifacts arise and also get the benefits of having a cleaner image across your ISO range.


There we go. Mischief managed.
 
Last edited:
Back
Top