Welcome to our community

Be a part of something great, join today!

  • Hey all, just changed over the backend after 15 years I figured time to give it a bit of an update, its probably gonna be a bit weird for most of you and i am sure there is a few bugs to work out but it should kinda work the same as before... hopefully :)

First Look: Interchangeable OLPF on Dragon

I hear that the STH OLPF gives better color rendition compared to the LLO OLPF, but how much of it can it be corrected in post? In other words, can't I get close to the STH? I love the skin tones I'm getting right now out of the STH OLPF, but I would like a little more latitude in low lit situations.

I also agree that if they can give us a monochrome kind of latitude we will be smiling from ear to ear!
 
Picking my Interchangeable OLPF installed, on my M body camera today, if all goes well. Although additional OLPF's are not available for purchase today, I was told by my rep yesterday, the very helpful and zealous Niick Pau, that they are still targeted for sale by month's end...

Thank you very much

Fury
 
I hear that the STH OLPF gives better color rendition compared to the LLO OLPF, but how much of it can it be corrected in post? In other words, can't I get close to the STH? I love the skin tones I'm getting right now out of the STH OLPF, but I would like a little more latitude in low lit situations.

I also agree that if they can give us a monochrome kind of latitude we will be smiling from ear to ear!


Here's something relevant on this topic:


Remember the OLPFs, their calibration/profile, and general color science is alarmingly close to each other. The Skin Tone - Highlight OLPF just gives you those last few drops that make it taste better. You also see it a bit in the highlight roll-off. They are tuned to each other in regards to where values land overall.

Also to note, inside Redcine-X Pro there is now a Metadata Tag for "Sensor OLPF Name" so you can verify which shots used which OLPF.
 
Here's something relevant on this topic:


Remember the OLPFs, their calibration/profile, and general color science is alarmingly close to each other. The Skin Tone - Highlight OLPF just gives you those last few drops that make it taste better. You also see it a bit in the highlight roll-off. They are tuned to each other in regards to where values land overall.

Also to note, inside Redcine-X Pro there is now a Metadata Tag for "Sensor OLPF Name" so you can verify which shots used which OLPF.

This is a great comparison. The differences are ever so subtle but illustrated on her skin tones. Looking at the color chart the differences aren't as obvious. Thanks!
 
Remember when shooting at lower ISO ratings you're tapping into a smaller sliver of DR, though you will have alarmingly clean shadows and a clean image overall. However your highlight detail can get nuked, especially if you have something that rolls to clip in frame. When shooting at higher ISO ratings you will begin to see more texture/noise/grain, but you are also tapping into where a lot of the Dynamic Range available to you is on Dragon.


I'm not understanding the logic of why shooting at ISO 250 would cause these highlights to clip, but they don't clip at ISO 800/3200.

My understanding was that ISO just remaps the curve of where middle gray lands, with the pure black/white endpoints untouched.
Is there some special exception for ISO 250?
 
For those who prefer the skin/colors of the STH OLPF, does this image represent the reason you prefer it?
Maybe it's my monitor, but I just see slightly less saturation in the skin and hair. Maybe if I was on set, observing how it looked in person, I could appreciate the color accuracy more.

Based on what I've read in this thread, the LLO OLPF seems more appealing to me if I was to choose one this second. Still unsure though.

Thanks again for the tests!
 
I'm not understanding the logic of why shooting at ISO 250 would cause these highlights to clip, but they don't clip at ISO 800/3200.

My understanding was that ISO just remaps the curve of where middle gray lands, with the pure black/white endpoints untouched.
Is there some special exception for ISO 250?

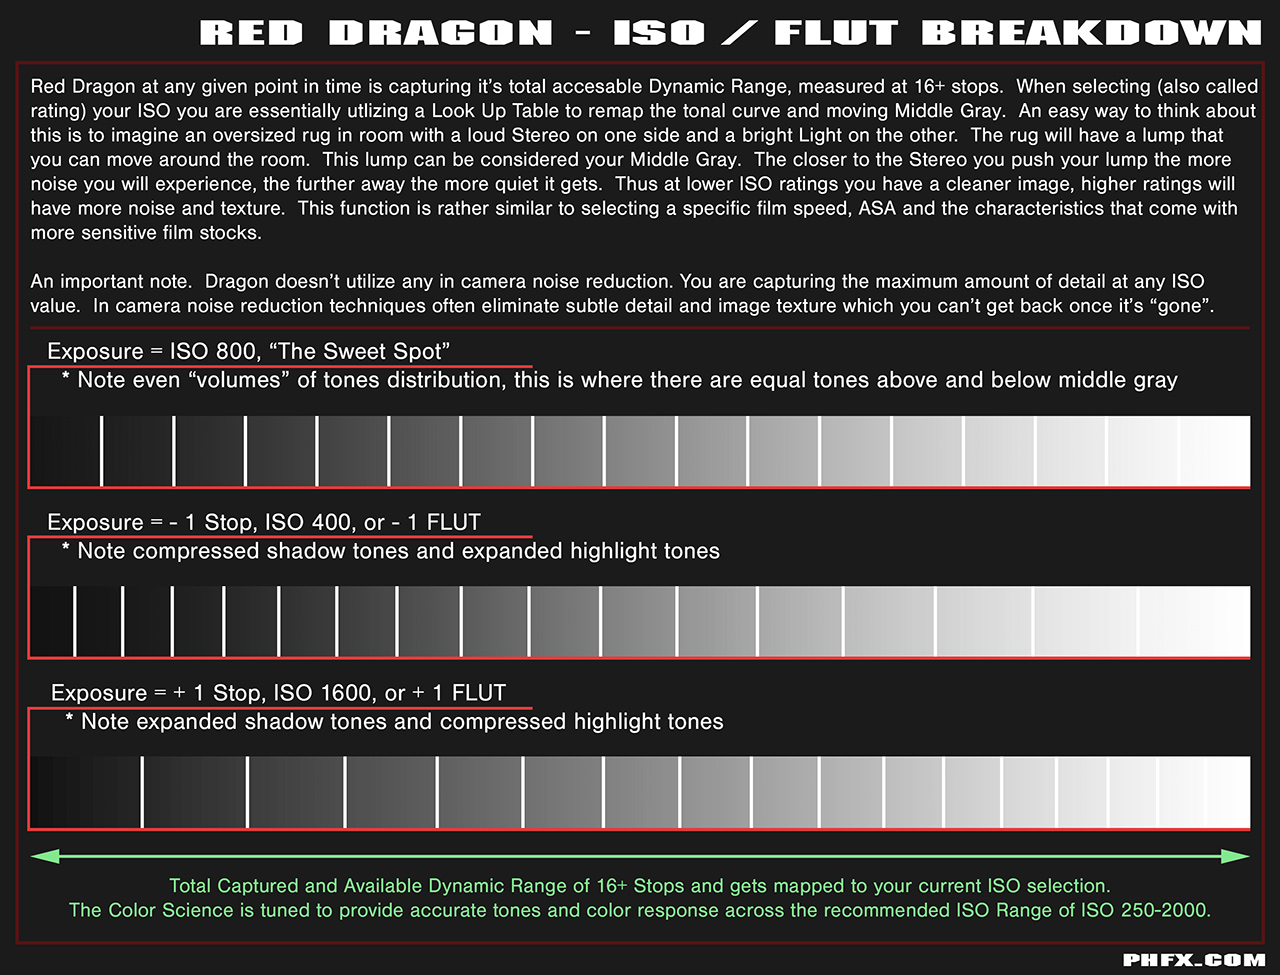
These two graphics describe how Dynamic Range is distributed and mapped across the ISO range.


Red Dragon - ISO / FLUT Breakdown


Red Dragon - ISO Examples


While shooting at lower ISO creates a cleaner image you are in effect using less and less available Dynamic Range the lower ISO Rating you shoot. This isn't necessarily a bad thing if that's the effect you are going for. Red utilizes ISO 800 for "Raw View" and that's the approximate area where you have a fair amount of distribution above and below "Middle Gray". Actually it's in the ISO 800-1280 arena in reality.


For those who prefer the skin/colors of the STH OLPF, does this image represent the reason you prefer it?
Maybe it's my monitor, but I just see slightly less saturation in the skin and hair. Maybe if I was on set, observing how it looked in person, I could appreciate the color accuracy more.

Based on what I've read in this thread, the LLO OLPF seems more appealing to me if I was to choose one this second. Still unsure though.

Thanks again for the tests!


Appealing is subjective, however, when it comes to subtle variation the STH OLPF tends to provide a hair more. Also the Highlight Roll-Off is slightly smoother, but more or less what I think this particular side by side shows is how similar the STH and LLO actually can be.
 
I remember RED said its not just olpf its extra tweaking they did while upgrade to OLPF1 to 2.Now how its gonna be same? Im looking at these samples and i find it quite different than we had original olpf (noise free) than the upgraded one.On these examples difference is negligible
 
I remember RED said its not just olpf its extra tweaking they did while upgrade to OLPF1 to 2.Now how its gonna be same? Im looking at these samples and i find it quite different than we had original olpf (noise free) than the upgraded one.On these examples difference is negligible

Color-wise they should be in the same ballpark due to the calibration/profile for each OLPF. They are designed to match.

Where you will see the biggest difference overall is when it comes to texture/grain/noise character. The Low Light Optimized OLPF is about 1 to 1.3 stops cleaner than the Skin Tone - Highlight OLPF.

The drawbacks of the LLO OLPF is that you still have the small aperture dot grid pattern showing up that we are familiar with on MX. You also can get orbs around highlights, though it's slightly reduced due to some "tweaking" that Jarred mentioned. So in some ways it's slightly better than the "V1" OLPF in my mind.

The STH OLPF still produces the most natural and accurate color to me under a variety of lighting conditions. That's pretty much what's happening here.
 
For those who prefer the skin/colors of the STH OLPF, does this image represent the reason you prefer it?
Maybe it's my monitor, but I just see slightly less saturation in the skin and hair. Maybe if I was on set, observing how it looked in person, I could appreciate the color accuracy more.

Based on what I've read in this thread, the LLO OLPF seems more appealing to me if I was to choose one this second. Still unsure though.

Thanks again for the tests!

I think he exposed differently for each ISO - that's what he meant by "shooting at". Probably more clear wording would be "exposing for an 250 ISO finish" (or a 2000 ISO finish, or etc.).
 
I'm not understanding the logic of why shooting at ISO 250 would cause these highlights to clip, but they don't clip at ISO 800/3200.

My understanding was that ISO just remaps the curve of where middle gray lands, with the pure black/white endpoints untouched.
Is there some special exception for ISO 250?

The problem with the lighting bulb is that you look at RedLogFilm encoded pictures. This means that neither real whites nor blacks are projected. You look at dark grey to light grey. Or to put it differently the whites you are looking at are not clipping technically, they are clipping perceived.

Now with a good grading application it won't be too hard to get more information at ISO 320 out of the lighting bulb if, yes, if the dynamic range of the filmed environment is not exceeding the DR of the sensor.

What Phil did by raising up ISO (and effectively underexposing the sensor) was to bring down parts of the lighting bulb into middle-grey area. This makes the luminance differences in the light bulb visible in the RedLogFilm range. But as said above, a good grading application in trained hands would pull out more detail in the bulb also in in the ISO 320 range.

My experience with Dragon (and MX) is that the infamous "native" sensitivity, the realm where neither blacks nor whites are favoured, the noise is hardly visible and the DR is maxed out, can be found at around ISO 320 - depending on the environment you point your camera at. Your milage may vary.

Hans
 
Appealing is subjective, however, when it comes to subtle variation the STH OLPF tends to provide a hair more.

The STH OLPF still produces the most natural and accurate color to me under a variety of lighting conditions. That's pretty much what's happening here.

Concretely? What should we be looking for to actually see the difference?

"A hair more", "subtle variation", "slightly" more "natural" and "accurate"... I keep reading these over and over again but nothing concrete.

Not being ironic at all, Phil - no worries - we are just curious about the concrete differences. What should we be looking at the differentiate colorwise between the two OLPFs?

Thanks a lot!
 
These two graphics describe how Dynamic Range is distributed and mapped across the ISO range.

Now with a good grading application it won't be too hard to get more information at ISO 320 out of the lighting bulb if, yes, if the dynamic range of the filmed environment is not exceeding the DR of the sensor.

*Edit: Deleted to avoid confusion to anybody trying to learn...*
 
Last edited:
Here's something relevant on this topic:


Remember the OLPFs, their calibration/profile, and general color science is alarmingly close to each other. The Skin Tone - Highlight OLPF just gives you those last few drops that make it taste better. You also see it a bit in the highlight roll-off. They are tuned to each other in regards to where values land overall.

Also to note, inside Redcine-X Pro there is now a Metadata Tag for "Sensor OLPF Name" so you can verify which shots used which OLPF.

Concretely? What should we be looking for to actually see the difference?

"A hair more", "subtle variation", "slightly" more "natural" and "accurate"... I keep reading these over and over again but nothing concrete.

Not being ironic at all, Phil - no worries - we are just curious about the concrete differences. What should we be looking at the differentiate colorwise between the two OLPFs?

Thanks a lot!

Like you I was having trouble discerning the difference until I looked at the upper right hand corner of Phil's examples. Clearly the warmth of the siding is different and to me, much more pleasing in the STH example.
 
Phil,

I have heard repeatedly that ISO is just metadata and that as long as we expose using RAW view and avoid any stoplights or goalposts, we are able to extract the most information during post. This series of posts though seems to indicate differently. My question is this -- were any of the images below clipping when recorded? If not, then can you obtain the same image (noise-wise) from one R3D file simply by tweaking the ISO in Redcine? If the answers are "no" and "no" then ISO in-camera does indeed impact what is captured.

I appreciate the help!

Remember when shooting at lower ISO ratings you're tapping into a smaller sliver of DR, though you will have alarmingly clean shadows and a clean image overall. H


.
 
As someone who has "Exposed to the right" throughout almost all the versions of RDC cameras (R-1, Epic X, Epic Dragon) I was resistant when Mark L. Pederson suggested in order to get the MOST out of the Dragon sensor, we needed a Light meter and lighting skills... two things that aren't in my kit.

But with the Gio Scope, I can see how one CAN maximize an image in camera should the need arise. I'll still shoot most of my daylight shots using ETTR, but I'm thinking more and more to go specialized lighting rather than simple illumination for low-light shots.
 
Concretely? What should we be looking for to actually see the difference?

"A hair more", "subtle variation", "slightly" more "natural" and "accurate"... I keep reading these over and over again but nothing concrete.

Not being ironic at all, Phil - no worries - we are just curious about the concrete differences. What should we be looking at the differentiate colorwise between the two OLPFs?

Thanks a lot!

It's a matter of color being "true to reality". The tabletop "Knick" setup was setup very, very precisely to illustrate a few things. This is a mixed lighting setup with tones being effected by both daylight and incandescent sources. Additionally the shadow areas were created by flagging off the key light and the light bulb itself is what allows this scene to exceed 16 stops of dynamic range during capture.

So when you look at them in an "A/B" comparison:


And also in this image:


Some observations can be made. For instance, the pages of the book with the bugs that's tilted up is more color accurate in the STH OLPF image as there was a slight warmth to the pages. Examining the rest of the frame you can see this warmth really comes into effect everywhere, especially when comparing shadow and dark tones. The medical bag in the upper left corner clearly illustrates that more. The point of the lighting setup was to have subtle chromatic and luminance variety accros the image. Check out the wooden box, the shadow side of any of the cotton balls, the wall, the paper color, the table color, etc.

Under the daylight example you can see that difference here is fairly minimal in terms of visual cues.

The STH tends to have a warming deep shadow and the LLO tends to have a cooler/green-ish deep shadow. This is near the "bottom floor" near crushed information, but that's the visual tell here if you look closely.


I think I understand better now. Correct me if I'm wrong:
The key point is that DR was ALREADY exceeded (the bulb was ALREADY clipped), at ISO 800, in the sensor's last visible highlight stop. Therefore, when lowering the ISO, the shadows were crushed towards the sensor's last visible shadow stop, and the last visible highlight stop (ALREADY clipped) was stretched into what used to be the 2nd to last visible highlight stop (previously unclipped and NOW clipped)... If nothing was already clipped at ISO 800, nothing would be clipped later on when changing ISO.

I didn't mean to derail the thread. That concept of expanding the highlight stops when lowering ISO is new to me. I'm coming from BMCC, where I usually kept ISO at 800 (does the same expanding concept apply on BM cameras when lowering ISO?)

Yes. The bulb itself should clip "at some point no matter what". However, you are incorrect on your assessment here. Remember these examples in terms of variations of exposures was performed by precisely exposing at 18% Gray for each ISO Rating, so visually the exposures are "spot on". The ISO Rating difference reveals how the Dynamic Range is used at each rating. So what's being revealed in the comparison:


Is that the lower ISO Rating creates a cleaner image and places more tonal range in the shadows. And in the higher ISO Rating you will get a more textured image and have better highlight retention as you are using more of the "sensors total available dynamic range". The shift of Middle Gray when adjusting ISO effects the entire image and how the tones are mapped. In this particular stress test the light bulb is showing exactly how that can reveal itself as well as the shadow and texture implications.

On a side note in terms of a smoother Highlight Roll-Off ISO 500-1280 is very, very nice and retains a lot of detail prior to clipping.
 
Phil,

I have heard repeatedly that ISO is just metadata and that as long as we expose using RAW view and avoid any stoplights or goalposts, we are able to extract the most information during post. This series of posts though seems to indicate differently. My question is this -- were any of the images below clipping when recorded? If not, then can you obtain the same image (noise-wise) from one R3D file simply by tweaking the ISO in Redcine? If the answers are "no" and "no" then ISO in-camera does indeed impact what is captured.

I appreciate the help!

As you can tell by the increasing focus in the BG the iris was closed to compensate for the higher ISO settings. Thus, the sensor got less and less light until in shot 3 the sensor got obviously not enough light for a proper exposed picture. Would one now transcode the three pictures with the default ISO 800 in RCX, the ISO 250 picture would be too bright, the ISO 800 picture just fine and the ISO 3200 much too dark.

The ISO settings does lead to different exposures, the EVF/monitor gets brighter/darker, but does not to manipulate the digital information in the RAW R3D file. ISO settings are stored as meta data and can be altered to your liking later in post. The idea behind the meta data pipeline from the camera to RCX is the wish to make a WYSIWYG workflow possible.

Red's concept of RAW, ISO, meta data etc... is great for those who wrapped their head around this unique approach but does in fact lead to many headaches. Very understandable.


Hans
 
As someone who has "Exposed to the right" throughout almost all the versions of RDC cameras (R-1, Epic X, Epic Dragon) I was resistant when Mark L. Pederson suggested in order to get the MOST out of the Dragon sensor, we needed a Light meter and lighting skills... two things that aren't in my kit.

But with the Gio Scope, I can see how one CAN maximize an image in camera should the need arise. I'll still shoot most of my daylight shots using ETTR, but I'm thinking more and more to go specialized lighting rather than simple illumination for low-light shots.


Now that I've been shooting Dragon "a while and a lot" I can safely say that this system works a whole lot like working with film. The concept of ETTR is lovely, but it has nothing to do with exposure consistency. In reality getting comfortable with a Light Meter, 18% Gray, and the In Camera Exposure Tools is going to give you the best and most predictable results.

You can do all of this with just the Light Meter in reality.

Nearly everything I shoot these days is at precise ISO rating and I only adjust that if I get into trouble after the fact. However, these days I'm having fun doing stranger things like rating at ISO 500 and pushing one stop (a very film thing to do) and developing out at ISO 1000 for that effect on skin tones. I've done the reverse as well and pulled a stop out from higher ISO ratings like shooting at ISO 1600 and developing out at ISO 800.

The cool thing is that I'm doing this for the same reasons you'd do this aesthetically with film. It has a wonderful controlled effect on skin tones and general image character.

Ideally though, shoot accurately and you'll get the best possible results.
 
Back
Top