Welcome to our community

Be a part of something great, join today!

  • Hey all, just changed over the backend after 15 years I figured time to give it a bit of an update, its probably gonna be a bit weird for most of you and i am sure there is a few bugs to work out but it should kinda work the same as before... hopefully :)

How to change the internal battery RED EPIC X

Toni Tur

Well-known member
Joined
Mar 2, 2018
Messages
86
Reaction score
0
Points
0
Location
IBIZA, SPAIN
Website
www.tupra.es
I'm sorry but I'm going to write the procedure in Spanish because it's easier for me.

If someone wants to translate perfect !!

Hace un par de semanas empece a sufrir el problema del reset en la fecha y hora del reloj de mi Red MX.
Empece a preguntar al support sobre tiempo y coste de la reparación, al final tenia que enviar a UK para un simple cambio de batería interna?? en serio???!!

Yo soy de una pequeña isla en el mediterráneo, por lo que es muy complicado para mi enviar la red al servicio técnico, de hay que empece a investigar como solucionar un problema aparentemente tan estupido y finalmente me decidí a abrir la cámara y buscar la pila.

!!LO CONSEGUI!!

1. Hay que sacar la parte de la ssdMAG. son 6 tornillos.
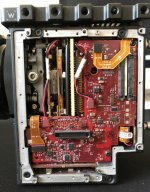
2. Sacar la placa metálica que cubre la electrónica. son 16 tornillos.
3. Ya con la electrónica vista, en la parte superior veréis un texto que pone RTC_BAT, pues allí debajo esta la pila!!
-Desconectamos los conectores de las 2 cintas amarillas.
-Desconectamos los dos conectores de color rojo.
-Sacamos los 3 tornillos que sujetan la placa electrónica.
-Tiramos de la placa con cuidado, veréis el conector del ventilador frontal, hay que desconectar también (Recordar volver a conectarlo después!!!)
-Hay un conector debajo de la placa donde se ve una cinta amarilla con un código QR, hay que sacarlo cuando empezamos a sacar la placa (OJO: Volver a conectarlo después !!!)
4. Sacar la placa con mucho cuidado.
5. comprar antes una pila CR2025 3V
6. Sacamos la pila vieja con cuidado.
7. Insertamos la pila nueva.

8. Volvemos a montar todo siguiendo los pasos pero al revés, y con mucho cuidado de volver a conectar el conector inferior negro y el conector del ventilador frontal.

Hacerlo todo con mucho cuidado, a mi me ha funcionado porque no me da miedo tocar la electrónica (Soy técnico básico de electrónica).Pero si no tienes costumbre de desmontar aparatos te recomiendo que no lo intentes con la Red!!!

Espero que os sea de utilidad la información y que la uséis si sabéis, si no NO LO HAGAIS.
 

Attachments

  • 2.jpg
    2.jpg
    91 KB · Views: 5
  • 3.jpg
    3.jpg
    99.5 KB · Views: 5
  • 4.jpg
    4.jpg
    95 KB · Views: 5
  • 5.jpg
    5.jpg
    95.3 KB · Views: 5
  • 7.jpg
    7.jpg
    99 KB · Views: 4
Last edited:
RED EPIC X como nueva para un par de años mas!!!

Total cost of repair if you have a minimum knowledge of electronics: 2€ and 15 minutes!
 
Last edited:
Thanks for sharing
 
Would anybody know if there is any advantage in replacing this battery by a rechargeable one,
would the camera charge it ?
Thank you
 
Last edited:
Rechargeable? ... you ask it seriously or kidding??...
Better you do not try to change the battery without help ... jjjjjjj
If it carries a normal battery is because the system is not designed to carry a rechargeable, better not to make inventions with expensive equipment ... do not you think?
You better change every 2 years and without problems...
 
Bravo Toni! Now we just need someone to translate... Actually, if I decide to do this I may actually shoot it...
 
In reality it is very simple if you have experience dismantling electronic devices.
I have not translated it because there are words that I do not know how they say in English and in the end it's easier with images step by step.
You just have to be careful with the 6 connectors that you have to take out and put back very carefully, besides taking care that no screws fall inside the rest of the electronic circuits ...

But I repeat, if you do not feel comfortable doing it, do not do it !!

https://www.imageupload.co.uk/images/2018/04/18/stepbystyep.jpg
 
Send me a weapon and I do it!!! :001_smile: jjjjjjjjj
 
I'm curious to know how they feel the redusers who paid $500 for the replacement of a $2 battery with a process that takes 15 minutes.
 
Last edited:
Can someone translate this?

I have access to electronic techs.
 
I'm curious to know how they feel the redusers who paid $500 for the replacement of a $2 battery with a process that takes 15 minutes.


Thats quite normal fee. Just handling someones something that cost 20k USD I would want twice that. How much was your oil change in your car last time?
 
Thats quite normal fee. Just handling someones something that cost 20k USD I would want twice that. How much was your oil change in your car last time?

Just got my truck done for $79 CAD.
 
OK let's stir up some trouble....

.
. ** ** ** This has been Modified for clarity ** ** **
.
A couple of weeks ago I started to experience the problem of the realtime clock resetting the date and time in my Red MX.

I asked tech support about time and cost for the repair, and in the end I was told that I needed to send the unit to the UK for a simple change of an internal battery

Really???!!

I am from a small island in the Mediterranean, so it is very difficult for me to send the unit in for technical service. So, I started to investigate how to solve a seemingly simple problem and finally I decided to open the camera and look for the battery.

!!I GOT IT!!

1. The SSD Module must be removed. There are 6 screws.

2. Remove the metal plate covering the electronics. There are 16 screws.

3. With the electronic circuit board visible, you will see some text at the top that says RTC_BAT, marking the location of the battery on the underside of the board!

-Disconnect the connectors for the 2 yellow ribbon cables.

-Disconnect the two red/black wire connectors.

-Remove the 3 screws that secure the printed circuit board.

-Carefully lift the printed circuit board, you will see the front fan connector, which you need to unplug as well (remember to reconnect it later !!!)

-There is also a connector under the circuit board, where you can see a yellow ribbon cable with a QR code; you have to disconnect it when when you remove the circuit board (Remember to reconnect it later !!!)

4. Carefully remove the printed circuit board.

5. On the reverse side of the board you will see the CR2025 3V battery

6. Carefully remove the the old battery from the holder, making note of the positive/negative orientation.

7. Insert the new battery.

8. Reassemble everything following these steps in reverse order, carefully reconnecting the lower ribbon cable connector and the front fan connector on the underside of the board.

Do everything with great care, it worked for me because I'm not afraid to play with electronics (I'm a basic electronics technician). But if you are not familiar with dismantling devices, I do not recommend recommend you try this with the camera!!!

I hope you find the information useful and that you use it if you are capable, if not DO NOT DO IT.
.
.
.
 
Todd T, thanks for the translation ... :thumbsup:


PD: My van costs more than 60k and I change the oil, wheels, etc ... jjjjj
 
Last edited:
Thats quite normal fee. Just handling someones something that cost 20k USD I would want twice that. How much was your oil change in your car last time?

I understand that bringing the camera to Red is the best because they have a dust-free environment, highly trained technicians and the best tools. In addition to the logistics involved in receiving cameras and sending them back.
However $500 makes me think that Red does not want to charge less than that to not receive hundreds of cameras that have this problem.
And to me it seems expensive to pay $500 to change a simple $2 battery that lasts about two years.
Why Red does not offer a DIY solution at your own risk like this?
 
yes, you are right, RED gives you a security and a guarantee that the "repair" will be satisfactory, (or not) ...
But why they have hidden the battery and have not made it available to the user who has paid more than 20k, so he can change it himself ?? it's only a battery!!
They only had to put a cover with a screw and the battery on the other side of the printed board.
How difficult was it ??

Any old handycam has that same battery accessible to the end user from the beginning of the history of the cameras ...

I can not understand it, it can only be a business model, or send it to "repair" or update (buy) new RED.!!
I prefer to "repair" mine for the moment, changing the sophisticated hidden battery ...
 
Last edited:
I recognize that if I had an official RED service in Spain, sure i would surely have paid 500$ without thinking and believing that the internal battery is something special and complex to replace ...

But if I later learned that with 2$ and a little patience you can repair, I would have felt very very very deceived and a little stupid, for sure...
 
Last edited:
Back
Top