Welcome to our community

Be a part of something great, join today!

  • Hey all, just changed over the backend after 15 years I figured time to give it a bit of an update, its probably gonna be a bit weird for most of you and i am sure there is a few bugs to work out but it should kinda work the same as before... hopefully :)

Ask David Mullen ANYTHING

David,

A follow up question to the previously linked image- how do you manage coverage for a scene lit like that- when you go in for singles are you adding fill / lighting each of them? And if so, does it cause much of a problem for continuity / editing since they are not lit in the wide? Or does that get "hidden" in the compositional choices of the singles?

Depends on how different the angle is for the coverage -- we shot angles for that scene with the windows to one side of the frame, and thus the actors were softly side-lit by the windows, but that's a different look than the backlit angle looking towards the window.

You basically cheat on close-ups IF necessary, but subtly. If the face is silhouette in the wide shot, you may add a tiny bit of soft fill. Or you may add a soft edge that wraps around a little more into the shadow side, etc. It shouldn't change the overall feeling or mood compared to the wide master, or the direction of the light established... but you have some leeway to make minor changes if the shot size changes enough, or the angle changes.

You'd be surprised at how much you can cheat the lighting shot to shot though, especially if the editing pattern is shot-reverse shot so you are never cutting directly in tighter on the same axis, but cutting to a reverse first.

I've posted this before, but look at this night exterior sequence from "Tucker":

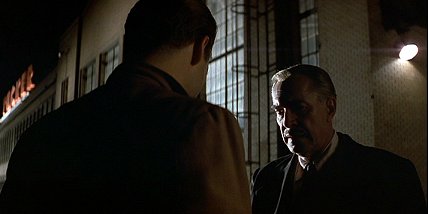
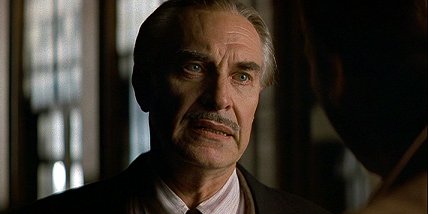
#1 First you have a wider shot, with Landau kept in a shadowier, harder key light:
tucker1.jpg


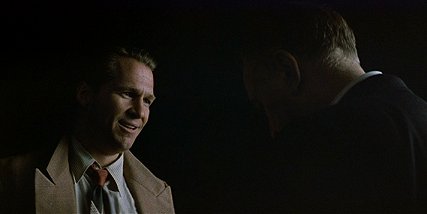
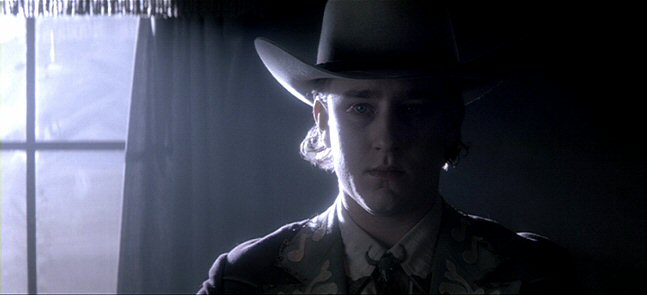
#2 Reverse angle on Bridges is softly side-lit:
tucker2.jpg


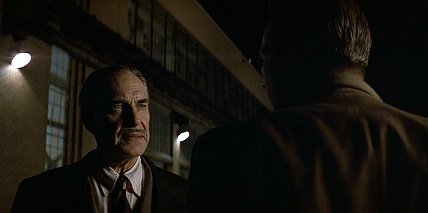
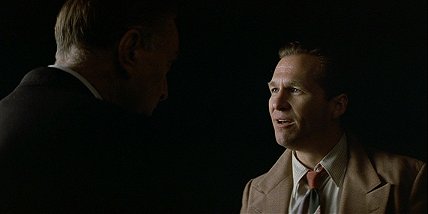
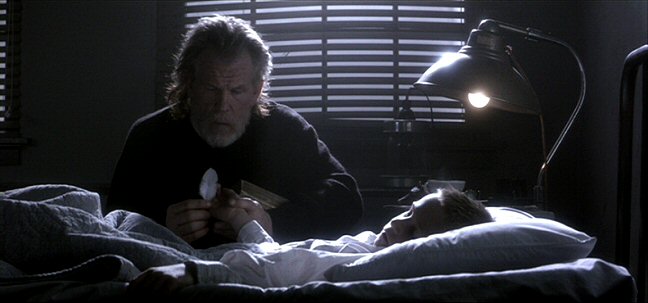
#3 Cut back to Landau -- he walks forward into a new key light, lighting his face more sympathetically. To signify this emotional "change", the camera also tracks behind Bridge's back to create a new screen direction onto Landau. This:
tucker1.jpg

Becomes this after the lateral dolly move:
tucker3.jpg
 
#4 Cut back to Bridges, but with a new screen direction to match the new angle on Landau. Note that the key light has been flipped to the other side of Bridges compared to #2:
tucker4.jpg


#5 Cut back to Landau in tighter close-up. The same key light has been softened further, making his close-up even more sympathetic:
tucker5.jpg
 
Hi David,

I’m shooting a short comedy set in a petty drug dealer’s apartment. I wanted to haze the room a little and have shafts of day light streaming in through the non-blacked out windows. I’ve been searching this forum and found that most to the shafts of light appear behind the actors in the background of the frame. Is this because the haze can be to distracting?
 
A shaft of light is most visible in smoke when it is coming at a backlit angle. You can think of this shaft as a hazy white beam. If the shaft is behind the actor, then the contrast on the actor stays close to normal. If the shaft is actually backlighting the actor, then some of the white beam will be behind their face and some in front of the face, hazing up the detail. If the shaft is in front of the actor, then there's a white beam in front of the actor's face, obscuring it.

So generally if you want to see the actor's face more clearly, you want more of the beam to fall behind their heads, unless it is only crossing below their faces.

The other thing is that it is hard to create a beam of light where you don't see the smoke drifting in curls and clumps -- it's hard to get the haze very even in a perfectly sealed-off draft-free room. So at least if the shaft is behind the actor and therefore also not in sharp focus, you may not notice some of the smoke drifting and curling, whereas if the beam was hitting the actor, then the beam itself would be in sharp focus and so might any moving smoke.

Here's some examples of using smoke from my own work in "Northfork". You can see that the beam does cross in front of the faces, but it's a mild haze and most of the backlight still falls behind the actor. It's tricky because if I had panned the beam a tiny bit more in front of the actor, their face would be more washed-out:

northfork33.jpg


northfork35.jpg
 
Thanks david. I'm lucky enough that i will be able to test before the shoot so will try a few different set-ups, keeping the smoke soft seems the safer option.
 
Thanks David- that was very helpful and informative! :)
 
David,

a couple of questions:

1) The look of "Northfork" is amazing. I understand the flashing and post process used for the imaging, but what i am curious about is the use of filters during production. What filters did you use and what was the the motivation behind them. (I apologize if this has been asked before and feel free to post a link if it has)

2) I have been asked to budget an upcoming independent feature. After much discussion of formats, it has been suggested shooting 2 perf 35 for the framing and price considerations. Other than equipment, is there someplace i can reference the workflow and output choices for this format, and in essence, educate myself further?

Thank you in advance for your assistance.

Matt
 
I shot "Northfork" in 35mm anamorphic and used Tiffen ProMist diffusion filters, fairly heavy ones at times -- the "band of angels/gypsies" scenes in the abandoned house were the heaviest in terms of diffusion, a #1 ProMist. The rest of the movie, it was mostly a #1/2 and 1/4 ProMist. On the widest landscape shots, I used a #1/8 ProMist to retain more sharpness and detail.

What was nice about using the Panaflasher for the negative combined with the silver retention printing process was that I could use less flashing when I had the heavier ProMist filter on, so the jumps in strengths were not as obvious because I counteracted the jumps in contrast and changes in black levels. Of course, if I had color-corrected the movie digitally, I could have matched the black levels even more easily. Leaving silver in the print had the side effect of sharpening the image, so the heaviness of the ProMist was reduced somewhat.

The scenes in the orphanage were shot on a lower-contrast stock, Fuji F-400T, and I used the #1/4 ProMist for most of that stuff -- whereas the dreamlike scenes with the angels/gypsies were shot on the higher-contrast Fuji F-125T, but with heavier diffusion (#1/2 and #1). I've never used that much diffusion since then -- generally a #1/4 ProMist would be the heaviest I would ever use. But in this case, I was working with a silver retention printing process which naturally adds more contrast, blacks, and sharpness, plus I was using a bigger negative format with 4-perf 35mm anamorphic... so I could get away with more diffusion.

--

Whoever is renting the 2-perf camera to you can probably hook you up with some labs or post houses who have handled 2-perf. It's a little like with 3-perf -- you would probably do a D.I. for the final conversion to 35mm 2.40 anamorphic, either 2K or 4K, or a cheaper HDCAM-SR 1080P D.I. workflow. I know that Laser Pacific has been doing some 2-perf D.I. work.

Checking the camera gate for hairs is critical with 2-perf.
 
Last edited:
Hi David,
I am shooting a medium budget commercial in a couple of weeks. You mast have shot so many times Inside the Running BUS but this is my first time. I will be rigging some kino outside the bus and must probably using kino or joker inside the bus. It is not a very wide frame mostly 2 people talking and will have 3-4 extras. I wanted to shoot on RED but client wants on 35. Do you have any suggestion or tips for me. Any help will be greatly appreciate. Hoping to hear from you soon.
Omkar
 
Thank you David,

Your choice of stocks, filtration and processing were spot on. I'm curious, did you stack filters, incorporating any pola or grads, and are anamorphic lenses affected differently by filtration than spherical lenses?

My knowledge of shooting anamorphic is very limited hence the questions. Regarding hair in the gate, after losing some great scenes shot on S16 due to hairs, I only use bald camera crews now :)

Matt
 
Hi David,
I am shooting a medium budget commercial in a couple of weeks. You mast have shot so many times Inside the Running BUS but this is my first time. I will be rigging some kino outside the bus and must probably using kino or joker inside the bus. It is not a very wide frame mostly 2 people talking and will have 3-4 extras. I wanted to shoot on RED but client wants on 35. Do you have any suggestion or tips for me. Any help will be greatly appreciate. Hoping to hear from you soon.
Omkar

I hate to say it here on RedUser, but 35mm color negative would handle the contrast range better for a daytime bus interior than any digital camera could.

Most of my moving bus stuff has been pretty low-tech actually, just available light and a sun gun or something for eye fill. I just put the actor as close to the window as possible. Kinos would work well on a bus too. More elaborate lighting starts to involve rigging off of the roof of the bus and towing a generator or something.
 
I'm curious, did you stack filters, incorporating any pola or grads, and are anamorphic lenses affected differently by filtration than spherical lenses?

Yes, I used ND grads and Polas outside, ND gel behind the lens (possible with a Panaflex.) Works the same as on a spherical lens.

One issue to watch out for is that blue horizontal flare -- you don't want to accidentally get it crossing/covering the eyes of the actor.
 
David,

Do you think you could shoot the same scene in Northfork without diffusion filters and get the exact same look using today's post production abilities and effects?


I shot "Northfork" in 35mm anamorphic and used Tiffen ProMist diffusion filters, fairly heavy ones at times -- the "band of angels/gypsies" scenes in the abandoned house were the heaviest in terms of diffusion, a #1 ProMist. The rest of the movie, it was mostly a #1/2 and 1/4 ProMist. On the widest landscape shots, I used a #1/8 ProMist to retain more sharpness and detail.

What was nice about using the Panaflasher for the negative combined with the silver retention printing process was that I could use less flashing when I had the heavier ProMist filter on, so the jumps in strengths were not as obvious because I counteracted the jumps in contrast and changes in black levels. Of course, if I had color-corrected the movie digitally, I could have matched the black levels even more easily. Leaving silver in the print had the side effect of sharpening the image, so the heaviness of the ProMist was reduced somewhat.

The scenes in the orphanage were shot on a lower-contrast stock, Fuji F-400T, and I used the #1/4 ProMist for most of that stuff -- whereas the dreamlike scenes with the angels/gypsies were shot on the higher-contrast Fuji F-125T, but with heavier diffusion (#1/2 and #1). I've never used that much diffusion since then -- generally a #1/4 ProMist would be the heaviest I would ever use. But in this case, I was working with a silver retention printing process which naturally adds more contrast, blacks, and sharpness, plus I was using a bigger negative format with 4-perf 35mm anamorphic... so I could get away with more diffusion.

--

Whoever is renting the 2-perf camera to you can probably hook you up with some labs or post houses who have handled 2-perf. It's a little like with 3-perf -- you would probably do a D.I. for the final conversion to 35mm 2.40 anamorphic, either 2K or 4K, or a cheaper HDCAM-SR 1080P D.I. workflow. I know that Laser Pacific has been doing some 2-perf D.I. work.

Checking the camera gate for hairs is critical with 2-perf.
 
David,

Do you think you could shoot the same scene in Northfork without diffusion filters and get the exact same look using today's post production abilities and effects?

Similar but not the same. Digital diffusion done to film frames, because it involves layering sharp and soft passes over each other, have the side-effect of making the image less grainy -- whereas optical diffusion, because of the patterns in the glass and the lowering of the contrast, can make the image look slightly grainier. There is a texture. Digital diffusion tends to look much cleaner.
 
I hate to say it here on RedUser, but 35mm color negative would handle the contrast range better for a daytime bus interior than any digital camera could.

Most of my moving bus stuff has been pretty low-tech actually, just available light and a sun gun or something for eye fill. I just put the actor as close to the window as possible. Kinos would work well on a bus too. More elaborate lighting starts to involve rigging off of the roof of the bus and towing a generator or something.

Thanks David,
Really appreciated.
 
Similar but not the same. Digital diffusion done to film frames, because it involves layering sharp and soft passes over each other, have the side-effect of making the image less grainy -- whereas optical diffusion, because of the patterns in the glass and the lowering of the contrast, can make the image look slightly grainier. There is a texture. Digital diffusion tends to look much cleaner.

Thanks David.
 
Hey David,

Can you talk a little bit about an inexpensive chinese lantern(s) gear solution?

I'm trying to build up some lighting equipment for mostly personal projects entailing short narrative and also visual effects work. As is typical, I don't have a big bank account for this, so HMI's and Kino's that I'd like are out of range. We're talking bare-bones here... like right now all I have for myself is those little clamp lights from the hardware store - obviously i'd like something more haha... I use matteboard for reflecting and I like me some tracing paper and sometimes a sweet piece of shower curtain for softening. I've tried to milk shooting with available light as much as possible, but this just isn't always a viable option. When I need to I've been able to borrow gear, but yet again that's not always an option, so I'd like to get a little bit of basic gear.

I've taken a look at some of those source4 PAR's and I kinda like the pricepoint there... Do you think a couple of them could be a good start? Any good accessories for that? Other suggestions?

Also, how might you think those consumer "daylight" bulbs work as opposed to the regular in such lights? For example in a daylit scene (interior or exterior) that needs a little accentuation or for general fill. Especially thinking towards the RED sensor as I'm aiming for a Scarlet here when they're released.

Finally, what do you think about doing a lecture at SCAD? I'd love to see you there sometime.

Thank you! Very much.

paul herrin
 
I've thought about using Chinese Lanterns myself with daylight compact flos -- Lowell makes some for their Rifa light that should be fairly free of the green spike.

You would probably want to make the lantern so that it had two or three sockets in it for the compact flos because you need a brighter light for daytime work.

Yes, as a starter light, it helps to have one really bright punchy light in your kit -- I had a 650w open-face quartz movie lamp I found in a garage sale when I was a beginner (cost me $5, when the bulb finally burned out, it cost me $25 to replace it...), but a 1K PAR would also work well.

If someone wants to give me a plane ticket, I'd be glad to go to any film school and lecture!
 
Thanks David! I really would love to have you down, I'll see if I can talk to those who write the checks :) and line that kinda thing up.

Now, excuse my inexperience. How does one go about making a chinese lantern? Are we just basically talking about spending a little extra time at the kids craft table? And dropping a couple of those bad boys down in there?

Or just buying one somewhere, my roommate used to have this huge one that was pretty cool he picked up at IKEA. Or do they make some for "professional" use? What size(s) might you reccommend for the compact bulbs?

Thanks once again David, you're very patient and forthcoming - and I appreciate it greatly.
 
You just use the regular round white Chinese Lanterns you get at IKEA or Cost Plus, etc. The larger ones are better in terms of softness, the smaller ones in terms of limited space.

The important thing though is to go to the hardware store and get some porcelain sockets instead of the plastic sockets, which can melt when you use higher-wattage bulbs like a 250w or 500w photoflood.

Make sure the bulb is hanging straight down without touching the sides of the lantern before you turn them on.

A c-stand is useful for mounting the Chinese Lantern off of the arm if you aren't just taping the cord to the ceiling.

Most professional shoots use the regular lanterns you get at IKEA, etc. though some use the "Lantern Lock" product where the bulb is at the end of a rigid rod inside the lantern and you can grab the other end with a c-stand gobo head, so you can hold the lantern at any angle because the bulb inside is not swinging around. I've heard that you can make your own version of a lantern lock with some hardware store supplies. Though the regular Chinese Lantern with the bulb at the end of a cord tend to be lighter and easier to hang from a ceiling, and you can easily adjust how far down the lantern hangs. The lantern lock style really is meant for rigid c-stand mounting.

http://www.lanternlock.com/

More advanced than that are the expensive professional Chimera-style Chinese Lanterns made out of nylon or muslin, etc.
http://www.chimeralighting.com/lanterns.asp
http://www.jemlighting.com/products.html
 
Last edited:
Back
Top