Welcome to our community

Be a part of something great, join today!

  • Hey all, just changed over the backend after 15 years I figured time to give it a bit of an update, its probably gonna be a bit weird for most of you and i am sure there is a few bugs to work out but it should kinda work the same as before... hopefully :)

Strange-clip-Monstro

Jake,

Yeah, +4 stops of overexposure , I think, should be the max that you should "professionally" try to recover a red file from presently. Thanks for responding back Jake!
 
Adrian,


I must spend about 3 to 4 hours a day trying to uncover little "Easter eggs" in Red r3d files. And from downloading both Arri Raw and ProRes files from the Arri Sample page and from downloading Red red files from here, I'm trying to use WB, Temp., Tint, ISO, Lum Mix, Hue and luminance Curve to try get as good and image from Red r3d files as from Arri Alexa footage However, every camera manufacturer 's camera product has their pluses and minuses based on the individual companies image rendering philosophies .
 
Rand, I love that you Dig Deep!


Only thing I would add is that "camera Company's image rendering philosophy" = the technical aspect of camera design that directly creates images. Speaking of it as philosophy seems to imply that everyone is on the same level playing field and that the only difference is their approach to the subject matter. Although in a general way this is true the practical results of having a camera in your hands tells a very different story. We can say that a scene contains a defined range of luminance and color information. We cannot say that every Arri, Red, Sony, etc camera can capture that complete defined range of information and then take a philosophical approach to how that information is then generated into an image.
 
Rand, I love that you Dig Deep!

Thanks man for that!


Only thing I would add is that "camera Company's image rendering philosophy" = the technical aspect of camera design that directly creates images. Speaking of it as philosophy seems to imply that everyone is on the same level playing field and that the only difference is their approach to the subject matter. Although in a general way this is true the practical results of having a camera in your hands tells a very different story. We can say that a scene contains a defined range of luminance and color information. We cannot say that every Arri, Red, Sony, etc camera can capture that complete defined range of information and then take a philosophical approach to how that information is then generated into an image.


I get what you are saying Adrian, some cameras are simply better in some aspect of image capture/ post than others. It would be like saying Red, Arri, Canon, Sony etc all have the same +6 stops of Highlight recovery, the same low light capabilities , the same distributed dynamic range and the same skintone rendering they just each chose different Log to Rec709/ Rec2020 tranform luts to get a different "look".

I guess I could have done a better job of describing what I meant. Ha Ha Ha
 
Last edited:
I'm really curious about what Graeme Nattress has to add here...

G.
 
Okay, sorry that I’m still unclear, but (other than Jake B) are you guys saying if I shoot something at 5000K, reduce that temp to 1800K in RCXp/metadata, then use an adjustment in Resolve/Baselight/et al, to warm it back up to a ~5000K “look”, it will actually have a noticeably better highlight recovery (up to 1.5stops more)?

And is this with all RED sensors or like Helium onward?
 
Mike,


First, you obviously have to decrease Exposure to whatever level you need it to be.

Next, 1800K is way too low and will actually bring back the blown highlights. For Monstro its a 3000 to 3100K Temp with or without a mild tint adjust of a plus 4.00 to 12.000 with a correction of the WB at this point, makes only a minor difference if you use tint. And for Helium and Gemini a 3000 to 3100k Temp with a necessary Tint of from plus 15.000 to 26.000 with a correction of the WB at this point.


Also, after testing out some old footage, I believe it only has to have a higher Temp than about 3200K to work , but double check me on this. All the overexposed r3ds I have are from 5000k to 5600k.


This method only recovers blown skin tones and some other areas up to a point and is not meant to be a solution for a grossly overexposed image. I believe Red R3d files should only be recovered up to a max +4 stops of overexposure. Although the +5 stops overexposed image Aaron made available could be recovered somewhat, the colors were negatively affected in the process.
 
Last edited:
Sorry about the late reply, just got in from an early call.

What you are seeing is the Highlight Extension Algorithm attempting to bring detail back in on over exposed material. Remember, in camera, this footage is indicated as clipped, and there's an extreme white balance adjustment occurring. In this scenario, if you're highlight is that far gone and you need to bring some life back into it, I'd aim for a post color correction/grade solution as Jake mentioned. What I like to do on footage really depends on a shot by shot basis from all cameras when clipping occurs in not-so-ideal areas. Usually some combination of a slight desaturation, colorization, or even retuning the highlight roll-off to a degree. For those used to film, the general bias of the base stock is often what you see when clipped. If not brought to white, you end up with the rather common yellow/peach highlight or something closer to a light cyan depending on what's going on. A lot of earlier films of the 80s and 90s also went a bit more to the pink magenta side of things, but the yellow/cyan world won out big time when timing a project.

Ideally when filming, you don't overexpose so grossly on your subject matter of course.

Here are examples of properly exposed versus over exposed footage with merely the metadata white balance moving around.


Hope that explains what's going on.


*edit before dinner - Most other cameras do a hard ramp to desat to white no matter the color the area of overexposure. Some go to a purple/magenta space, light pink or whatever. For those of us familiar with the old DRX tuning ability we would adjust the clipped information's hue to ideally land on something that worked best with the material.
 
Last edited:
David,

No, not at all. Just that at a certain color temp for monstro and a certain Color Temp and Tint for Helium and Gemini, that if you have footage that is overexposed and conventional methods for correcting it don't work there may be an alternative. Only you can decide if all the effort and the results are usable to you for professional use.

Plus 4 stops of overexposure has been demonstrated to be the limit for recoverability of highlights for Red R3d files without really affecting color. Recovering +5 stops over will negatively affect color to some extent. But you can determine if the affect on color is or isn't worth it to possibly recover more highlight info.
 
Here is a start to finish in Davinci Resolve


I used an IPP2 project with (1)"IPP2" "Color Science" (2) "RWGRGB" "Color Space" (3) "Log3G10" " Gamma Curve"

I used a REC709/Bt1886(Gamma 2.4) Medium/Soft (64 cube size I made in REDCINE-X) IPP2 Output Transform Lut


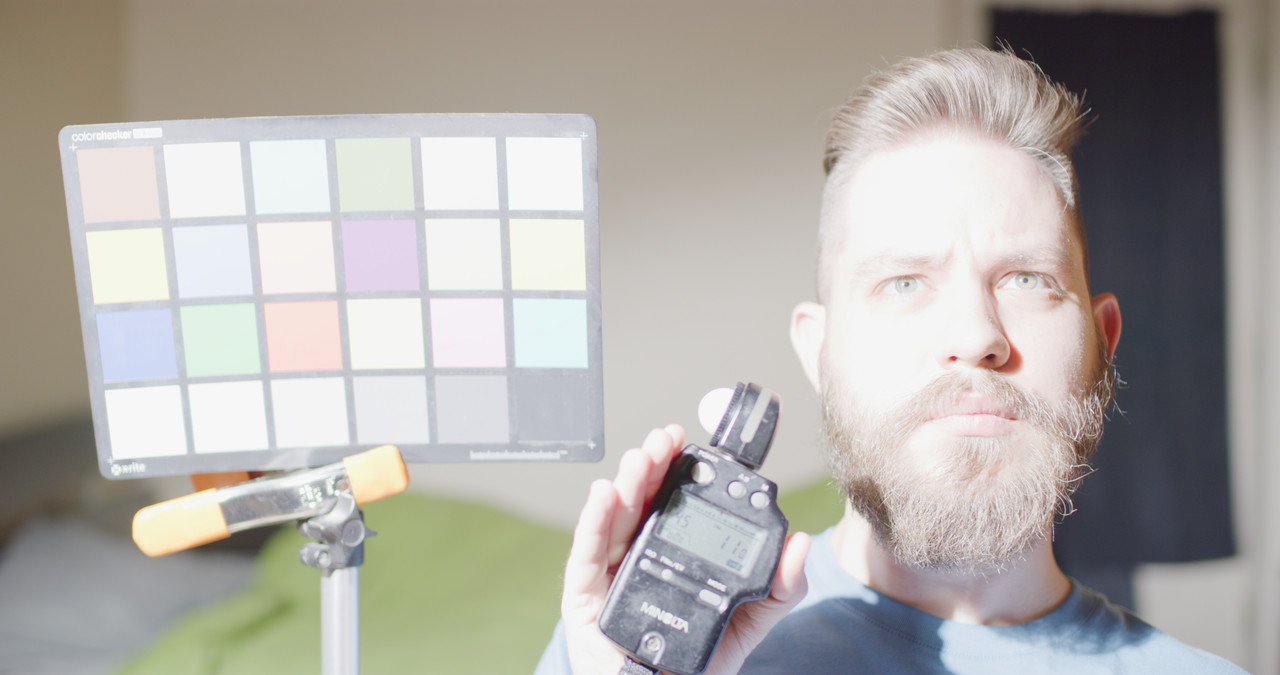
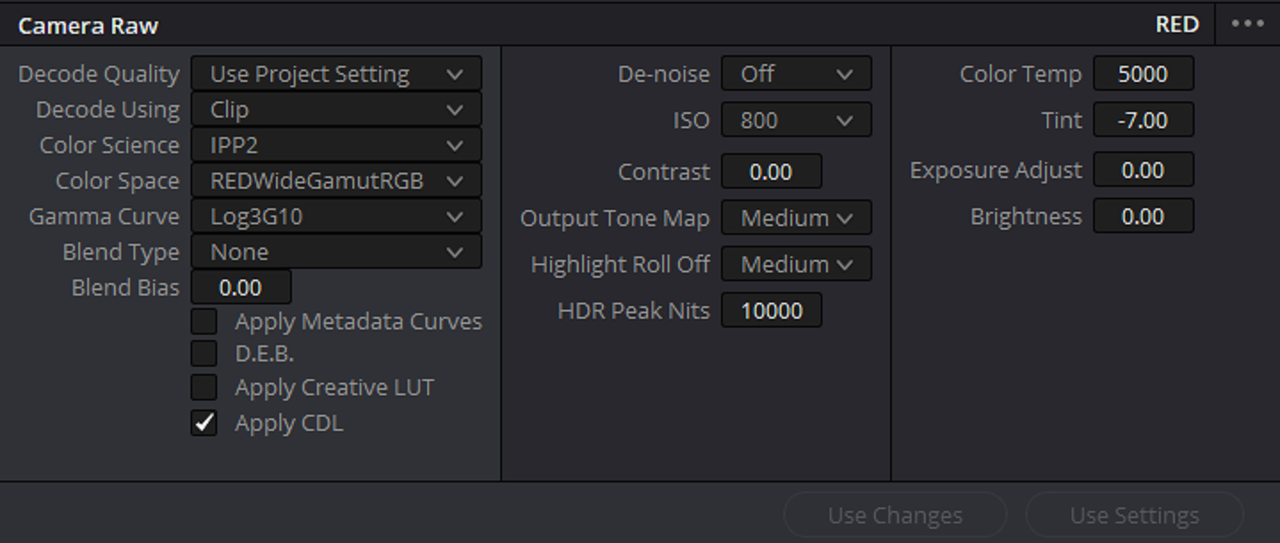
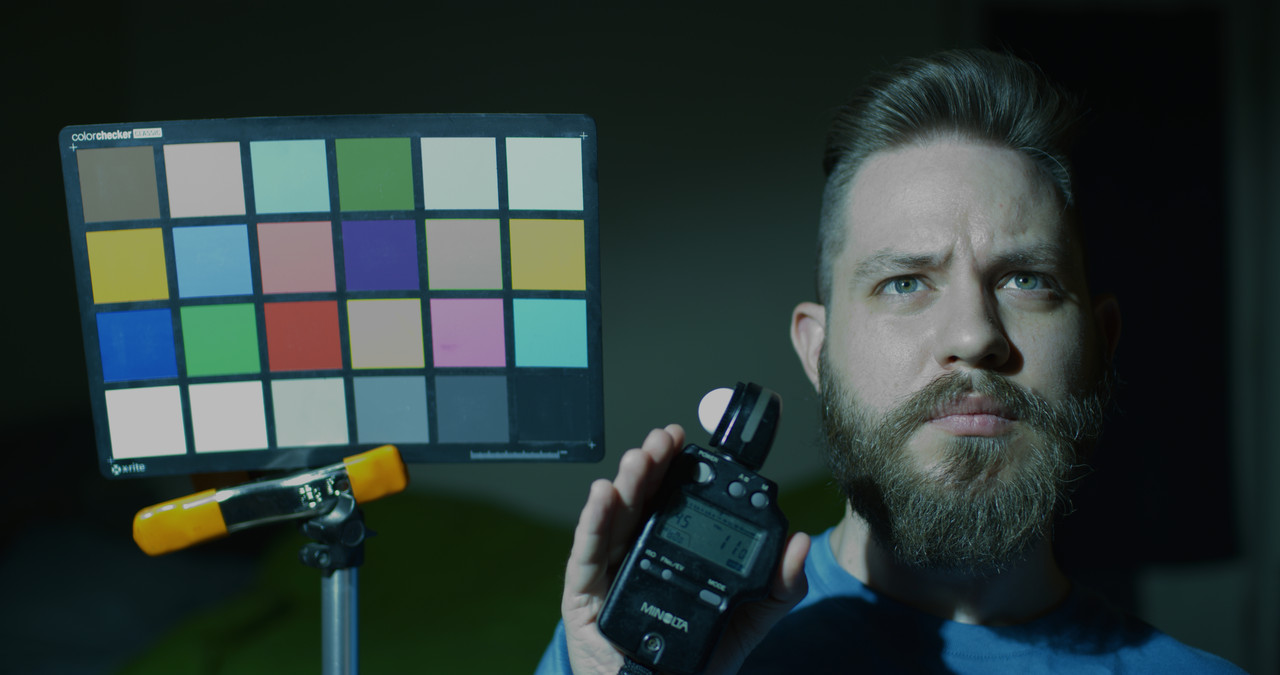
(1) I Imported Aaron +5 stops overexposed R3d file into project with an original metadata of 800ISO, 5000k and -7.00 Tint


Aaron-1-1-1-4.jpg


Screenshot-128-2.png


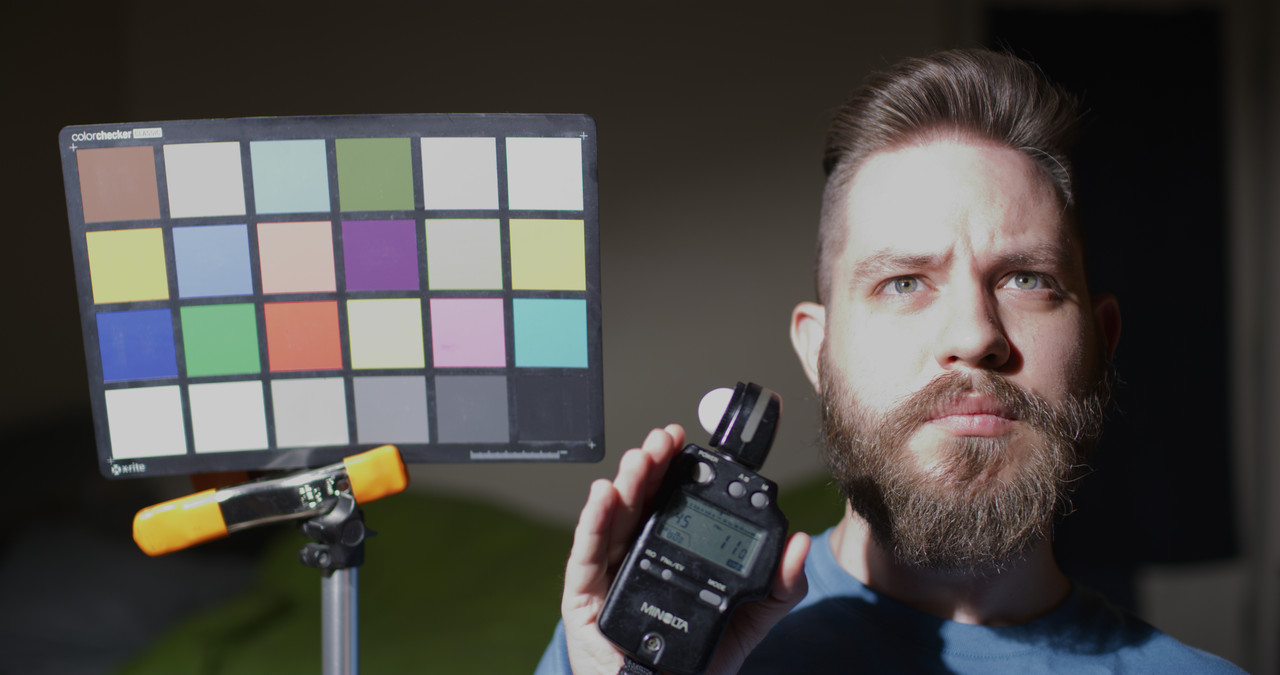
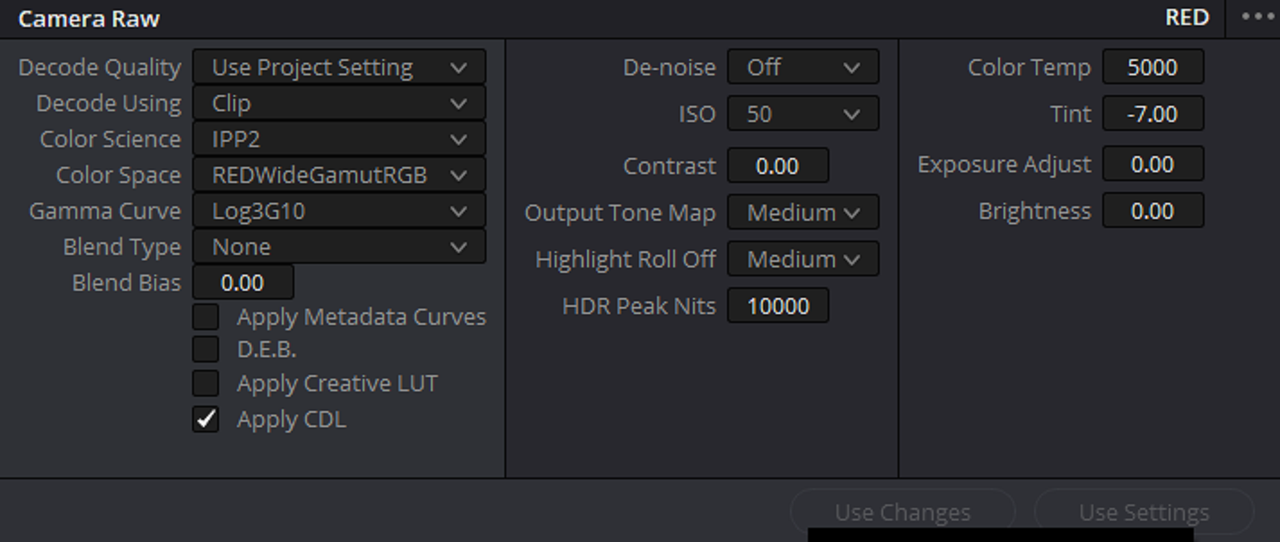
(2) Next, I dropped the ISO down to 50. You can probably devise a better method of reducing Exposure than I did with ISO.


Aaron-2-1-1-5.jpg


Screenshot-129-2.png


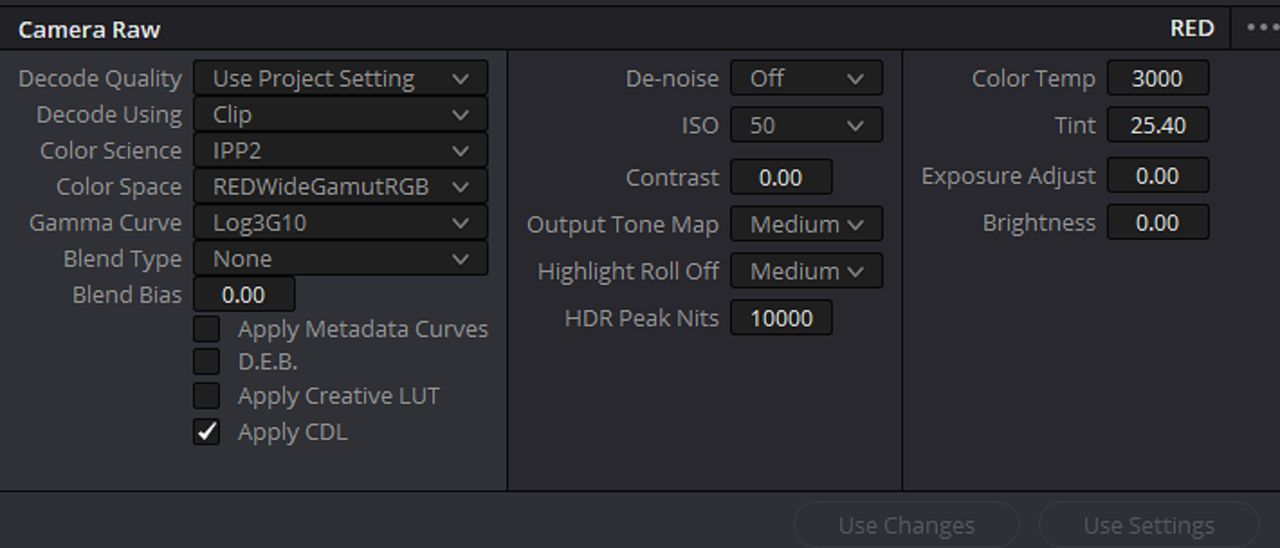
(3) Then I changed the Temp to 3000K and the Tint to 25.4 along with the 50ISO

Aaron-3-1-1-3.jpg


Screenshot-130-2.png


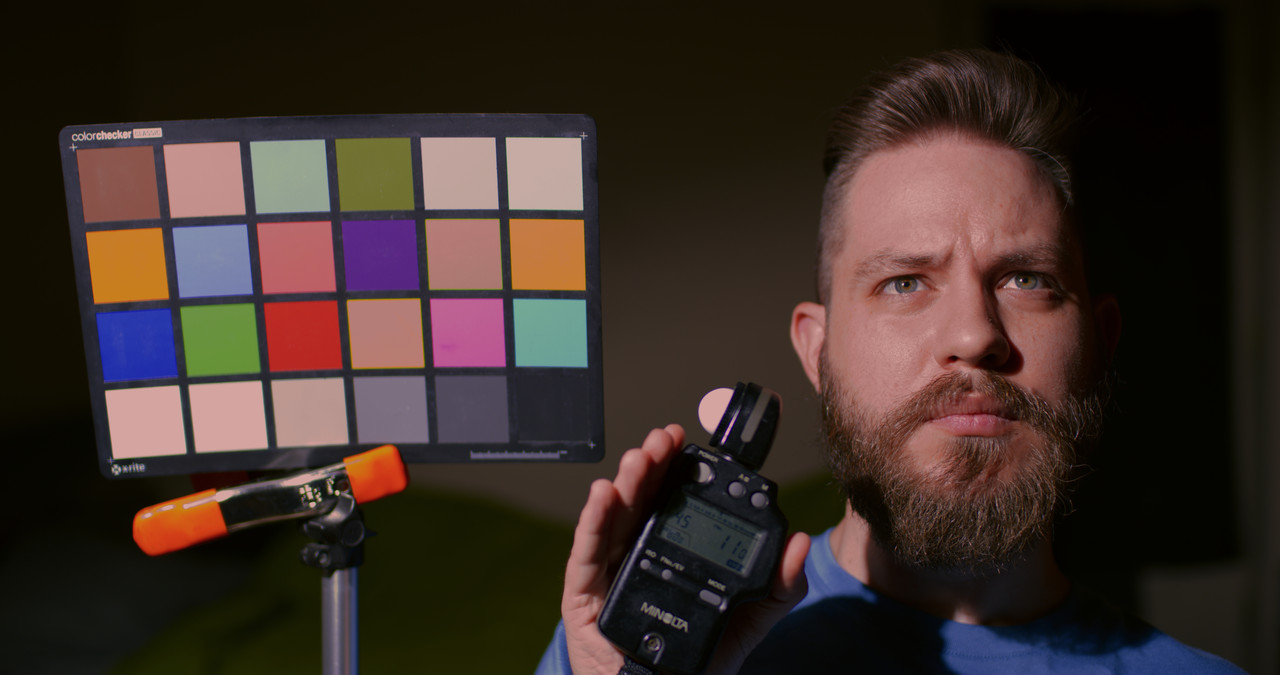
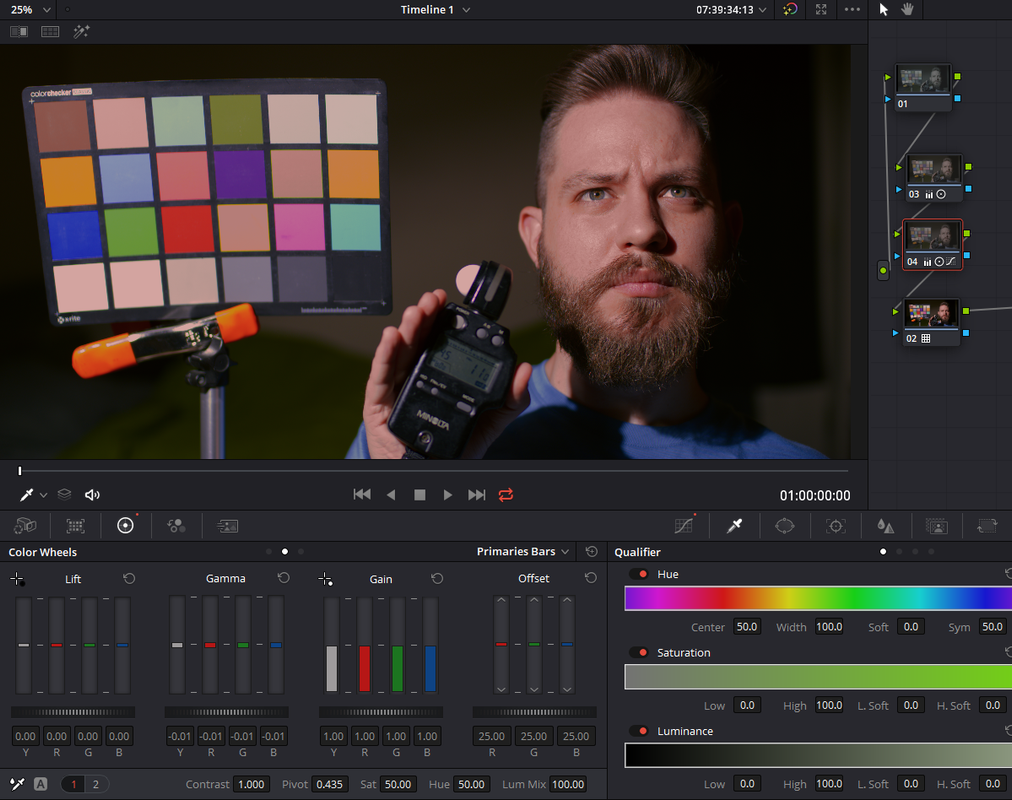
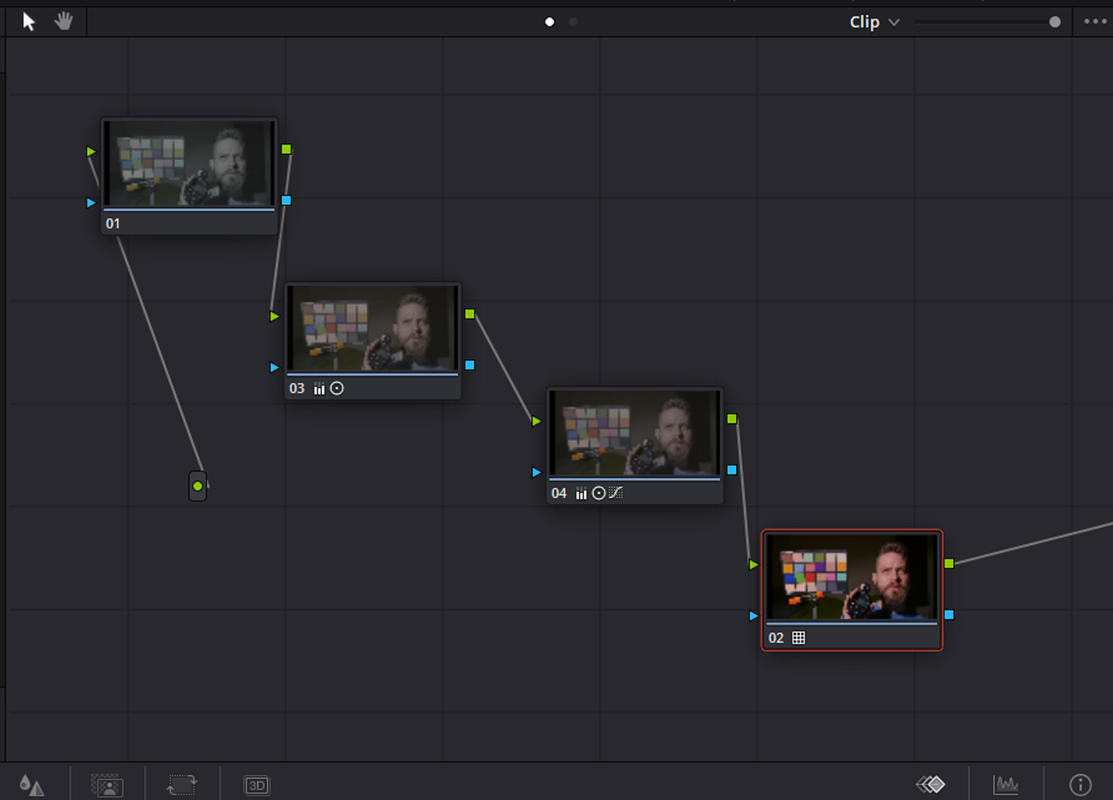
(4)Finally, I corrected from the 3000K and 25.4 Tint Image from the previous step with Primary Wheels, Primary Bars and Log Wheel and decreased the exposure in Log Wheel Mids and used a Hue Vs Hue to remove a slight green cast in Aarons Lower eyelids. Excuse the sloppiness of the Node tree.

Aaron-best-corr-new-1-1-2.jpg


Screenshot-136.png


Screenshot-137-2.png


Others may have an easier conventional more professional method to do this than I did.
 
Last edited:
Okay, sorry that I’m still unclear, but (other than Jake B) are you guys saying if I shoot something at 5000K, reduce that temp to 1800K in RCXp/metadata, then use an adjustment in Resolve/Baselight/et al, to warm it back up to a ~5000K “look”, it will actually have a noticeably better highlight recovery (up to 1.5stops more)?

And is this with all RED sensors or like Helium onward?


Yeah, I don't get it either.

Are y'all saying the dynamic range is better in tungsten light vs daylight? And also, does any other camera have this weird issue? This is the first I have ever heard about this.


DR stays the same no matter the WB. However, your WB setting during shooting will affect your base exposure. Meaning that you will see an exposure change onset via monitors and exposure tools like waveforms when you set your lens stop and then change WB to extremes.

Think of the camera's ability to capture data (like dynamic range and color fidelity/gamut) as a big bucket. When you expose a scene the goal is to fill that bucket as much as possible without spilling any useful data. This big bucket on CMOS sensors is black and white. In order to divide everything in the bucket into RBG components to derive color you can think of it as pouring out the contents into 3 smaller buckets: Red, Green, and Blue. When you fully expose a properly white-balanced image (like an actor wearing a white suit dancing in a white room) your big bucket should be full and when you pour it into your smaller RGB buckets they are all filled equally. Your scene looks white, ie neutral.

Now lets say you decide to shift the color of this same scene to create a cool cast to the image. Instead of gelling all of your lights with steel blue gel you simply shift your camera's white balance adjustment to 2000K. Your image looks cool and exposure has shifted. Why? The fill-ratio between the small RGB buckets are ganged or locked. When you shift WB to extreme cool you fill your Blue bucket almost to the top with very little left for the Red and Green buckets. The data captured in the big bucket is the same but because of your WB setting during shooting the camera gave priority to the small Blue bucket over the Red and Green. In this example you might actually be clipping some data in the red channel like skin-tone but could be unaware since the blue channel is receiving all of the gain from your exposure. Now trying to correct this in Post from cool to warm is like pouring all of the Blue bucket into a much smaller Red bucket and spilling out highlights.

The above example is far from technically-accurate but might provide a useful way in which to get one's head around the process. For best results it is always helpful to have your camera settings and lights set appropriately for your final intended look. Remember the cleanest image with the most color fidelity will be the image that is exposed closest to neutral. And as your camera can only capture reflected light it is likewise helpful to make sure your light sources are full-spectrum.
 
Adrian,

Thanks a lot! But I still don't think I would use the image above in any kind of "professional" capacity but you kinda get a better understanding of how the " Highlight Extensions Algorithm " works in IPP2. And Adrian, I will never be smart enough to truly understand what you explained in your post above and that's just the honest truth.

Maybe others will post their Highlight recovery techniques so that maybe we can get a more useable +5 stops of Highlight recovery out of Red R3d files.


The sample R3d I used in the test above is from reduser member Aaron Lochert. He can probably tell you the Temp of the Key light he used in this sample image.
 
The interesting thing is that even if you avoid adjusting the metadata, you might not avoid the issue because it's counter-intuitive. The example I've been using of my mug was shot with a 5600K balanced fixture. The metadata color temperature that yields the best highlight recovery in this scenario is somewhere around 3200K. But of course I shot it at 5600K and would of course deliver it to a colorist with that metadata. But a colorist would have better luck actually changing the color temp counter-intuitively to 3200k and then timing that color back to 5600K in their grading software.

I'd like to get this R3D file to see if that is the case. In the past I never had to do this two step dance in order to retain the highlights.
 
For everyone here, here's the entire over-exposure ramp worth of .r3ds on Helium.

Light used was an Aputure 120d Mark II blasted straight at my face from maybe 2-3 feet away. I used the on board dimmer of the light and a meter. I haven't tested my meter against a known reference, so there might be an offset there, so don't treat this as a definitive test of Helium's dynamic range. It's been a while so I forget which aperture I was set do, but for the demonstration of the highlight extension algo, should be enough.

There's an important distinction we have to make that Phil touched on. We're not talking about recovering highlights that were captured in the camera but for whatever reason clipped or lost in the workflow. We're talking about recovering highlights that were not captured by the camera and RED's highlight extension algorithm is trying to rebuild those peaks. In some cases we get more rebuilt peaks than others. So this isn't a slight to RED or RED cameras. Obviously we should consider these "gravy" stops, not "main course" stops, as Graeme would say.

I'm surprised that people are so new to this. We've been discussing it for two years now..

Here's my two-step recovery of this grossly overly exposed image:

48029425318_73de9fc3c8_o.png


The interesting thing that I've noticed is that in my samples and the NoFilmSchool samples linked in the second comment in this thread, both must be white balanced cooler than looks normal and be graded back warm, because this is happening on a face, which has a color to it. When you WB cooler, you're getting the skin closer to grey/neutral (take an eyedropper to Rand's "green" example and you'll see my skin is grey. In Phil's examples, the highlight extension is working best at proper WB because the wall is white. When the surrounding area of clipping is neutral, the extension works best. But when the surrounding area of the clipping is not neutral, it seems like the algorithm is disregarding some extra information it could be rebuilding some peaks with.

So I'm curious if there's some way RED could take a fresh look at that algorithm and see if there's a way to rope these recreated/extended highlights in so they don't ever clip. Or at least tell me it's not possible. :)
 
So here's the thing from an imaging and color science perspective: once you fill the Big Bucket that's it. There is no algorithm or post process that can add or subtract data from the bucket. You only have the ability to "re-interpret" that data. When you shift data into RGB components to make a color image you are essentially adding and/or subtracting gain to your image. Gain is exposure. When you shift WB you are shifting exposure. In the example above it is not some trick that changing WB gives you more "highlight protection". You are simply shifting exposure down to create a cooler-looking image. You will notice if you look at the waveform that the Red channel at 5620K is clipping because it has been gained up too much. Basically too much data is being poured into the smaller red bucket and it is overflowing. When WB is adjusted to 3300K the Red channel is noticeably receiving the least amount of gain compared to Green and Blue (which are aligned). Also the top spike of the Red channel is now closer in alignment with G and B. That top spike is the face.

This is the basic theory of creating a color image from RGB channel gain. You can adjust color by adjusting RGB gain but once you add or subtract too much gain in a channel you will lose information. For CMOS cameras that do not record direct discreet RGB color channel data that color data needs to be created via a Bayer pattern and the surrounding pixel values. What this means is that color is not being captured directly, it is being "interpreted" based on the camera's sensor design, color science, and fundamental ability to discern and record differing luminance values between pixels. This happens at capture and is recorded to the raw file. Next that raw file needs to again be interpreted from that raw luminance data with a Bayer mask to a proper 3-Channel RGB color image. You will notice there is a lot of interpretation going on here.

When the camera system gives equal weight to recording and balancing image data into RGB components you end up with a very malleable image in Post in which to work with. However, if the camera system has a certain deficiency or perhaps prioritizes some image characteristics over others you may find some weird artifacting happening when interpreting RGB gain values. No camera system is perfect. They all have their strengths and weaknesses.

In my personal experience working with every iteration of Red's cameras I've consistently come across strange color balance issues. Some of these issues are issues that every other camera system deals with in varying degrees of success. But others seem unique to Red and have a certain tendency to not behave as expected. Perhaps this is why there seem to be so many "easter eggs" to find within the Red Ecosystem. In my experience I've always gotten the most pleasing images out of Red cameras when my exposure placed the RGB channels in a more-balanced range relative to each other. A waveform monitor showing you the camera's RGB gain can be a very useful tool onset.
 
DR stays the same no matter the WB. However, your WB setting during shooting will affect your base exposure. Meaning that you will see an exposure change onset via monitors and exposure tools like waveforms when you set your lens stop and then change WB to extremes.

Think of the camera's ability to capture data (like dynamic range and color fidelity/gamut) as a big bucket. When you expose a scene the goal is to fill that bucket as much as possible without spilling any useful data. This big bucket on CMOS sensors is black and white. In order to divide everything in the bucket into RBG components to derive color you can think of it as pouring out the contents into 3 smaller buckets: Red, Green, and Blue. When you fully expose a properly white-balanced image (like an actor wearing a white suit dancing in a white room) your big bucket should be full and when you pour it into your smaller RGB buckets they are all filled equally. Your scene looks white, ie neutral.

Now lets say you decide to shift the color of this same scene to create a cool cast to the image. Instead of gelling all of your lights with steel blue gel you simply shift your camera's white balance adjustment to 2000K. Your image looks cool and exposure has shifted. Why? The fill-ratio between the small RGB buckets are ganged or locked. When you shift WB to extreme cool you fill your Blue bucket almost to the top with very little left for the Red and Green buckets. The data captured in the big bucket is the same but because of your WB setting during shooting the camera gave priority to the small Blue bucket over the Red and Green. In this example you might actually be clipping some data in the red channel like skin-tone but could be unaware since the blue channel is receiving all of the gain from your exposure. Now trying to correct this in Post from cool to warm is like pouring all of the Blue bucket into a much smaller Red bucket and spilling out highlights.

The above example is far from technically-accurate but might provide a useful way in which to get one's head around the process. For best results it is always helpful to have your camera settings and lights set appropriately for your final intended look. Remember the cleanest image with the most color fidelity will be the image that is exposed closest to neutral. And as your camera can only capture reflected light it is likewise helpful to make sure your light sources are full-spectrum.

If that's the case, what's the point in RAW? I thought changing the metadata was its whole advantage?
 
If that's the case, what's the point in RAW? I thought changing the metadata was its whole advantage?


Think of the bucket. For every frame you capture you discreetly fill the Big Bucket up to a certain point. Raw allows you to shift the contents of the Big Bucket into the smaller RGB buckets in a "non-destructive" way. Meaning your are shifting RGB bucket levels to create a different image than the one you viewed onset. If you had recorded a color-baked file, like say ProRes, your RGB buckets would already be filled up to a certain level and recorded that way. There is no way to pour the contents of the RGB buckets back into the Big Bucket and then redistribute them. You cannot re-interpret their levels to recreate a different image. You can however add or subtract gain in Post software like Resolve to change them after the fact. With lesser camera systems you may notice a large discrepancy between what sort of fidelity you have in Post manipulation when adjusting RGB levels in raw vs video files (say for an example a Sony A7). More robust systems, like the Alexa, may show only very slight almost unnoticeable differences between video and raw.


EDIT: To add to my first explanation where I introduced the idea of the buckets I would say that the camera system is supposed to work equally from the Big Bucket if you have access to it (ie the raw file). If the raw file gives proper weight to equally distributing all of it's Big Bucket contents into the smaller RGB buckets, in theory, you should not be clipping channels when redistributing that data. However, if you are clipping in the Red Channel, like in Aaron's example, but don't know it because you have set your white balance to 2000K, which severely drained your Red bucket, the Red channel is not part of the face anymore (hence why it is no longer overexposed and has no warmth of color). Meaning that when shifting the camera WB cool during shooting you will find more headroom to open up exposure to fill up the Blue and Green buckets to their max unaware that you are also filling up the Red bucket (you're just not using it when prioritizing B&G).

Your camera SDI output and exposure tools should be able to tell you that even in this 2000K scenario you are in fact clipping in the Red Channel. Red's current Gen Cams are pretty good about letting you know your exposure and RGB tolerances during shooting but I've had some small discrepancies in the past.
 
Last edited:
Back
Top