Welcome to our community

Be a part of something great, join today!

  • Hey all, just changed over the backend after 15 years I figured time to give it a bit of an update, its probably gonna be a bit weird for most of you and i am sure there is a few bugs to work out but it should kinda work the same as before... hopefully :)

Ask David Mullen ANYTHING

Have another question if u don't mind, thanks for your previous help... we are doing some test shoots with our lead actress... shes in her mid 30's... we wanted to get a warm soft look for the daylight and we were going to do some fake firelight stuff for a nighttime test.
the question I had was regarding filters... i was reading the manure thread and you mentioned using the classic black 1/2 for the closeups on tea leoni... i also read that you liked the tiffen soft fx 1 and 2... what do you think would be a good range of filters to test? to get a nice soft look on the skin tones... hide blemishs etc...

thanks for your time.
 
I wouldn't use filters to add warmth, you can do that with lighting. I think pale warming filters are a waste of time, just extra glass for an effect you can easily get in some other way, plus it makes even less sense for the RED since it prefers higher color temps.

But in terms of diffusion, it's really just a matter of finding a series of strengths that you like of a certain type. They have different personalities and they do things a bit differently.

Most diffusion filters break down into two designs: mist filters and filters that throw an out-of-focus area over an in-focus area. And there is some overlap in these two techniques (some mist filters throw bits of the image out-of-focus and some filters with a pattern that throws bits out-of-focus have some misty quality.)

"Mist" filters are things like ProMist, Black ProMist, SupaFrost, Frost, Black Frost, GlimmerGlass, etc. They all do some softening but they are mainly designed to cause bright areas to halate into dark areas, though the "black" versions have an added pattern of black specks or dots to restore some contrast and black level.

True diffusion though involves through an out-of-focus area over an in-focus area. In digital post, it's like doing a Gaussian Blur overlay on a sharp image.

The classic example are nets, pantyhose, etc. The clear gaps in the net pattern allow sharp detail to pass through but the fabric lines cause the focus to shift and diffract, creating softness overlaid on sharpness.

Then you had the old Mitchell diffusers, which have a pattern of a sort of an indented trapezoid shape imbedded in the glass. Schneider Classic Softs have their round bubble-shaped "lenslets", Tiffen Soft-FX and Diffusion-FX use a sort of kidney-shaped lenslet.

Schneider Classic Soft Blacks have a 1/8 Black Frost added to all the Classic Soft line-up. Double Classic Blacks have a 1/4 Black Frost added.

Schneider HD Classic Softs use a tinier pattern of lenslets so that they won't come into focus on 2/3" cameras. Schneider Hollywood Black Magic is the HD Classic Soft with a 1/4 Black Frost added -- in other words, it's the HD version of the Classic Blacks.

I sort of type diffusion by what I call "visible diffusion" and "invisible diffusion". Visible Diffusion is basically when you want an obviously diffused look with glowing highlights, halations, etc. Invisible Diffusion is when you want the audience to think the movie was shot unfiltered. Of course there are degrees of visibility, you can opt to be fairly subtle. For example, most of "Iron Man" was shot with a 1/8 ProMist but most people do not think of that as a diffused movie, yet the filter effect is deliberately visible.

If all you want to do is invisibly soften details without getting any traditional artifacts like halation around light sources and loss of contrast, then the Tiffen Black Diffusion-FX is the filter for you. It's very subtle, even as you go heavier. There is a pattern of Black dots that help to keep the contrast normal, and the pattern and shape of lenslets are very random and small.

The reverse of that is the Schneider Classic Soft, which has a fairly large and regular pattern of round lenslets, creating certain ring and bubble artifacts around lights. But that can be pretty.

Truth is that I find the Black Diffusion-FX to be a bit boring because it doesn't do anything but soften detail, but I use it for movies where I want to only occasionally slip in a diffusion filter for a certain face, but otherwise, I want the movie to look unfiltered.

When I use the more obvious types of diffusion, I tend to be consistent in its use, like a light version for medium shots, a heavier version for close-ups, and only pulling the filter for extreme wide shots when I want maximum sharpness. This way there is a consistency of texture.

Though the extremely light Classic Softs are fairly subtle. You can drop a 1/8 or 1/4 Classic Soft on a close-up in an otherwise undiffused movie in most cases, though occasionally some bright light in the frame may give away the effect.

But I like to see a little halation around lights. When I was doing "Big Love" (Season Two) I started playing with the Black Diffusion-FX to sneak in some diffusion for an otherwise unfiltered show. But when Bill Wages joined me as a co-DP halfway through the season, he brought with him a homemade black net made from a fine sort of tule or bridal veil. It produced a nice diffusion effect on faces, but had a bit of a star filter halation around some points of light. I decided to switch to a Tiffen GlimmerGlass diffusion on my episodes, which has a more ProMist effect, but sometimes I shot a scene with Bill's black net instead.

I thought it would be nice to have a filter that was a bit of both, sort of a mist filter mixed with a diffusion like a net. So when I heard that Schneider was putting their Black Frost filter on top of their Classic Softs, that seemed like the filter I wanted to try.

So which you want to test is just a matter of taste.

I think the Tiffen Soft-FX are still very pretty and have a nice halation effect that is subtle. My only beef with the Soft-FX is that the strengths are too widely spaced apart -- there are obvious jumps between the 1/2, 1, and 2. So you end up thinking that the 1/2 is too subtle but sometimes the 1 is too heavy. But otherwise, I like the look. I'd test them.

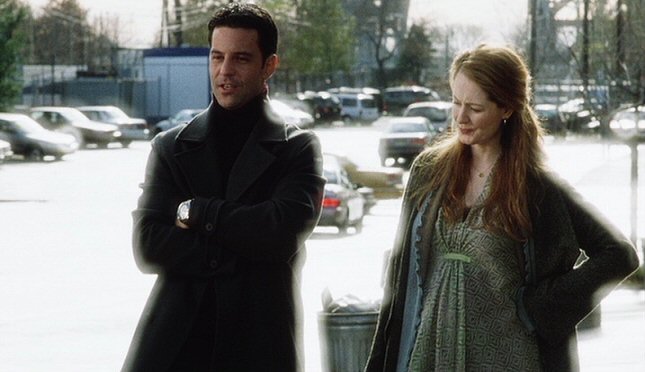
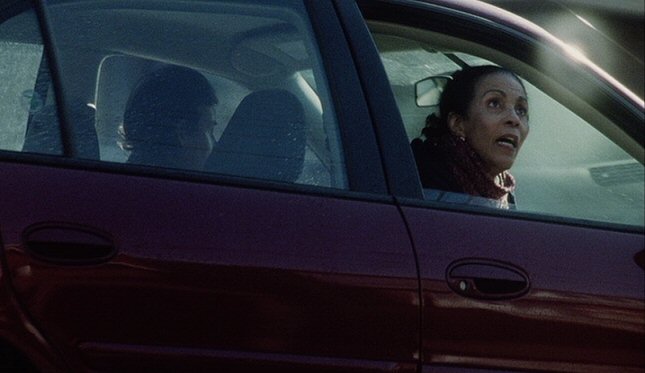
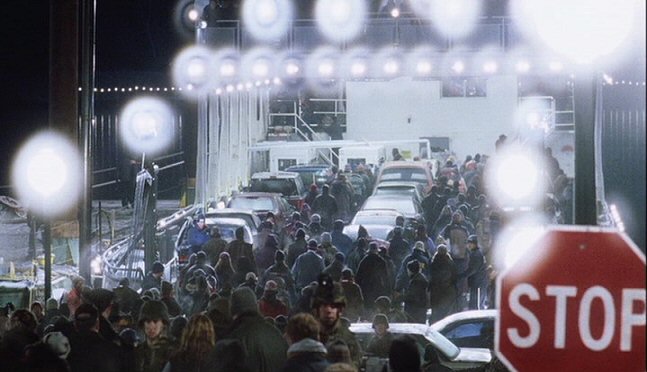
I haven't tried the HD versions of the Classic Softs. On a 35mm sensor camera, the pattern of the regular Classic Softs is not so much of a problem at wide apertures, but do you get some odd artifacts, especially on longer lenses which enlarge the lenslets and cause some odd ring effects, like in "War of the Worlds":

wotw3.jpg


wotw4.jpg


wotw5.jpg


Now these were the heavier versions, like the 1 or 2, not the 1/8 or 1/4... but I've found that even with the lightest Classic Softs, once you go above 100mm or so, you get ghostly rings around lights. So in theory, the HD version of those filters would solve that problem, but then, you also don't get the interesting Classic Soft halations, it's more subtle.
 
David, do you think it's still worthwhile to use these soft/mist filters on the Red? It seems a growing school of thought to only use filters that would affect exposure (ND, ND grad & Pola) and that any soft/mist filter can be easily done in post. I realize this leads to the larger "get a pure an image as possible" vs "bake in camera" argument, but I'm more specifically asking in regards to this one issue of soft/mist filtration.
 
Ditto. Using Red I would prefer to have nothing baked in... I think this is in line with the whole RAW benefits...?
 
You can see an example of Black Diffusion-FX here:
http://www.camerafilters.co.uk/page57.html

As I said, it's such a subtle filter that unless someone used a heavy version, it would be hard to find an example on a DVD worth posting.

I'm not going to settle the "do it in-camera vs. in-post" debate, but it has nothing do with shooting RAW or not, the question applies if you are shooting film for a digital finish, for example.

If you're talking about a feature film, the reasons for doing it in-camera would be that (1) it can be an awful lot of shots in a feature to process in post for a diffused effect, adding time to an expensive D.I., and (2) final color-correction is done months after principle photography has wrapped, and after watching undiffused footage for months in the editing room, the director and producers may change their minds about diffusion, for no other reason than they've gotten used to the way it looked in dailies.

I also found, when doing digital diffusion for "Manure" that the added diffused blur layer basically increased the luminosity of the bright highlights, causing them to clip faster. It was hard to find the right balance of diffusion in post that did not cause me to lose overexposed detail faster. I don't think a camera filter would have increased the tendency to clip.

Also, digital diffusion has a way of hiding grain and noise because of the blurred layer you are adding over the sharp image. That can be a good thing sometimes, which is why I like it, but it can also be a bad thing if you want to preserve grain (if shooting film for example) and you don't want the softened image to look to plasticky and digital, hyper-smooth. Camera diffusion sometimes has the opposite effect, it adds a texture (like from a Black ProMist) that seems a bit more like noise/grain.

So there are pros and cons with doing it either way, but definitely one reason to do it in-camera is that you're the one doing it, you know what you'll be getting and it will be locked into the footage -- which may be important if you feel you may be cut out of the post-production phase, or not around for it.

And there can be political reasons too for delivering an image from the camera that looks the way it is intended to look -- you don't want to get fired because your middle-aged lead actress saw some raw dailies where you intended to soften her lines later in post. You don't want to spend the next six months constantly reminding people of how the movie is supposed to look. Now if there was a simple, fast way to add some digital diffusion to dailies as well, then maybe you'd be covered.

As I've mentioned before, I'm something of an advocate for what I call the "50/50" approach, which is get half the look in-camera and then finish it in post. This way you've baked in some of the look but at a milder level so it's not missing entirely but you're not too locked in either. For example, use a 1/8 ProMist on the camera lens for a movie and then add another 1/8 worth in post later. This is why when I test diffusion filters, I generally opt to use the filter strength that is one step lighter than the one I liked in my tests. Because I know I can always increase the softening in post; it's harder to get rid of the effect if you went too far.

In regards to the RED, it has a somewhat naturally smooth, unsharpened look, not as crisp and artificially edgy as some other digital cameras, so you may find that you don't need to use as heavy a filter as you'd think.
 
I'd also add that in-camera diffusion can lead to certain happy optical accidents that feel more exciting and organic than carefully applied digital diffusion. The new "Star Trek" movie is an example of designed optical chaos, with off-camera crew people flashing the anamorphic lenses with high-powered flashlights to create a lot of flares. Some thought it was too much, but I thought it looked fun, and fun to do on the set -- which is factor you should never ignore, that a movie shoot should be creatively exciting.
 
Hi David...
Me being a newbie posting at this forum but reading it for a long time I'm a big fan of your 50/50 approach thinking - doing half way in camera and half way in post.
So besides the terms of diffusion which I will have to think and test about, how do you work with mixed lighting Situations.
If Im not wrong, I need to expose the RGB channels equaly to get full BIT depth of every channel. So when for example shooting inside at tungsten mixed with daylight seen through the windows, would you use a filter in front of the camera balancing you between those two, maybe at 4800K and getting the warm or cold look you want in post?
Regards
Kim
 
First of all, artistic photography is not about getting equal RGB levels, nor always having a 3:1 lighting ratio, or never having any clipped highlights in the frame, etc. You can't really make a movie that way.

If the best way to shoot a close-up is to side-light the face with no fill and a black background, then you will have no shadow detail but if that's what you want, then why not do that?

If you have a face lit by a strong colored light, like from a green neon sign or some other colored source -- deep orange firelight let's say or a red darkroom light -- then your RGB channels are not going to be equally represented, but that's OK (unless you attempt to correct out the color effect in post...)

So I would first think about what looks interesting, striking, graphic, etc. and then figure out the best way to get that effect -- don't start out with creating some sort of technically perfect scenario. You are shooting a movie, not a bunch of color charts.

Camera filters can't correct a mixed-light situation since they only correct the overall image, not the mismatch. But in the case of a mixed tungsten-daylight room, assuming you want the mix, then you can get away with setting the WB to somewhere in the middle, like 4300K to 4800K. A pale blue filter may help the noise a little but at least you aren't using a 3200K base for the WB. Your tungsten would look a little warm and the daylight would look a little blue.

Now if you wanted the tungsten light in the scene to be the "white" base and the daylight look very blue in comparison, then that would be working around a 3200K base -- and you'd get better results on the RED with some blue camera filtering to get the balance up from 3200K to something higher.
 
Thank you very very much for answering!
I do get your point about artistic photography and I appreciate it...
Im just trying to understand "the right way" (if there is any) to do it my way!

If I get it right: It doesn't matter in Terms of noise or picture quality, if Im shooting with very colourful light like at a Concert, If I dont want to balance it back to "normal".

But what Do you do if youre in a night scenario with mixed lighting situations (street lights, traffic lamps, Shop windows) the sensor balance is at 5000K right? Would you use a blue filter, to help the quality of the RAW Image - to help the blue channel in terms of contrast and noise floor, and push it back to warm tungsten look in post?

I have to edit here cause I just read your post in exposure 101...
I do understand that a Filter in front of the camera just corrects the over all colour balance....
So going in between ad help the blue Channel is something good to do.
The pictures of manure (havnt seen it yet) look all very warm - I assume thats being done in post?

Having the feeling to have the unique opportunity to ask you:
How would you set up the situation,
A guy in his car in front of a Traffic light.
Because of the story you want to see the reflections of the changing lights
(red, red/yellow, green) on his face - wich for my opinion is noticeable in real life.
Thank you so much for listening!
 
The trouble is that you often don't have the exposure to be able to use a blue filter at night, so you just get the best exposure you can in tungsten. Not much point in using a blue filter to reduce noise if it forces you to underexpose as a result.

Besides, for partial-spectrum sources like sodium vapor streetlamps, filtering doesn't help because these lights are missing wavelengths, and all a filter can do is subtract wavelengths, it can't add them. In other words, all a blue filter does is subtract redder wavelengths, it's not adding any blue wavelengths. So if a source is missing blue wavelengths, like a sodium streetlamp, you can't filter it to normal color.

But on the other hand, part of the beauty of night photography is the mixed colors of different sources.

If you can hang an actual traffic light closer to the car windshield to get both the reflection of it and the light effect on the face at sufficient exposure, that would be great, but the more common method is to shine some color-gelled lights on the face to simulate the effect, timed to match the real traffic light (if reflected on the windshield glass.) Even better would be to get a prop traffic light and hang that over the windshield so you can tie the off-camera colored light to the same circuit as the colored bulb in the traffic light and have them switch on and off together.

But if you are set on using real available street lighting, I suggest getting some good T/1.3 lenses.
 
Thank you about the wavelength explenation... thats a very good point I havnt been aware of till now.
Thanks as well for your Traffic Light recommendations. (Still wondering about blue channel exposure=contrast getting lost?)
In most situations even a high speed lense wouldnt offer the needed exposure in real available street lighting over here in Germany - besides in the hot spots of a major City, wich are shot too often. How would you increase the light of streetlamps?
With a 1K PA 64? But where to place them? with a ballon light (Dont know how you call it)what seems impossible always thinking low budget...
Also wondering about the high ISO/ASA diskussion in contrasty situations and Low ASA/ISO in low dynamic range. I read your posts and thoughts about that... but do you have a final conclusion?
KIM (getting the feeling to get on your nerves - if so, just dont answer)
 
I don't really buy the logic of changing the ASA rating to suite the CONTRAST -- the dynamic range of the camera is what it is, changing your exposure or ASA rating doesn't change that.

Basically you've got the wider dynamic range of reality and you've got the narrower range of the camera, so you are just making choices as to whether to bias the exposure in favor of the brightest highlights or the darkest shadows. In a bright contrasty day exterior, you may figure that you need to bias more towards highlights since there are more of them, hence why you may choose a faster ASA rating, or you may just keep the ASA rating the same but lower the exposure to hold more detail in the bright areas. But you aren't reducing the contrast range of the subject by doing this.

And I think the argument for the lower ASA rating in low-contrast scenes is simply that if you don't have a lot of hot highlights to worry about, you might as well expose more fully in order to reduce the noise further. But again, you could just keep the ASA rating the same and simply expose more when you are able to.

As for night exterior, generally the approach is to shoot wide-open on the fastest lenses you can get and then augment the available light until you get the exposure you need. And you may resort to tricks like a higher ASA rating (at the risk of more noise) or longer shutter times (at the risk of more motion blur), figuring that the benefits outweigh the negative artifacts. So doing all of this, you may find that you don't need a lot more additional light. Yes, 1K tungsten PAR's can be useful at night for creating the effect of pools of light from streetlamps. You may be able to rig the PAR's off of the arm of the streetlamp for example. Tends to take a lot of cabling and rigging because of the number of small lights being used, which is why some people opt instead for the "big backlight" approach, or one big softlight like from a balloon.
 
This is a question i'd love to pass you, since I really admire the quality of your work.

I am going to be part of a Student Cast/Crew that is going to be shooting a micro-budget feature this Summer on 16mm.

This is kind of broad, but what are some of the rookie "mistakes" that low-budget productions and student productions most often make, that you think they don't have to?

We have a budget on a similar level as "Clerks" or "El Mariachi", and we don't really want the production to "look" like a Student film, and wanted to hear from a professional about what you felt were some of the signatures of a rookie film, and the best ways to overcome them during production?

Thanks. :)
 
Some mistakes to watch out for:

Camera prep. I heard about a major indie movie shot in Super-16 where they found out during post that the entire movie was soft due to a camera problem and had to file an insurance claim, after which the entire movie was reshot (in 35mm). So prep the camera and lenses properly (I'm not an AC or else I would be more specific.) And print and project some rolls now and then (not shots, but whole rolls, otherwise they have to cut-up your negative to create a printing roll, and besides, many labs don't even offer that service for 16mm.) I know you're on a budget so perhaps just do it once after the first day or so of shooting, just to be sure. Print one roll and project it.

Shorten the script. Long scripts cost more money and time and film stock to shoot, so shorten it if you can.

Be prepared -- come up with a reasonable shot list for each day.

Be bold. Don't be boring or conventional, not if you want people to notice your little movie.

16mm doesn't handle mistakes in focus or exposure as well as 35mm does. Sure, you have more depth of field to save you, but a badly-focused 16mm shot just looks crappy on the big screen because you are fighting for resolution with 16mm already. Also, underexposure causing blacks to lift and grain to pop out gets more noticeable with a smaller negative, so be consistent in your exposures (unless it's part of the style you've chosen to have some shots look technically funky.)

Shoot a framing chart in prep and keep it at the head of the rough cuts of the project.

Shoot a face and grey scale / grey card at the head of the first roll of a certain stock in a certain color balance (you don't necessarily have to shoot it on every roll if it's of the same scene on the same stock in the same lighting.) Shoot it in boring frontal light so that there is no creative misinterpretation possible.

Think of ways of being faster and more efficient at every moment in the day.

Pacing, pacing, pacing. Biggest mistake most first-time directors make, thinking that the chaos and energy of the set is somehow transferring into the scenes. Don't be afraid to ask the actors (politely, diplomatically) to pick up the pace if you think it is lagging.

Plan out your post path all the way to the end. Figuring out how you will finish the project will tell you how to shoot the project.
 
David,
I'm wondering in what scenarios you would use a 300mm lens if you had it in the kit. Reason I ask is a bit backwards. My dad bought the Red 300mm so he could shoot wildlife and so I have it available and its a great lens, but i've yet to use it in a narrative production because its use hasn't occurred to me.
 
Well, there may be an outdoor scene that would look cool shot on a 300mm, to enlarge the background and get the compression -- like that last shot in "Rumblefish" of the ocean and Matt Dillon on his motorcycle (after a whole movie of wide-angle photography).

I did a movie called "Jennifer's Body" that comes out in September -- it's mostly a wide-angle movie but we did one shot of Megan Fox strolling down a school hallway in slight slow-motion on a 300mm lens (not easy to hold focus as she walks straight towards the lens at T/2.8...) It's meant to look a bit surreal, but it also makes her stand out from the crowd moving around her. That's probably the most common use a super telephoto lens, to compress the action as someone walks towards the camera so they hardly change in size. "The Graduate" had some famous shots like that, as Dustin Hoffman runs towards the camera but doesn't seem to be getting very far. And there's the famous shot of Omar Sheriff arriving at the well in "Lawrence of Arabia" through a watery mirage. (Now I don't know the exact focal lengths used in these examples -- "Lawrence" was a 65mm movie and "The Graduate" was a 35mm anamorphic movie...)

Long lenses are also useful in action scenes to compress the layers of action and make pans more swishy and dynamic -- you see this in the final battle in "Seven Samurai", probably the first movie to use multiple cameras with long lenses to shoot an action scene.

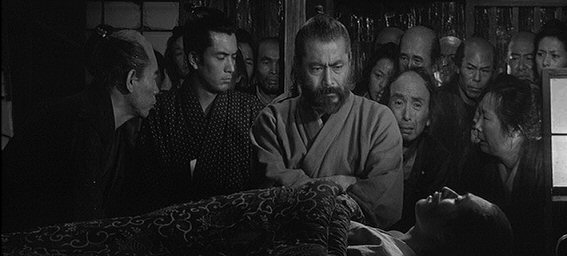
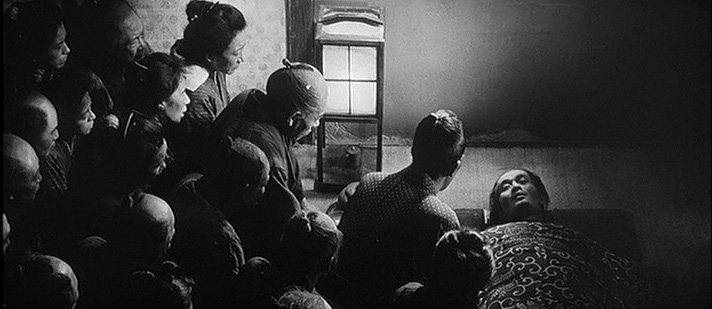
Kurosawa then started applying that technique to interiors. "Red Beard" is probably the most famous example of that -- he used telephoto lenses and sets lit to deep stocks (sometimes f/22) to hold focus, requiring the the sets be built at one end of the soundstage and the camera be at the other end, so he could shoot a scene on anamorphic lenses in the 300mm to 500mm range. See:

redbeard1.jpg


redbeard2.jpg


Also a 300mm lens, if it focuses close enough or if you use a diopter, may allow some extreme close-ups of a face.
 
thank you David, I appreciate that explanation!

Btw, I didn't realize you were the DP of the new Diablo Cody movie, sounds cool!
 
David,
Today I was watching 'Atonement' again and after your posts on filtration it leapt out to me how filtered the early parts of the movie are, so I took some screen caps and was wondering if you'd give your opinion on what filters they likely used.
 
Back
Top