Welcome to our community

Be a part of something great, join today!

  • Hey all, just changed over the backend after 15 years I figured time to give it a bit of an update, its probably gonna be a bit weird for most of you and i am sure there is a few bugs to work out but it should kinda work the same as before... hopefully :)

Sorry, another Dragon optimal ISO thread...

shoot by observing the raw histogram - u see what the sensor is getting.

This is actually false.

Here is a shot:
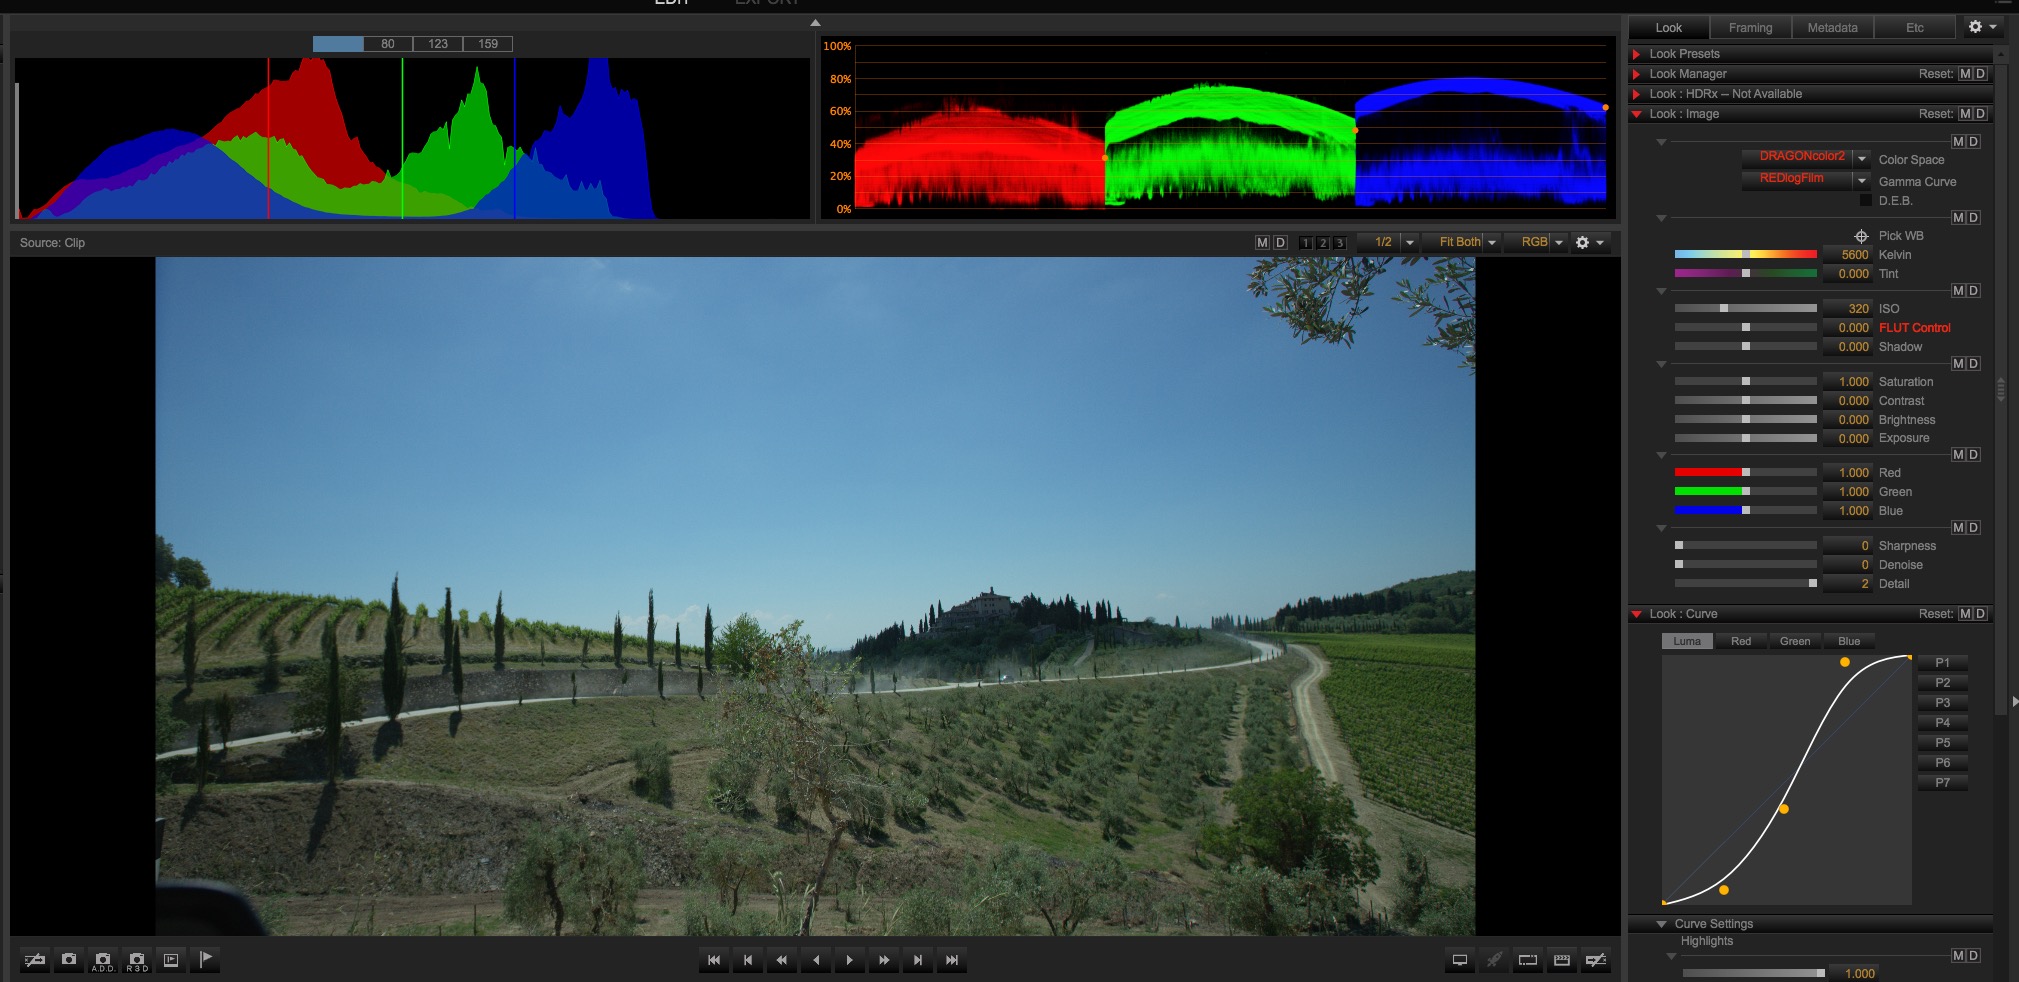
histo_05.jpg


and here is what the sensor is actually seeing.
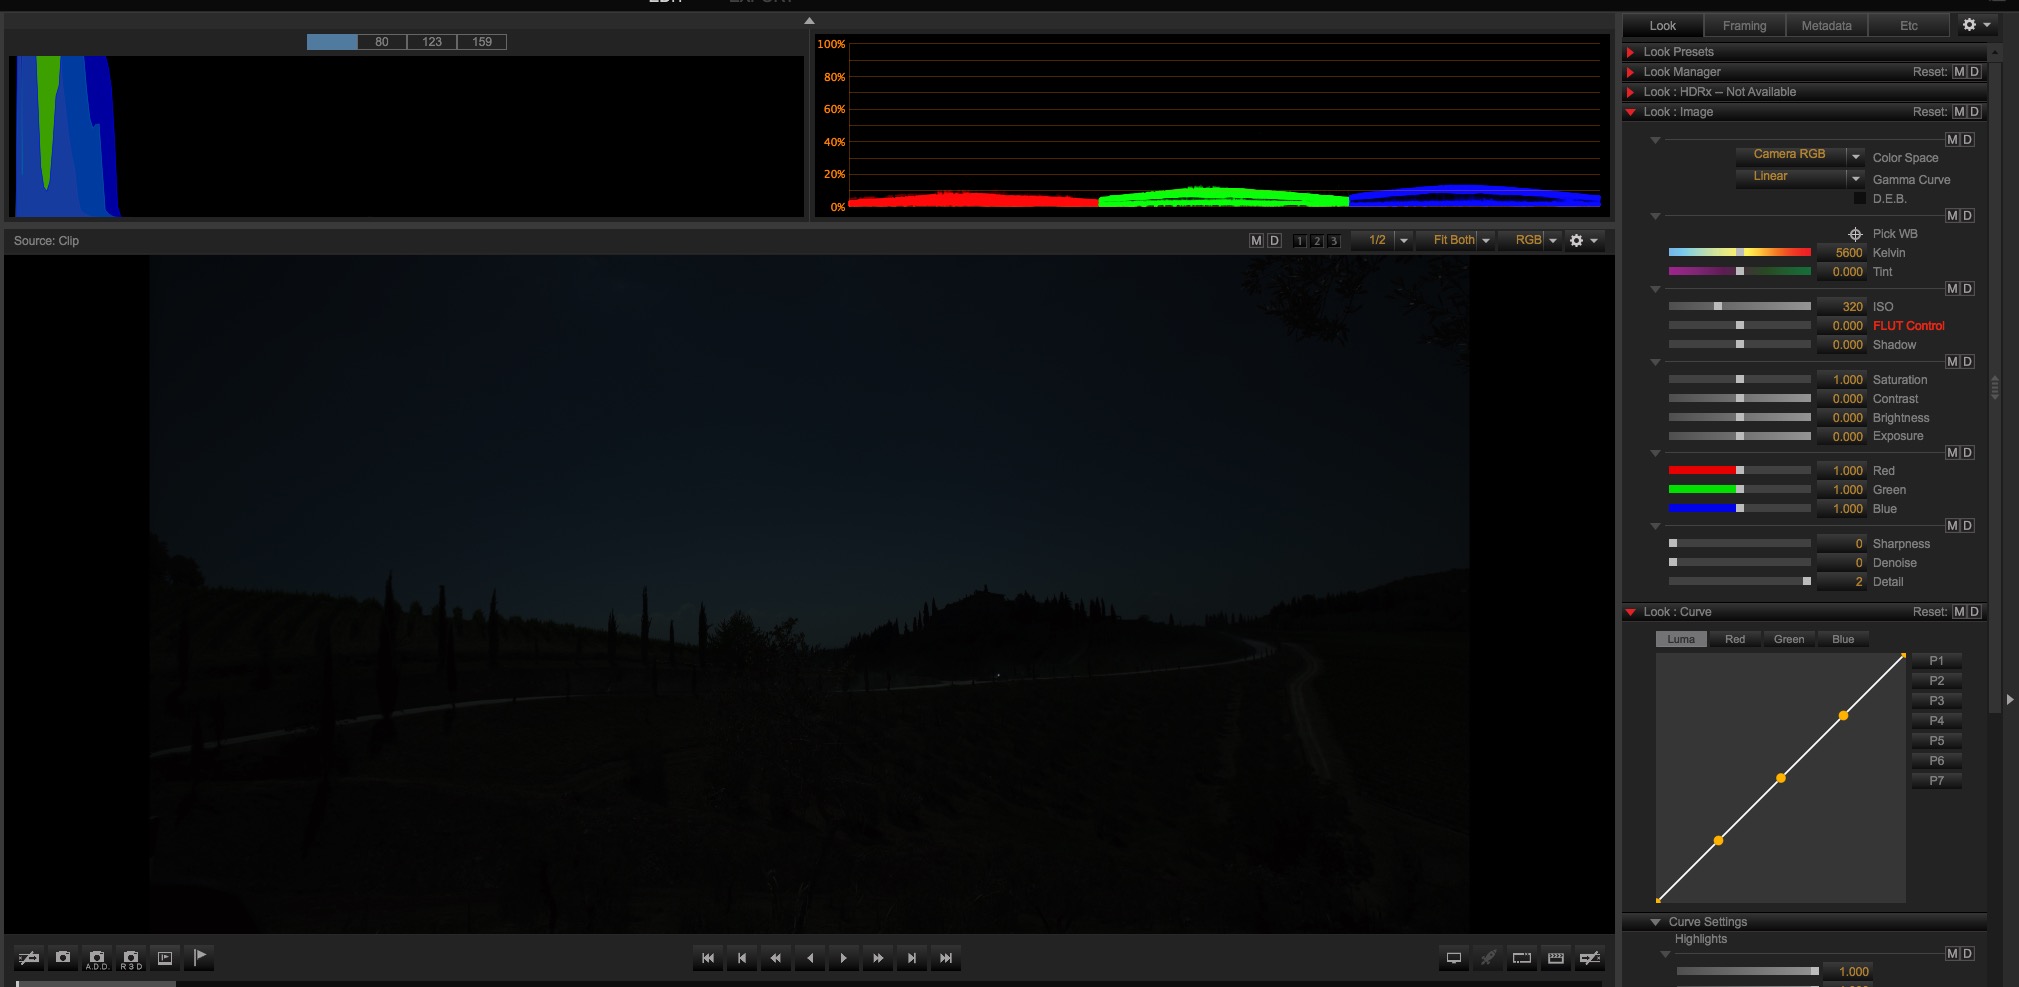
histo_06.jpg


RAW VIEW is there to make images viewable while capturing and as a suggested base for exposure by the manufacturer.

David
 
Discussions on exposure are always interesting, to absorb the different thought processes and techniques.

I was going to say that ETTR was more applicable to the RED ONE days, when shooting a sensor/camera with less latitude than the sensors which are now on the market. It was good advice for getting maximum data onto the sensor, across the available range of stops. This would result in a more "stretched" or sloping look to the histogram, frequently.

I find myself using it less now, where I tend to like to shoot for mountain peaks on my histogram (especially with the Weapon) and tweak it up in post-....where FLUT is my friend.

Also agree with a few people who pointed out that having this conversation without being very specific on which sensor (now M, MX, MX Epic/Scarlet, and MX W are all working still in the field) is a little problematic. Also add in the various flavors of OLPF and it gets even twitchier, depending on where the OLPF is placing middle gray.

I think it comes down to testing your favorite sensor/OLPF combos and finding the sweet spots for what you do. I own a SCARLET MX, an EPIC DRAGON, and now a WEAPON, and have modified my baseline exposure rules for each camera and, with the Dragons, for each OLPF. And I think I can extract pretty consistent results.

But you really need to listen to the advice for exposure and then test, test, test and compare your results to the advice until you like what you see. Lather, rinse, repeat. It's a process of refinement.
 
I'm referring to looking at the raw histogram - u see exactly what the sensor is getting across the stimuli range... what else does one need ? this is as transparent as it gets

color space, color temp, white balance, ISO is nothing but meta - ergo a "look" and can be changed as needed in post... irrelevant for the capture, a look preview at best on a crappy, non-calibrated, small LCD...

feed the sensor correctly and u have a raw capture that can provide all "looks" that u want... shoot for a specific "look" with less light and u may/will get noise once u change ur opinion later in post...

DOF changes nothing in this regard
 
Simply no, NO! Please do your research.

ISO on RED is in no way effecting the recorded data. If you try a comparative in the analog world you would have two cameras with the same film stock and one cameras film will be push developed in the lab, and guess what, it´s going to result in more grain ;-) Hell, I´m wondering why this is so hard to understand.

Cheers
Ulf

Hey Ulf,

No reason to be rude in disagreement. We are all trying to learn and to help here. I did my research, and I am also not so hard in understanding things.

I simply state the fact that ISO is a variable of your exposure, even if it is just metadata. Your histogram depends on it, even if it is not the raw one. The amount of light you give to the sensor it is based on the aperture you set for your given angle/shutters speed, but the ISO gives you an indication on how much light you have on the sensor at a certain sensitivity level. Or to say it in RED words, where is your middle grey with that aperture AT THAT ISO. From RED 101: " Although ISO doesn’t actually change the raw image data, it does change how the image is displayed, since it shifts which portions of the scene are mapped to middle gray."

The raw image data is captured at a basic sensitivity level (native ISO is a term that is hated here. But physically there is a baseline of sensitivity for a sensor. SENSor). You can choose to give more or less light to the sensor. That will change where you want your middle grey to be. The ISO and the histogram tells you that.

Back to the film example, is the difference if you prefer to pull ISO 1600 to 800 or push ISO 400 to 800. You end up with the same ISO, but with different grains, shadows and highlights.

If I am wrong, please correct me as I am eager to learn. But do it in a respectful way.
I am currently using ISO 800 with the LLOLPF on a Epic Dragon as my base to adjust exposure. If I am in a situation where there is a lot of light, then I will move to ISO320 as a base.
 
I don't disagree with you. But when you say RAW histogram, you are talking about , in camera yes? IN this case that histogram is displaying based on an ISO selection in camera.
In RAW view that histogram is based on DC/RLF 800 ISO 5600K. So in that case one are basing the exposure on that.

Which is a bit different than what Mark was suggesting earlier with ETTR at 250ISO. And the DOF is effected if you are using aperture and not shutter to control the amount of light hitting the sensor.

David


I'm referring to looking at the raw histogram - u see exactly what the sensor is getting across the stimuli range... what else does one need ? this is as transparent as it gets

color space, color temp, white balance, ISO is nothing but meta - ergo a "look" and can be changed as needed in post... irrelevant for the capture, a look preview at best on a crappy, non-calibrated, small LCD...

feed the sensor correctly and u have a raw capture that can provide all "looks" that u want... shoot for a specific "look" with less light and u may/will get noise once u change ur opinion later in post...

DOF changes nothing in this regard
 
This is the language I am speaking and makes complete sense to me.

David

Hey Ulf,

No reason to be rude in disagreement. We are all trying to learn and to help here. I did my research, and I am also not so hard in understanding things.

I simply state the fact that ISO is a variable of your exposure, even if it is just metadata. Your histogram depends on it, even if it is not the raw one. The amount of light you give to the sensor it is based on the aperture you set for your given angle/shutters speed, but the ISO gives you an indication on how much light you have on the sensor at a certain sensitivity level. Or to say it in RED words, where is your middle grey with that aperture AT THAT ISO. From RED 101: " Although ISO doesn’t actually change the raw image data, it does change how the image is displayed, since it shifts which portions of the scene are mapped to middle gray."

The raw image data is captured at a basic sensitivity level (native ISO is a term that is hated here. But physically there is a baseline of sensitivity for a sensor. SENSor). You can choose to give more or less light to the sensor. That will change where you want your middle grey to be. The ISO and the histogram tells you that.

Back to the film example, is the difference if you prefer to pull ISO 1600 to 800 or push ISO 400 to 800. You end up with the same ISO, but with different grains, shadows and highlights.

If I am wrong, please correct me as I am eager to learn. But do it in a respectful way.
I am currently using ISO 800 with the LLOLPF on a Epic Dragon as my base to adjust exposure. If I am in a situation where there is a lot of light, then I will move to ISO320 as a base.
 
i havent read the entire thread, but i was doing some 2k tests for high speed with my DIT, and i too was under the impression that iso was all meta data and it wouldnt make a difference in changing it while recording. so the 2k at 800 iso was a bit noisy, so my dit said lets try some at 500 and the result was a significantly cleaner image, especially where you really see the noise, in the shadows, but even in the overall image we achieved a much cleaner result. Then tried 320, even cleaner. so anything i ever have to do in 2k i will be shooting at 320. about 10 years shooting on red and i still learned something new.
i dont care what arguments are about what, tests say it all.
 
Hey Ulf,

No reason to be rude in disagreement. We are all trying to learn and to help here. I did my research, and I am also not so hard in understanding things.

I simply state the fact that ISO is a variable of your exposure, even if it is just metadata. Your histogram depends on it, even if it is not the raw one. The amount of light you give to the sensor it is based on the aperture you set for your given angle/shutters speed, but the ISO gives you an indication on how much light you have on the sensor at a certain sensitivity level. Or to say it in RED words, where is your middle grey with that aperture AT THAT ISO. From RED 101: " Although ISO doesn’t actually change the raw image data, it does change how the image is displayed, since it shifts which portions of the scene are mapped to middle gray."

The raw image data is captured at a basic sensitivity level (native ISO is a term that is hated here. But physically there is a baseline of sensitivity for a sensor. SENSor). You can choose to give more or less light to the sensor. That will change where you want your middle grey to be. The ISO and the histogram tells you that.

Back to the film example, is the difference if you prefer to pull ISO 1600 to 800 or push ISO 400 to 800. You end up with the same ISO, but with different grains, shadows and highlights.

If I am wrong, please correct me as I am eager to learn. But do it in a respectful way.
I am currently using ISO 800 with the LLOLPF on a Epic Dragon as my base to adjust exposure. If I am in a situation where there is a lot of light, then I will move to ISO320 as a base.

Hello Alberto,

you are right I sounded very rude and i feel sorry for that. It had never been my intention though - I´m a friendly person, please apologize.

May be I even misinterpreted what you said, it makes way more sense for me in your latest post. I see that ISO thing pop up every now and then and I simply wanted to be clear that ISO setting does not effect anything regarding the recorded data. With a high ISO setting it is even possible to have a clipped histogram at the right side and be in fact heavily underexposing with no clipping in the recorded RAW data. When you say you expose the LL OLPF like 800ASA we´re exactly in the same range. I also agree with David there can be a reason to "rate" STH OLPF Dragon at 1000ASA if this results in the final image you´re after. The only thing that might be misunderstood easily and that is what I tried to point out is that ISO "setting" is just one variable of interpreting the same recorded data as it is perfectly shown in Davids example above. I completely agree with Patrick, RED provides excellent education on their 101 site and it is well worth in dive into.
 
Last edited:
Red should give an award to whoever can describe, in near perfect clarity and using the least amount of words,
how proper exposure works on their cameras. :)

The problem is... is that people can be told over and over again how it works, but they just don't get it because
it's just too abstract for them etc. I have a film background and find digital easy to understand,
but I know others with film backgrounds that have a hard time understanding digital.

Whatever ISO you use as a guide while shooting, and by this I mean the amount of energy (light) you allow to hit the sensor at capture,
or whatever ISO you use in post processing to make your already captured image look brighter or darker, is fine as long as you are happy
with the results. So in other words, when people see a dark and noisy image and say that it is underexposed, this would only be true if the
person who shot the image also agrees with them because if the intention was for the image to be dark and noisy in the first place then
it is not underexposed.

I know this is all so obvious, but I call this "The Special Theory of Relative Exposure"

:)
 
i havent read the entire thread, but i was doing some 2k tests for high speed with my DIT, and i too was under the impression that iso was all meta data and it wouldnt make a difference in changing it while recording. so the 2k at 800 iso was a bit noisy, so my dit said lets try some at 500 and the result was a significantly cleaner image, especially where you really see the noise, in the shadows, but even in the overall image we achieved a much cleaner result. Then tried 320, even cleaner. so anything i ever have to do in 2k i will be shooting at 320. about 10 years shooting on red and i still learned something new.
i dont care what arguments are about what, tests say it all.

Well if you took the image you captured that looked good on screen at 800 iso and then in post chsnge the to 50 iso sure you get an image with less noise then if you develop at 800iso... simply raised iso more noise, less iso less noise. But the importance is that it does not matter what iso you capture, its only relevant at what iso you set when you develop/transcode. I see a lot of people shooting at 800 iso but to get their highlights to a good 80% peak on the histogram i need to bring iso up about 3 stops or such so simply they where heavily under exposing. Since histogram is affected by metadata I find the best practice to use goal posts and stoplights if your highlights are 1.5 stops under the stoplights and your lowest low 1.5 stop over your left goal post then all is normally good.
 
Yep. Can't help but think that Jordan left the captured images at the ISO at which they were captured; so 800 for one, 500 for the other. The real test would be whether the images captured at 800 (assuming all else being equal) looked noisier when the ISO was dropped in post compared with ones actually captured at 500. (Or, a vice versa comparison with adjustments in post.) I have to admit, I remain unconvinced that lowering ISO from 800 to 500 - ALL ELSE BEING EXACTLY EQUAL - would result in a "cleaner" image.
 
Last edited:
...the histogram and goalposts show the interpreted values of ISO and curve settings. They are NOT showing your actual exposure unless you set it to RAW...
I would love clarification and/or confirmation as I don't think this is entirely correct. It is my understanding (because this does come up every couple of years) that the Histogram is showing ISO-interpreted data, but the Goal Posts show raw data in all settings. (Scurrying to the RED site to find the answer myself... lol)


EDIT: From the RED site regarding goalposts:"Unlike the histogram though, these are not affected by the ISO speed or look setting, and instead represent raw image data."
 
Last edited:
I would love clarification and/or confirmation as I don't think this is entirely correct. It is my understanding (because this does come up every couple of years) that the Histogram is showing ISO-interpreted data, but the Goal Posts show raw data in all settings. (Scurrying to the RED site to find the answer myself... lol)EDIT: From the RED site regarding goalposts:"Unlike the histogram though, these are not affected by the ISO speed or look setting, and instead represent raw image data."

You guys should totally pick up my DSMC Field Ops Guide :)

This is all in there pretty clearly.

RAW Stop Lights and Meters look at the RAW Signal. Histogram takes into account ISO, Color Space, Gamma Space, and Look settings.
 
You guys should totally pick up my DSMC Field Ops Guide :)

This is all in there pretty clearly.

RAW Stop Lights and Meters look at the RAW Signal. Histogram takes into account ISO, Color Space, Gamma Space, and Look settings.

Haha - I own it and cherish it, Phil. I always forget - I think (?) - that I have an electronic version of it somewhere. (Don't I? Do I?)

That's how I learned half of this shit!!
 
Haha - I own it and cherish it, Phil. I always forget - I think (?) - that I have an electronic version of it somewhere. (Don't I? Do I?)

That's how I learned half of this shit!!

Yep. There is indeed an electronic PDF version designed to keep on your phone, tablet, phablet, etc...
 
I've been shooting with FS7 since it was released and in the CineEI mode it locks your ISO to 2000. Then they have a MLUTs that you can use to "rate" the camera at different ISOs. I think it confuses a lot of people because they don't realize that viewing a LUT set to 500ISO = darker image on screen (previewing with the LUT) = opening up aperture and allowing more light to hit the sensor = brighter raw footage captured = cleaner shadows when the image is lowered to proper exposure in post, resulting in noise levels relative to shooting 500 ISO (of course, at the sacrifice of more highlight headroom).

I'm probably just repeating what everyone else has been saying... but basically you don't use ISO to darken/brighten your shot, rather that it determines how much light you allow through your aperture. And the light coming through the aperture is really probably the biggest thing that can't be adjusted later in RAW settings. Too little light and you've starved your sensor. Too much and you've clipped your highlights, but hey those shadows will be clean! It's all a balance of where you want to prioritize information.
 
Yep. Can't help but think that Jordan left the captured images at the ISO at which they were captured; so 800 for one, 500 for the other. The real test would be whether the images captured at 800 (assuming all else being equal) looked noisier when the ISO was dropped in post compared with ones actually captured at 500. (Or, a vice versa comparison with adjustments in post.) I have to admit, I remain unconvinced that lowering ISO from 800 to 500 - ALL ELSE BEING EXACTLY EQUAL - would result in a "cleaner" image.

To explain it shortly.

1. Adjust your light and aperture so your highlights are 3 stops from clipping and so that you got no goal post to the left. Shoot with ND3 in your camera and develop at 800ISO.

2. change nothing to the above setup except for Pulling that ND and develop at 400ISO.

The two images should look perfectly the same.... But when looking closely you should see that the noise of the first image is about twice as much. as in the second sample. Now within limits that would possibly not even show if shooting 6k for 2k or 4k mastering. So not much to worry about. But if you shoot 2k 300fps or such then the difference will be huge. Same thing if exposure is low things will differ even more as the closer to the noise floor you expose the more noise you will have.

Example: Last week we shot this white board film. I was not there and the DP emailed me and asked why they got so much noise... looking at the r3d I could see that they underexposed with about +2 stops. His highlights where at 40% of the sensor capacity.

PastedGraphic-4 by Björn Benckert, on Flickr

So if he would open up two stops he would get his highlights at 80% and still have a lot of color fidelity in the highlights and no burnout and have far less noise. But then possibly it would be difficult to hold both the hand/arm and the board in focus so simply he would need to bring up the light levels 2 stop to get a good result.

If the result would be HD from 6k HD this would not matter much. But the idea was to zoom in 300 procent and pan around in the 6k canvas with a HD frame then the noise level becomes way more visible if the stuff is not shot tack sharp and with good exposure.


Same image with the iso raised to 2500 ISO then the highlights starts to reach the desired levels. But as they are brought there by lifting iso instead of adding exposure noise is introduced.

PastedGraphic-2 by Björn Benckert, on Flickr

Now I don't have the r3d frame dump with proper exposure / F5.6 and highlights at 80%... But when that was made we could simply zoom in 300% and use a bit of unsharp mask and the result was clean as a whistle and no noise and nobody would be able to spot that we actually just use 1/9 of the actual canvas captured. When trying to do the same with the highlights at 40%... the result would not have been nearly as good, it was looking like low iso 16mm celluloid footage.
 
Yep. Can't help but think that Jordan left the captured images at the ISO at which they were captured; so 800 for one, 500 for the other. The real test would be whether the images captured at 800 (assuming all else being equal) looked noisier when the ISO was dropped in post compared with ones actually captured at 500. (Or, a vice versa comparison with adjustments in post.) I have to admit, I remain unconvinced that lowering ISO from 800 to 500 - ALL ELSE BEING EXACTLY EQUAL - would result in a "cleaner" image.
yup, that was the first thing he did, the 800 test he bought down to 500, then we shot 500 and he bought it up to 800. all the comparisons clearly showed the 500 shot footage was much much cleaner. though this ONLY made a difference in 2k. in 4k regular frame rate tests i could not tell any difference as it was all so clean.
everything was shot in controlled lighting exposed properly and my DIT is one of the best in the business.
 
yup, that was the first thing he did, the 800 test he bought down to 500, then we shot 500 and he bought it up to 800. all the comparisons clearly showed the 500 shot footage was much much cleaner. though this ONLY made a difference in 2k. in 4k regular frame rate tests i could not tell any difference as it was all so clean.
everything was shot in controlled lighting exposed properly and my DIT is one of the best in the business.

Changing iso in camera or changing it in post makes no difference. Giving the sensor more light, makes a difference / gives a cleaner image. fiddling with iso while shooting does not affect the amount of light hitting the sensor. ISO is nothing but a meta data setting that says what amount of digital gain should be applied to the image. So what you write above does not make sense, or it´s something I misunderstood.

A simple test, shoot a gray wall in 2k. Then while you are recording go trough all the iso numbers available without stopping the camera. Then in red cine apply a 800ISO setting for the whole clip. I can assure you the noise pattern will be the same all trough the clip.
 
Back
Top