


David Mullen ASC
Moderator
STAY COOL
I just finished the first eight days of “Stay Cool”, my sixth feature for the Polish Brothers. We started shooting just two weeks after wrapping out fifth feature together, “Manure”. This new movie is much smaller in scale, a romantic comedy about a writer (Mark Polish) with a successful pop novel about high school life to his credit returning to the scene of the crime, so to speak: his home town and high school, to give a graduation commencement speech. He hooks up with old friends and rivalries and finds himself re-experiencing all the pains of his high school years.
We are using the same three RED cameras that were bought for “Manure”, with the same Zeiss Ultra Primes and Angenieux Optimo zooms rented from The Camera House, and PlasterCity Digital again doing the dailies work. The budget is smaller on this movie however, and we are mostly shooting on locations in Santa Clarita.
In a complete twist from the soft, diffused, brown palette of “Manure”, this movie is being shot in a sharp, colorful style, sort of a pop art modernist feeling to the suburban locations.
We decided to update the cameras to Build 16 despite it still being in beta status at the time – it seemed to have stabilized the week before we began shooting so we decided to take a chance. This movie will have a number of low-light scenes and I needed to be able to push an underexposed image around, so the lower noise floor from Build 16 seemed like a good match.
I only had a day to shoot any tests of Build 16, mainly to look at the noise when rating the camera at higher ASA’s. Besides shooting some charts at different speeds, I took a camera out on the road – along with some T/1.3 Zeiss Master Primes -- at night to shoot some residential streets only lit by their sodium streetlamp fixtures.
I digitally projected the tests at 2K in the D.I. theater at PlasterCity Digital the next day. I found the increase in noise at higher ASA ratings to be fairly mild unless you tried to lift up low-end detail buried in the shadows. But the highlights and midtones were quite clean even at 800 ASA. There was enough exposure at T/1.3, 24 fps, 1/48th shutter, 800 ASA rating, to shoot by available light as long as there was a streetlamp right in that spot. Further away, the light levels fell off dramatically. The image was nice and clean and the sodium streetlamp color was closer to how it looks to you eye (orange-ish) compared to that reddish look created in some Sony HD cameras when shooting sodium streetlamps.
I did discover that no matter what frame rate or shutter speed I tried to select, there is a limit of 1/24th of a second for the longest exposure time per frame, so you can’t just go to 8 fps, for example, with the shutter off, to get nighttime landscapes exposed at 1/8th of a second per frame.
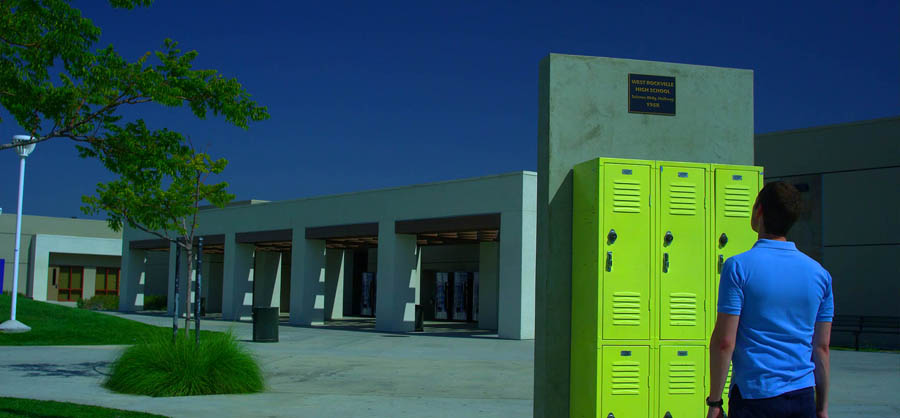
We spent the first seven days of the feature at West Ranch High School in Valencia. It was just built three years ago, so we decided that instead of the character seeing his old familiar building, he would discover that his high school had been demolished and replaced by a new structure, with fragments ala the Berlin Wall placed around campus as decorations.
This location is mainly fluorescent-lit and stark, so we had to find ways of adding color to these spaces.
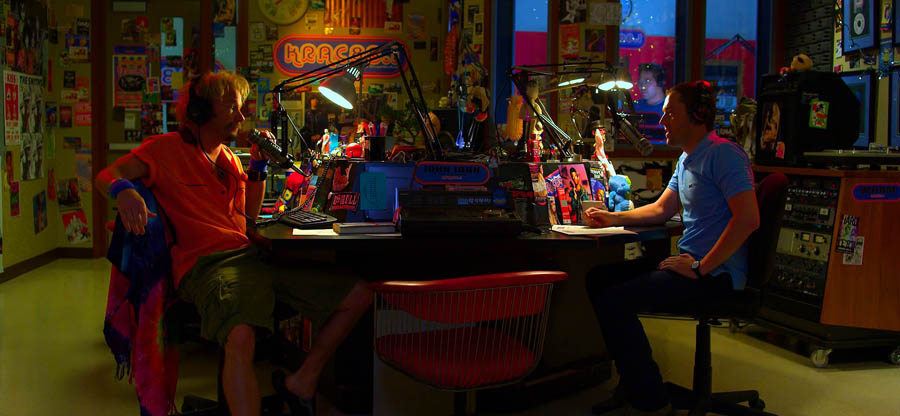
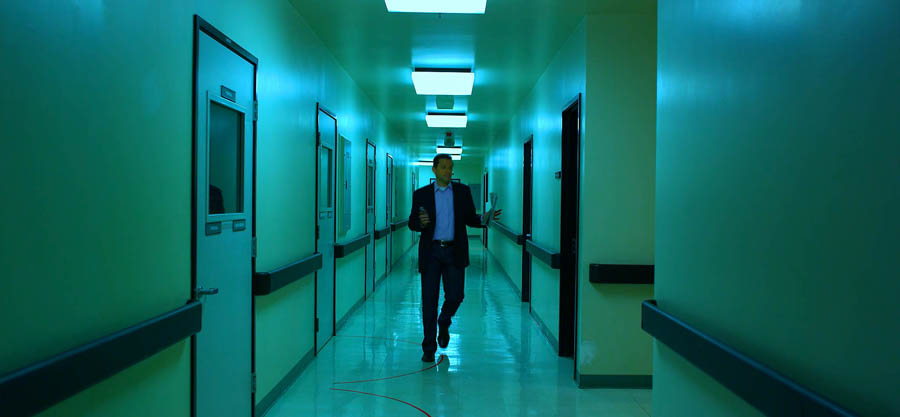
On Day One, we created a local radio station inside one of the rooms in the high school, which I lit with a mix of tungsten practical lamps and color accents (some red hairlight, cooler fluorescents contrasting with the warm tungsten, etc.) We also did a location move in the afternoon to a nearby chemical lab building which could double as a hospital. I let the main hallway be a very strong cyan from the overhead fluorescents but I lit the connecting rooms in tungsten. In a day scene in one hospital room, I had a half-orange light coming through a window flat we added to the larger room.
Then we came back to the school for the next six days. Some rooms had such small windows that I had to keep to the basic overhead fluorescent look (with the tubes swapped out to daylight-balanced ones), augmented in closer shots with Kinos or by bouncing an HMI Source-4 off of the ceiling.
But on our fifth day, we had a big prom scene in the gymnasium, perhaps one of our biggest and most expensive lighting set-ups for the whole movie. Skipping “Manure”, this was the third movie in a row I’ve done with a prom dance in a gym to light (“Assassination of a High School President” and “Jennifer’s Body” had one) and they are never easy – you can’t really use the overhead metal halide fixtures in these spaces for a dance. We hung about 40 PARCAN’s for the dance area, plus four HMI Source-4’s pointed into a mirror ball, a 1200w HMI follow-spot, two MAC lights, and a stage for a band with rows of PARCAN’s mounted to a truss. In “Assassination” I ended up, in the last minute, bouncing an HMI Source-4 off of the ceiling of the gym to bring up the general ambience, since the overhead PARCAN’s are quite spotty. And I had to use extras to hide the stand for that Source-4 in the middle of the dance floor. So for this movie, I added eight Chinese Lanterns to the overhead grid, with blue photofloods inside them to create a cool ambient fill for the room. I used Chinese Lanterns because I figured they might look better if seen on camera compared to some other soft units up there.
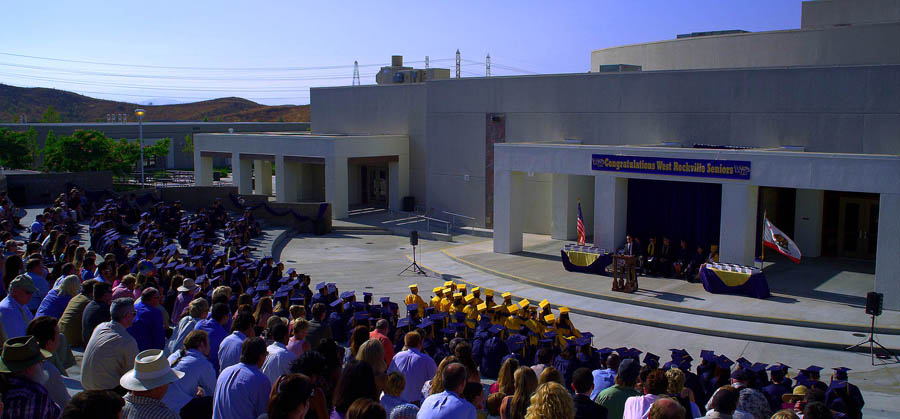
The following day we shot the graduation scene in an outdoor amphitheatre, and the day after that, having cleared out the gym, we shot a pep rally under the normal overhead metal halides.
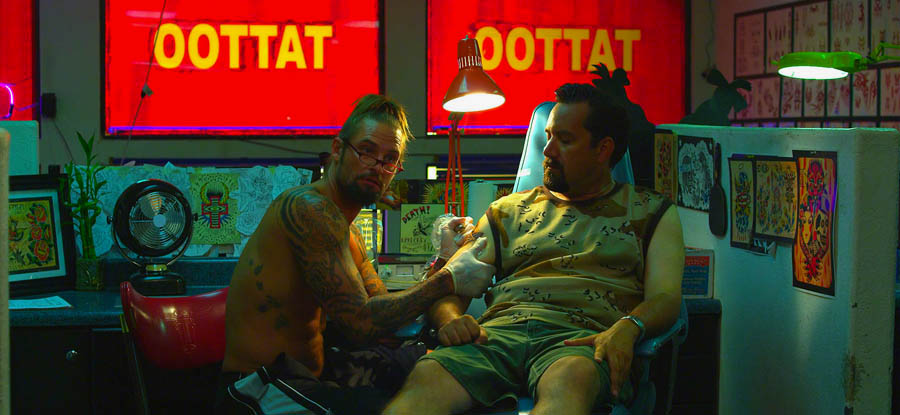
At the end of Week Two, which was Day Eight (we started Week One on a Wednesday), we had finished with the school and we beginning our scattered location work. Day Eight was spent at a local IHOP restaurant, with a stakebed move down the block to shoot one small scene in a tattoo parlor. Again, Production Designer Clark Hunter and I kept looking for ways to add more color to these locations. The tattoo parlor was basically a big white box with overhead fluorescents, not some black-painted neon-sign-lit funky place like you’d expect. We also had to deal with a big set of windows at one end of the room for a scene that would be shot from sunset into night for a day scene. So Clark suggested that he paint the top row of windows with letters on a color background so that I could backlight the paint and bathe the back end of the shot in colored light. That worked quite well. The back windows were mainly painted red and yellow, so I added cyan gel to the overhead Cool White fluorescents to provide an overall soft cyan ambience. Then I used a tungsten desklamp to light the foreground work stations.
I won’t be able to post many photos on this one as the last one, but I’ll show you a few actual RED frames (reduced in size and compressed as JPEG’s for the web) to give you some sense of the color approach of this movie.
I just finished the first eight days of “Stay Cool”, my sixth feature for the Polish Brothers. We started shooting just two weeks after wrapping out fifth feature together, “Manure”. This new movie is much smaller in scale, a romantic comedy about a writer (Mark Polish) with a successful pop novel about high school life to his credit returning to the scene of the crime, so to speak: his home town and high school, to give a graduation commencement speech. He hooks up with old friends and rivalries and finds himself re-experiencing all the pains of his high school years.
We are using the same three RED cameras that were bought for “Manure”, with the same Zeiss Ultra Primes and Angenieux Optimo zooms rented from The Camera House, and PlasterCity Digital again doing the dailies work. The budget is smaller on this movie however, and we are mostly shooting on locations in Santa Clarita.
In a complete twist from the soft, diffused, brown palette of “Manure”, this movie is being shot in a sharp, colorful style, sort of a pop art modernist feeling to the suburban locations.
We decided to update the cameras to Build 16 despite it still being in beta status at the time – it seemed to have stabilized the week before we began shooting so we decided to take a chance. This movie will have a number of low-light scenes and I needed to be able to push an underexposed image around, so the lower noise floor from Build 16 seemed like a good match.
I only had a day to shoot any tests of Build 16, mainly to look at the noise when rating the camera at higher ASA’s. Besides shooting some charts at different speeds, I took a camera out on the road – along with some T/1.3 Zeiss Master Primes -- at night to shoot some residential streets only lit by their sodium streetlamp fixtures.
I digitally projected the tests at 2K in the D.I. theater at PlasterCity Digital the next day. I found the increase in noise at higher ASA ratings to be fairly mild unless you tried to lift up low-end detail buried in the shadows. But the highlights and midtones were quite clean even at 800 ASA. There was enough exposure at T/1.3, 24 fps, 1/48th shutter, 800 ASA rating, to shoot by available light as long as there was a streetlamp right in that spot. Further away, the light levels fell off dramatically. The image was nice and clean and the sodium streetlamp color was closer to how it looks to you eye (orange-ish) compared to that reddish look created in some Sony HD cameras when shooting sodium streetlamps.
I did discover that no matter what frame rate or shutter speed I tried to select, there is a limit of 1/24th of a second for the longest exposure time per frame, so you can’t just go to 8 fps, for example, with the shutter off, to get nighttime landscapes exposed at 1/8th of a second per frame.
We spent the first seven days of the feature at West Ranch High School in Valencia. It was just built three years ago, so we decided that instead of the character seeing his old familiar building, he would discover that his high school had been demolished and replaced by a new structure, with fragments ala the Berlin Wall placed around campus as decorations.
This location is mainly fluorescent-lit and stark, so we had to find ways of adding color to these spaces.
On Day One, we created a local radio station inside one of the rooms in the high school, which I lit with a mix of tungsten practical lamps and color accents (some red hairlight, cooler fluorescents contrasting with the warm tungsten, etc.) We also did a location move in the afternoon to a nearby chemical lab building which could double as a hospital. I let the main hallway be a very strong cyan from the overhead fluorescents but I lit the connecting rooms in tungsten. In a day scene in one hospital room, I had a half-orange light coming through a window flat we added to the larger room.
Then we came back to the school for the next six days. Some rooms had such small windows that I had to keep to the basic overhead fluorescent look (with the tubes swapped out to daylight-balanced ones), augmented in closer shots with Kinos or by bouncing an HMI Source-4 off of the ceiling.
But on our fifth day, we had a big prom scene in the gymnasium, perhaps one of our biggest and most expensive lighting set-ups for the whole movie. Skipping “Manure”, this was the third movie in a row I’ve done with a prom dance in a gym to light (“Assassination of a High School President” and “Jennifer’s Body” had one) and they are never easy – you can’t really use the overhead metal halide fixtures in these spaces for a dance. We hung about 40 PARCAN’s for the dance area, plus four HMI Source-4’s pointed into a mirror ball, a 1200w HMI follow-spot, two MAC lights, and a stage for a band with rows of PARCAN’s mounted to a truss. In “Assassination” I ended up, in the last minute, bouncing an HMI Source-4 off of the ceiling of the gym to bring up the general ambience, since the overhead PARCAN’s are quite spotty. And I had to use extras to hide the stand for that Source-4 in the middle of the dance floor. So for this movie, I added eight Chinese Lanterns to the overhead grid, with blue photofloods inside them to create a cool ambient fill for the room. I used Chinese Lanterns because I figured they might look better if seen on camera compared to some other soft units up there.
The following day we shot the graduation scene in an outdoor amphitheatre, and the day after that, having cleared out the gym, we shot a pep rally under the normal overhead metal halides.
At the end of Week Two, which was Day Eight (we started Week One on a Wednesday), we had finished with the school and we beginning our scattered location work. Day Eight was spent at a local IHOP restaurant, with a stakebed move down the block to shoot one small scene in a tattoo parlor. Again, Production Designer Clark Hunter and I kept looking for ways to add more color to these locations. The tattoo parlor was basically a big white box with overhead fluorescents, not some black-painted neon-sign-lit funky place like you’d expect. We also had to deal with a big set of windows at one end of the room for a scene that would be shot from sunset into night for a day scene. So Clark suggested that he paint the top row of windows with letters on a color background so that I could backlight the paint and bathe the back end of the shot in colored light. That worked quite well. The back windows were mainly painted red and yellow, so I added cyan gel to the overhead Cool White fluorescents to provide an overall soft cyan ambience. Then I used a tungsten desklamp to light the foreground work stations.
I won’t be able to post many photos on this one as the last one, but I’ll show you a few actual RED frames (reduced in size and compressed as JPEG’s for the web) to give you some sense of the color approach of this movie.


 h34r:
h34r: