Welcome to our community

Be a part of something great, join today!

  • Hey all, just changed over the backend after 15 years I figured time to give it a bit of an update, its probably gonna be a bit weird for most of you and i am sure there is a few bugs to work out but it should kinda work the same as before... hopefully :)

Shooting Dark Scenes

RJ_Ortiz

Well-known member
Joined
Jun 8, 2009
Messages
229
Reaction score
0
Points
0
Location
North AL
Hey Everyone,

I've been itching to try some darker cinematography lately. This is an area I don't have a lot of experience in.

I would love to achieve a look like this: https://vimeo.com/219399361

Clean blacks/shadows and soft light wraps. Reminds me of the modern-horror aesthetic. I'm assuming to achieve a clean look like this, you cannot starve the sensor for light and must rate the iso to maintain DR in the shadows. What's throwing me off is that the final look is so controlled that it really doesn't look like they blasted tons light into the scene. How are they achieving this look? Low ISO, fast glass, good amount of light, and lots of modifiers?

Can anyone with experience in darker cinematography "shed some light" on this for me? :)

Thanks!
 
Now I'm not an expert or anything, but this looks fairly straightforward. Not easy, but straightforward. You start with very dim set, then apply directional lights where you want them. The brighter the lights are, the more contrast the highlights will be from the shadows. So you'd want enough to give the reading you want on your lowest ISO. Basically this is an example of low key lighting.

But the main ingredient is to start with a dim or dark set. That's very important. If your set isn't dark, you might have to use stronger lights, which might be a problem because the light could easily spill and bounce around the set, which would again kill the effect.
 
For noise free dark scenes the same rules apply, stay close to Base iso, watch the histogram expose to the right. If you have strong natural light or windows, bring nd or black fabric. I did an ad in a maroccan villa a few weeks ago, where I added a curve in the camera settings to send a darker slightly brown image to all monitors for the client while the sensor still has enough light. The camera curves can be tweaked on set and switched on and off in cine x or resolve to give the colonist an idea of what was seen on set but start his grade with a clean and neutral image. The colorist was surprised how clean the final dark frames from my Scarlet-W were...
 
This also looks to have a pretty heavy color grade, so I suspect the scene was lit more than it looks and the post work made it so nice.
 
I'm always impressed with shows like Walking Dead and how they create the "illusion" of darkness without winding up with a dense, crushed, muddy image.

A lot of it to me is to create a set that has pockets of light and shadow, even a little fill, so it's not just completely black. Make sure all the actors have an eyelight, and I think a little backlight (even blue "moonlight") is helpful to distinguish where their body ends and the background begins.

The American Cinematographer Manual has some good tips on night/dark/horror lighting:

https://www.amazon.com/American-Cinematographer-Manual-10TH-Michael/dp/1467568309

as does Chris Malkiewicz and David Mullen's book Cinematography:

https://www.amazon.com/Cinematograp...t_paperback?_encoding=UTF8&me=&qid=1553237579

Remember the most important mantra: shoot tests to figure out what your usable range will be in post. And be aware of the tradeoffs between exposure and noise. I also think for horror, you have to throw out the rules for plausible source lighting and just make the people's faces visible to the point where their character and emotions can be seen. I worked on Lost on and off for four years, and I learned a lot of lessons from DP John Bartley, who did an incredible job convincing the audience that we were on an island where the only source lighting at night was fire torches, campfires, and moonlight. But it was never, ever dark & muddy.
 
IMHO, i've always found it better to not have a dim set, not dim to the eyes because light bounces more readily. Instead it's about relative contrast. So take a baseline with ambience and lower the ISO/aperture/ND it to get your own black base line and then light ontop of that. To your eye it will be too bright but on camera you have more control. I just think trying to shoot what your eye sees doesn't always work. Of course if you are lighting that scene using mobile phone screens or candles or light sources that have a certain level that may not always be possible, but if you're lighting with proper lights i think the approach gives more control and the reach of the lights is more defined.

cheers
Paul
 
Finding the right level of dark

Finding the right level of dark

The faculty member that teaches lighting design at UNCSA's School of Design and Production once told me "it really takes a lot of light to make a scene look dark"

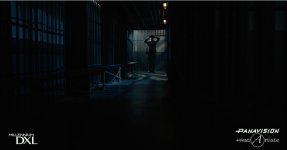
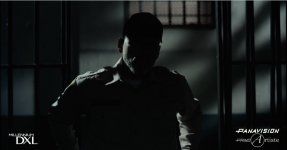
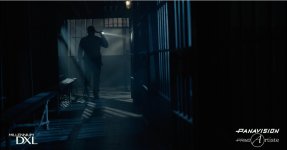
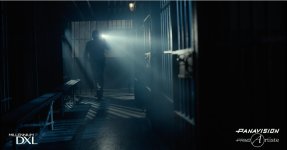
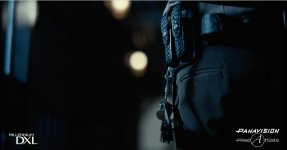
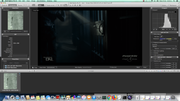
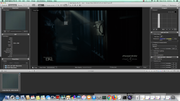
Drilling deeper into the question here, however, I snapped 6 screenshots from the start of the sample (limitations of the forum mean I can only attach 5 to this post...and 5 will do to prove the point). I suggest using a waveform scope to look at what you see (don't be distracted by the whites of Millennium DXL and PANAVISION logos). The 4th image tells me that this is the frame around which all decisions are made, because it has the full contrast range of the light from the flashlight cutting through the haze to the darkness of the guard's silhouette. Once you know where your flashlight beam is going to land (brightest to darkest), you can build the rest of the lighting plan around that. But composition is important, too: notice how the dim light of the entryway is darker than the bright rays cast in the haze close to the head of the flashlight, whereas when the flashlight beam gets dimmer, it's the reflection of the flashlight's beam off the dark bars that light up against the much darker background? That's great composition, not just good lighting.

The second image (sidelit profile of guard) shows that yes, there should be some reasonable bright spots to create definition in a dark scene. Without the bright light exciting the shoulder, the cheek, etc., the scene would just look dark and dead. Ditto the 5th image. The specular reflections off the guard's leather holsters give the eye something to grab onto, allowing the rest of the scene to look dark. If not for these meaningful bright elements (not just the brightness of a practical light that seems to illuminate nothing), our eyes would level down to whatever the average darkness is and send the brain the message "that scene's not lit very well!"

With a small amount of well-lit information, large swaths of darkness can be very evocative.
 

Attachments

  • Dark1.jpg
    Dark1.jpg
    60.8 KB · Views: 0
  • Dark2.jpg
    Dark2.jpg
    68.8 KB · Views: 0
  • Dark3.jpg
    Dark3.jpg
    76 KB · Views: 0
  • Dark4.jpg
    Dark4.jpg
    82.1 KB · Views: 0
  • Dark5.jpg
    Dark5.jpg
    68.5 KB · Views: 0
You are all awesome for sharing what you know. I'm going to soak up as much of this as I can and do some practice shots soon to see if I can get a feel for this type of lighting. Hoping this helps other people that are interested in this type of cinematography. Thanks!
 
BTW, I also just caught the Netflix show Haunting of Hill House, which is absolutely scary as hell and also extraordinarily well-lit. They did dark scenes about as well as I've ever seen, just amazing stuff. And there are moments where you just barely see something in the background, and then you start realizing what it is and it scares the F outta you. The DP was Michael Fimognari and the colorist was Jill Bogdanowicz over at Company 3/Santa Monica. Really great look.
 
So im still a bit confused.
Looking at the video, they exposed for the highlights (flashlight).
So, how bright would that jail cell would have been normally? Seems like it must be fairly bright to the eye to have to expose for that flashlight
 
So im still a bit confused.
Looking at the video, they exposed for the highlights (flashlight).
So, how bright would that jail cell would have been normally? Seems like it must be fairly bright to the eye to have to expose for that flashlight

Well, let's reset, and forget everything you've read so far. This is what you have: an apparently dark room, lit mostly by what seem to be diffused lights out of frame, and the flashlight is either correctly exposed or slightly over. Conclusion: the flashlight is giving off more light than the ambient light in the room.

So, how do you do this? Well, multiple ways. What really matters is this: the difference between the ambient exposure and the flashlight exposure. You can have a bright, evenly lit room, plus a very bright flashlight. Or, you can have a dim room with a weak flashlight. The former situation is preferable, because it allows you to use a lower ISO.

How I would do it: measure the correct exposure for the room (the highlights, not the shadows). Find a flashlight that can give up to three times more light (i.e. that would require up to three stops down from the room). Then, play with the differences. What does the scene look like:

- when the room is one stop under, and the torch is correct?
- when the room is two stops under, and the torch is correct?
- when the room is three stops under, and the torch is correct?

Using a histogram, I'd say that the difference is 2.6 stops (reflective). Screenshots:


Of course, let's remember that the exposure for the flashlight will never be precise, because the talent is moving it around a lot, and it's never going to be an exact distance from the subject.

A hazer probably was used here, I'd say.

Edit: You can do an experiment with nothing but a consistently lit room and a flashlight. Learning by doing is the best way to learn anything.
 
Cool. That's what I thought, was just double checking :)

I've worked on a lot of big shows where they don't light at all and would just use a flashlight. I keep asking, how can they shoot this without creating so much noise? Sure, it would be a good camera, but still.
Lighting the room to a set ambient would be more expensive but more ideal for controlling the noise levels (assuming that it is already dark in the first place).
 
It boils down to picking an ISO rating that gives you a base noise level that are happy with, along with a display LUT that gives you a black level you like, then light for the mood you want AND DON’T CHANGE YOUR MIND IN POST and try to lighten the shadows. LIGHT for the degree of shadow detail you want, don’t dig for it in post. I don’t think you need to expose everything brightly and bring it down later but if you want to play it safer, lower your ISO so you are giving the sensor more light while still lighting for the mood you want as seen on a good, calibrated monitor. Exposing everything to the right is just going to confuse everyone on set watching the monitor and then in the editing room cutting dailies if the look you intend isn’t visible, unless you have no one to answer to but yourself and can live with the footage looking “wrong” until you color-correct it. But I’d find it very hard to judge my lighting if I’m not exposing it for the intended look.
 
It boils down to picking an ISO rating that gives you a base noise level that are happy with, along with a display LUT that gives you a black level you like, then light for the mood you want AND DON’T CHANGE YOUR MIND IN POST and try to lighten the shadows. LIGHT for the degree of shadow detail you want, don’t dig for it in post. I don’t think you need to expose everything brightly and bring it down later but if you want to play it safer, lower your ISO so you are giving the sensor more light while still lighting for the mood you want as seen on a good, calibrated monitor. Exposing everything to the right is just going to confuse everyone on set watching the monitor and then in the editing room cutting dailies if the look you intend isn’t visible, unless you have no one to answer to but yourself and can live with the footage looking “wrong” until you color-correct it. But I’d find it very hard to judge my lighting if I’m not exposing it for the intended look.

As usual - this is an A+ answer.

Technically, i would say the usual stuff. A hazer, a large source for softness (8x8 at the minimum) and lots of black fill.
 
This is all great stuff-- and I love the bit from Ron Garcia, thanks for pulling that up.

Can we talk about fill for a moment? It's the ratio of fill to key that really makes this look-- but also the shape of the fill. As mentioned above, you often want a very soft source such as an 8x8-- presumably because you don't want the fill to have much direction ("darkness" shouldn't cast a shadow. Compare to the unnatural shadows in day-for-night sequences in older movies). Similarly, a hazer can diffuse sources and "carries" light, so you get illumination without a sense of direction (as long as you aren't shooting well defined beams of light into it, in which case the opposite happens). In the Panavision short that started the thread, undoubtedly a bunch of the fill simply comes from the hard light sources (which give the shadows from the bars) bouncing off the floor and walls. (And negative fill is flown in to tame it on the silhouette shots.)

What are your favorite techniques for the fill-- especially for low budget projects? Do you tend to go frontal (fill from the camera position), overhead? Is motivation important, e.g. the "moon light" comes in through the window? Do you bounce a light into the ceiling or off a bed sheet?
 
Back
Top