Welcome to our community

Be a part of something great, join today!

  • Hey all, just changed over the backend after 15 years I figured time to give it a bit of an update, its probably gonna be a bit weird for most of you and i am sure there is a few bugs to work out but it should kinda work the same as before... hopefully :)

Premiere to Resolve workflow IPP2

Lucas Wilkinson

Well-known member
Joined
Apr 9, 2014
Messages
92
Reaction score
1
Points
0
Location
Jindabyne, NSW, Australia
I really want to get into using Resolve as my primary grade app. But the workflow from Premiere just seems like a nightmare. I've been going the XML route and when I import I have all sorts of sizing issues. Especially as I have .r3ds, nested sequences and prores video files in the same timeline, is there a way around this? Or should I export the picture lock in prores to Resolve?

Also, IPP2 is a massive hassle. I'ver been trying the global settings and it just doesn't seem to work. I've used the work around with the output transform LUTs, but it's pretty time consuming. Any tips on IPP2 workflow? I've read the threads below and they don't really help with a timeline that has multiple footage sources.
 
Hi Lucas, I just did a test for a show coming in for grading. Edited in Premiere. The AE and editor followed my tips for how to clean up the sequence, how to export it, etc and the test went well in Resolve 15 Studio. We’ll be using a color managed workflow, using IPP2. It’s also got footage ftom GH5 and drone. I will say this, make sure you have handled media properly in Premiere. Everything should have a reel name and if possible unique TC, i.e. try not to have a bunch of clips start at 0:00:00:00. Convert stills to QT movies if possible, especially if you do moves on them. Make an offline reference QT movie to use in Resolve to match any reframes, etc. You can choose to ignore sizing on import to Resolve as well if that is causing issues.

If it’s a very complex timeline, you may run into some challenges but usually doing proper cleanup does the trick for a lot of it. The actual grading I’ll be doing for this 1 hour show will be in February so I’ll have a better idea on unforeseen issues then but feel free to PM if you have questions.
 
Man I know you don't want to hear this but I would just take the plunge and start editing in resolve. It is so convenient to be able to jump back and forth between color and edit if you need to. They really set it up to be a pretty seamless transition for premiere users. Would probably only take you a day to learn it and there are tons of youtube video tutorials.
 
Hi Lucas, I just did a test for a show coming in for grading. Edited in Premiere. The AE and editor followed my tips for how to clean up the sequence, how to export it, etc and the test went well in Resolve 15 Studio. We’ll be using a color managed workflow, using IPP2. It’s also got footage ftom GH5 and drone. I will say this, make sure you have handled media properly in Premiere. Everything should have a reel name and if possible unique TC, i.e. try not to have a bunch of clips start at 0:00:00:00. Convert stills to QT movies if possible, especially if you do moves on them. Make an offline reference QT movie to use in Resolve to match any reframes, etc. You can choose to ignore sizing on import to Resolve as well if that is causing issues.

If it’s a very complex timeline, you may run into some challenges but usually doing proper cleanup does the trick for a lot of it. The actual grading I’ll be doing for this 1 hour show will be in February so I’ll have a better idea on unforeseen issues then but feel free to PM if you have questions.


Thanks for the help. I'm happy to clean it up and prepare everything. I'm just not sure exactly how. Most of the clips are all unique timecode. It's just the nested sequences that I stabilised and stuff like that, they're giving me issues.
 
Thanks for the help. I'm happy to clean it up and prepare everything. I'm just not sure exactly how. Most of the clips are all unique timecode. It's just the nested sequences that I stabilised and stuff like that, they're giving me issues.

In my limited experience so far doing this i've found that

- AAF seems a bit better but when importing i tend to not check sizing and so on
- There's a benefit in cleaning up a timeline in PPro before exporting

But i've been able to bring things across with no problems. I am not handling nested sequences or anything though. Most effects, transitions and graphics won't come through either.

As mentioned above, my aim is to edit in Resolve as well to see if i like that but right now i'm handling some other projects and doing the grade/sound/finish in resolve.

The IPP2 workflow seems fine in resolve. But if you're mixing footage from different sources it's a fair point - if the timeline is set to RWG/LogG10 and you have some 709 footage then not sure how that is handled.

cheers
Paul
 
Lucas and Paul,


To grade different camera footage in the same Rec709 Color Space use Aces.

Edit:

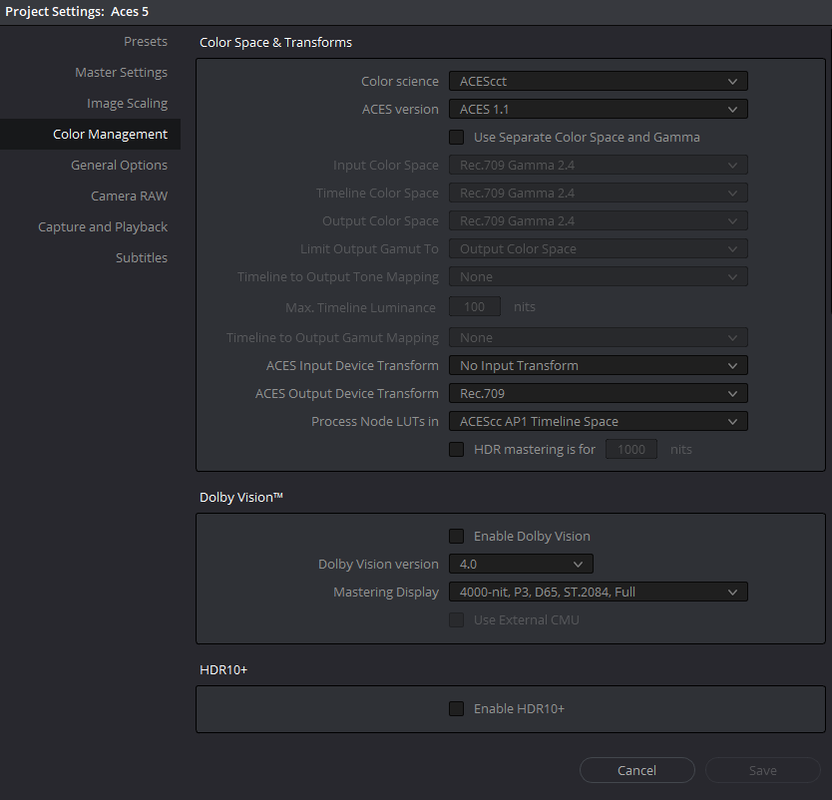
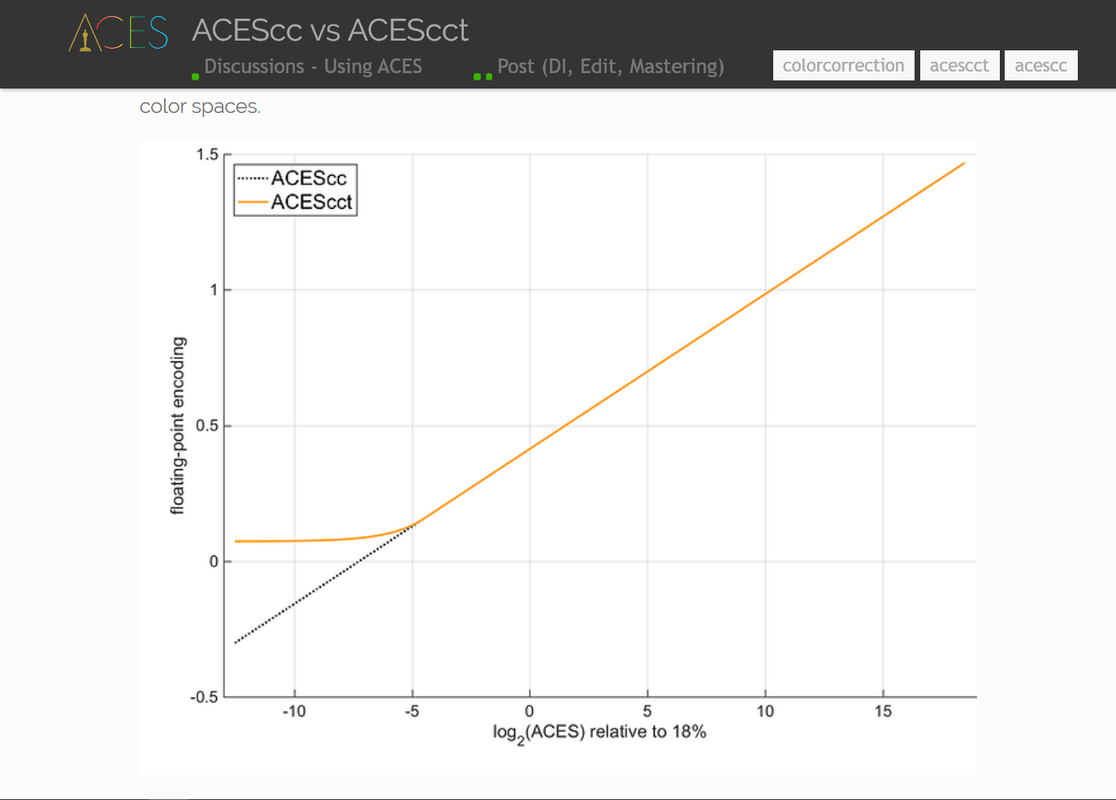
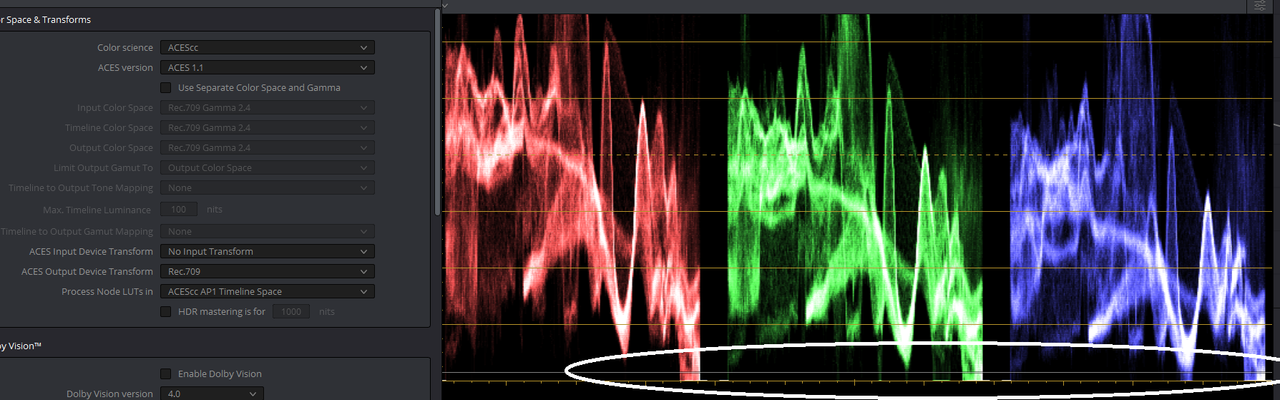
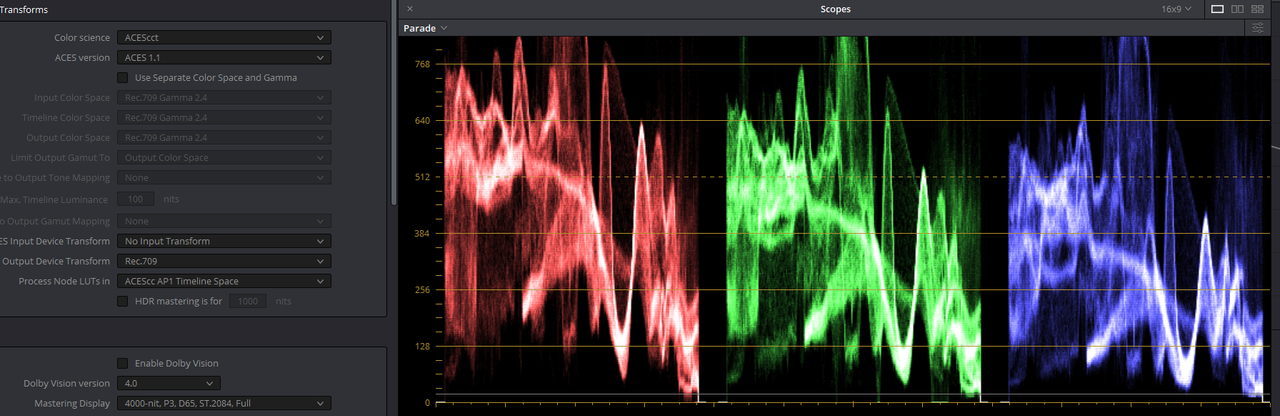
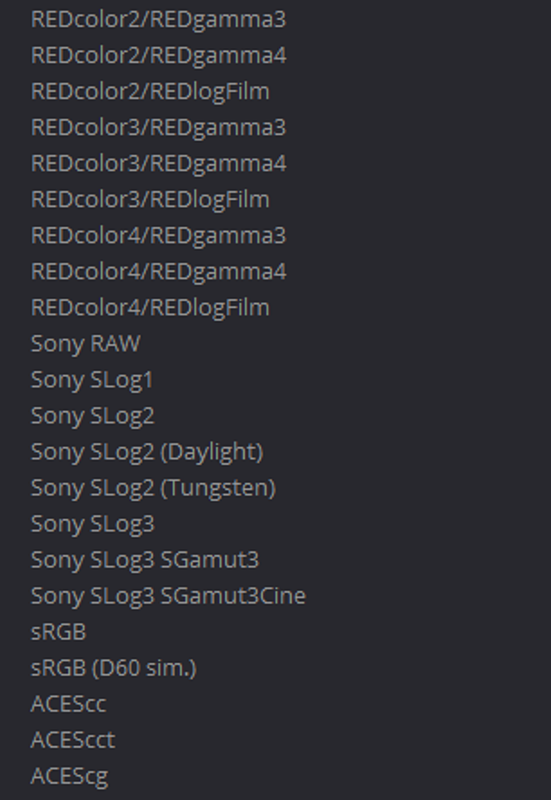
Its probably best to use "ACEScct(Toe)" instead of "ACEScc" for its better "blacks" Roll-Off

Screenshot-781.png


Screenshot-778.png


ACEScc Blacks


Screenshot-779.png


ACEScct Blacks


Screenshot-780.png


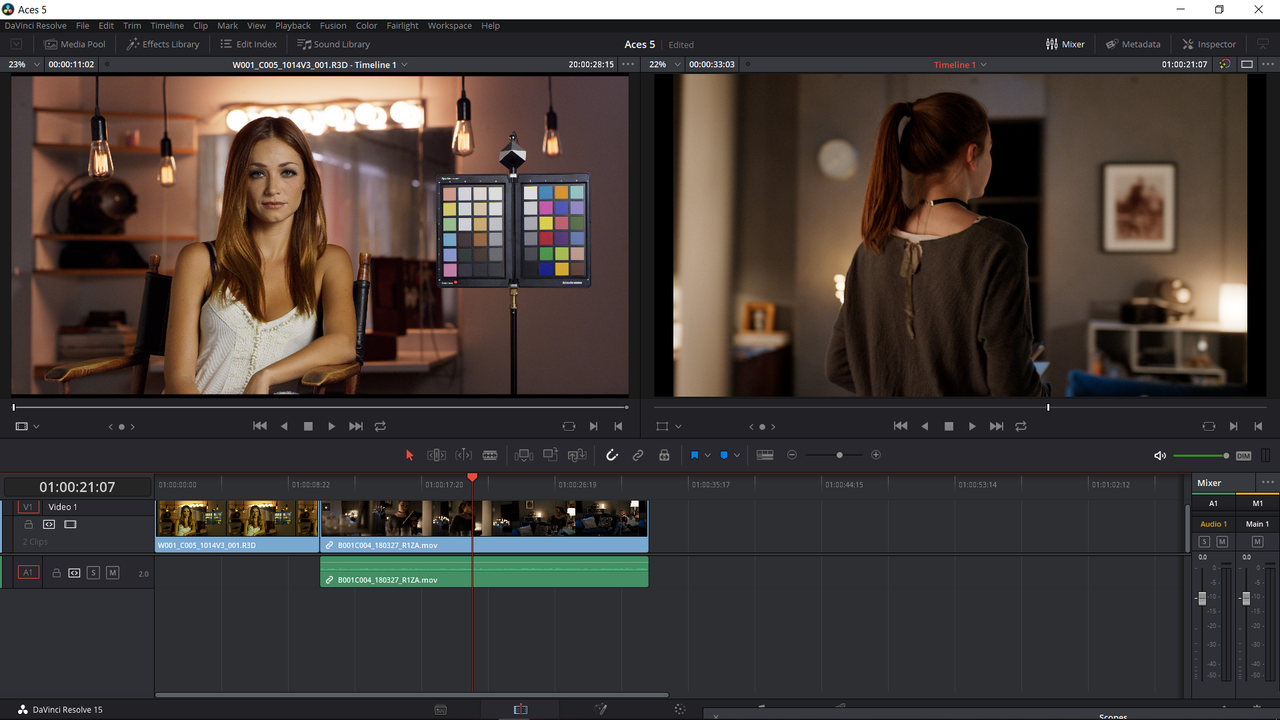
Here is a Red Raw .R3D file(Left Window) automatically transformed in Resolve. I used an "Alexa" "ACES input Transform" for the Alexa LF ProRes File(Right Window).

Screenshot-774.png


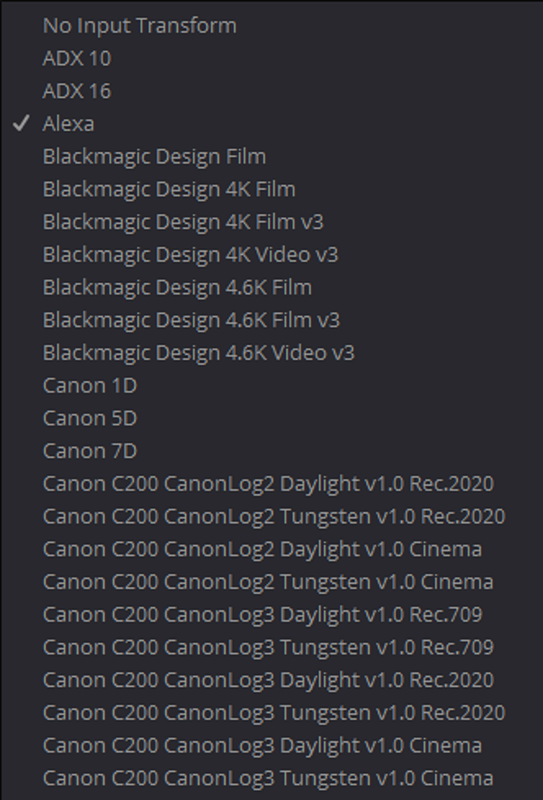
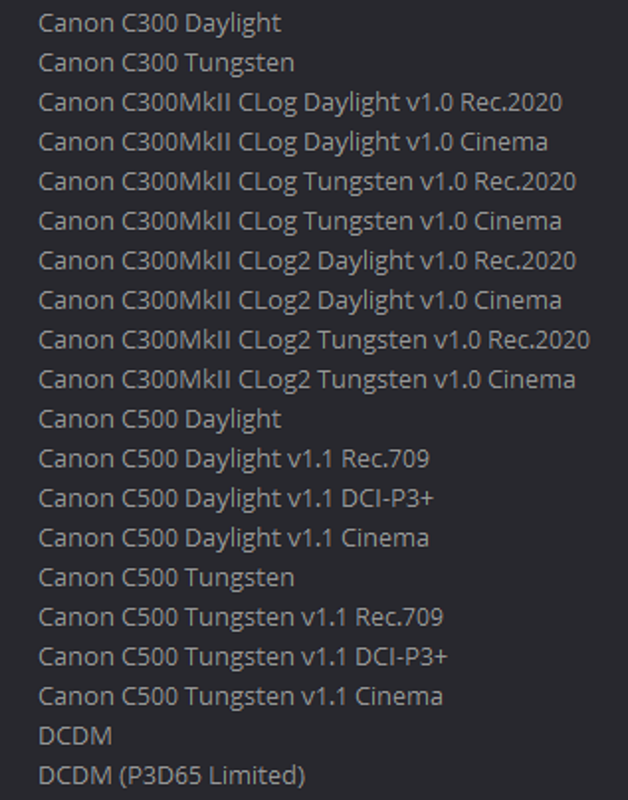
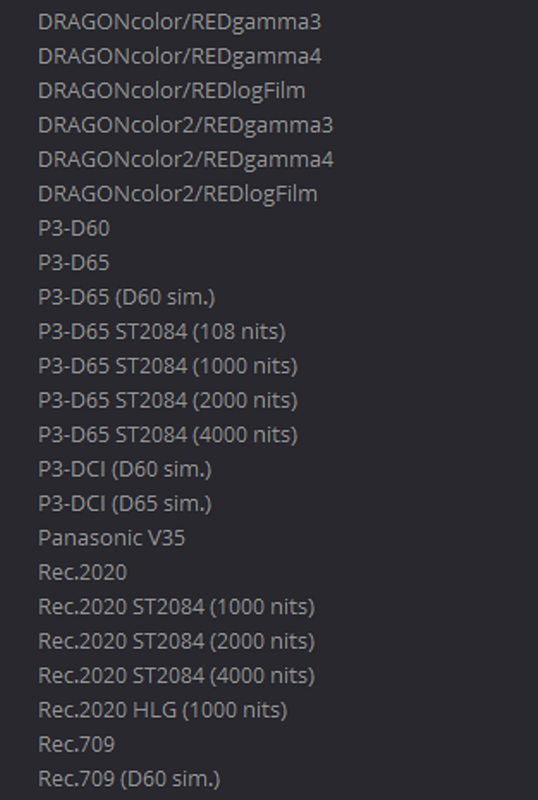
All Current "ACES Input Transforms" in Davinci Resolve Studio/Free(I Think) 15.2.2 for "None Raw files"


Screenshot-782-2.png


Screenshot-782-3.png


Screenshot-783-1.png


Screenshot-783-2.png
 
Last edited:
Lucas and Paul,


To grade different camera footage in the same Rec709 Color Space use Aces.

Interesting but not convinced about that.

I don't see a 'proper' linear way to get into ACES from Red in Resolve. Pretending it's Alexa will give you an image but i'm concerned that it's not scene linear. In my case i wrote some code to help balance exposure in a particular situation frame by frame and i need to know footage is real scene linear for that to work, no roll offs on my raw footage

I would have thought resolve could tag a 709 piece of footage in a RWG timeline and perform a mapping on it into RWG. If not then it could be done manually. Something for me to test a bit later.

I've also seen some odd results with ACES and Red, clipping and so on.

I think if you're doing a Red show then timeline in RWG is the way to go?

cheers
Paul
 
Paul,

I believe you have misunderstood my post. The Alexa ACES input transform was for the ProRes Alexa LF footage . ACES automatically knows how to properly Tranform the Raw footage from the different camera companies. You don't even get an option of what ACES input transform you want to use with the raw files from the different camera companies. You will get an ACES input transform option with say footage shot in ProRes, DNxHD/HR.....etc.ACES and RWG/Log3G10 are not compatible Color Spaces. So if you want to use Red footage shot in ProRes or DNxHD/HR in ACES, it will have be in the older Legacy formats. I don't really know how ACES would try to bring in .R3D Raw footage originally shot in the RWG/LOG3G10 color space in one of the newer Red cameras capable of IPP2 in camera .

I will probably try a sample .R3D file from the red.com sample download site, since I don't own a Red Camera, and see if any of those were originally shot with IPP2 in camera instead of transformed Into IPP2 in Redcine-X.
 
Last edited:
It brings in R3D files exactly the same way, regardless of the in camera IPP2 or any other settings, and regardless of the camera used to shoot it. It debayers all RAW footage to linear light and converts that to ACES AP0. The metadata settings are ignored, at least in terms of gamma.
 
It brings in R3D files exactly the same way, regardless of the in camera IPP2 or any other settings, and regardless of the camera used to shoot it. It debayers all RAW footage to linear light and converts that to ACES AP0. The metadata settings are ignored, at least in terms of gamma.

Thanks very much for explaining this!!
 
Last edited:
Thanks for the help. I'm happy to clean it up and prepare everything. I'm just not sure exactly how. Most of the clips are all unique timecode. It's just the nested sequences that I stabilised and stuff like that, they're giving me issues.
You can't transport nested sequences to any edit platform: Resolve, Avid, FCPX, Lightworks, anything.
 
It brings in R3D files exactly the same way, regardless of the in camera IPP2 or any other settings, and regardless of the camera used to shoot it. It debayers all RAW footage to linear light and converts that to ACES AP0. The metadata settings are ignored, at least in terms of gamma.

So if a timeline is set to RWG/LogG10 and an output mapping for IPP2 is added then where is it linear?

I'm used to Nuke where ingest and it's all linear but then you have to manage viewer mappings yourself. You can either keep the Log10 within linear and view through an IPP2 lookup (so this means that anything you do to the image is on LogG10 so not ideal) or you convert it fully into linear space and then convert back to LogG10 at the end.

Does Resolve do the same thing - so when you have footage in Log and a timeline set to Log then the controls are operating on that log image - not some linear internal interpretation? Or is Resolve doing a conversion to scene linear and then out again?

Paul,

I believe you have misunderstood my post. The Alexa ACES input transform was for the ProRes Alexa LF footage . ACES automatically knows how to properly Tranform the Raw footage from the different camera companies. You don't even get an option of what ACES input transform you want to use with

AFAIK and it's something via hearsay more than direct experience is that Red -> ACES in Resolve does not work properly, there were some recent tests on CML and using Red with a 'normal' Resolve ACES workflow clipped files heavily.

cheers
Paul
 
Paul,


Here are my results with .R3D files in Aces


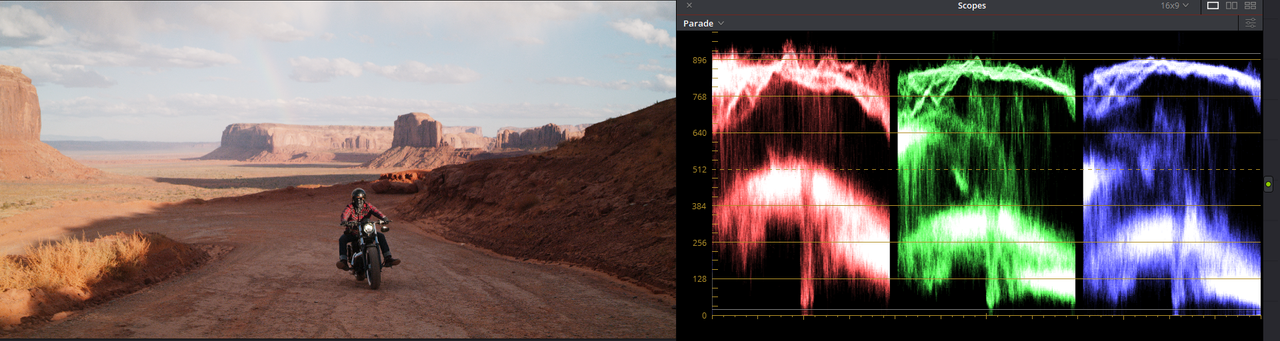
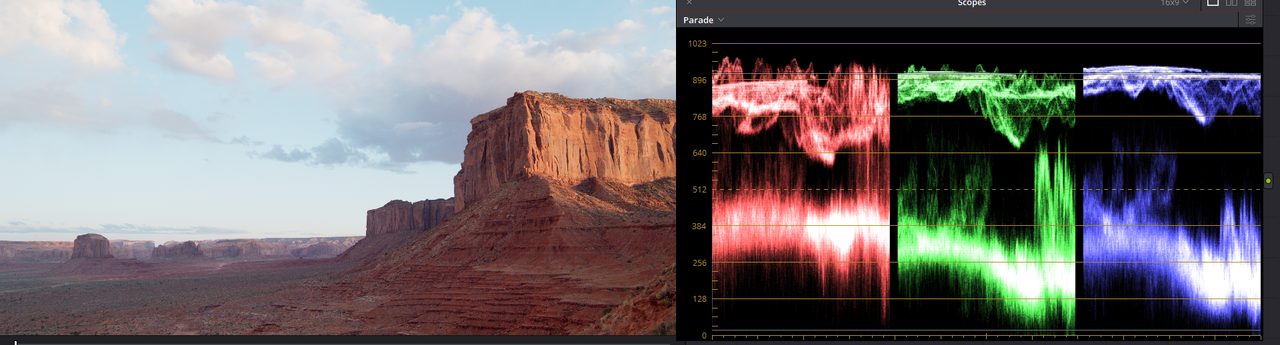
Here are two examples with nothing special added to control highlights. They both stayed at about the 896ish range even after adding some brightness in the Midtones


Screenshot-784.png


Screenshot-785.png


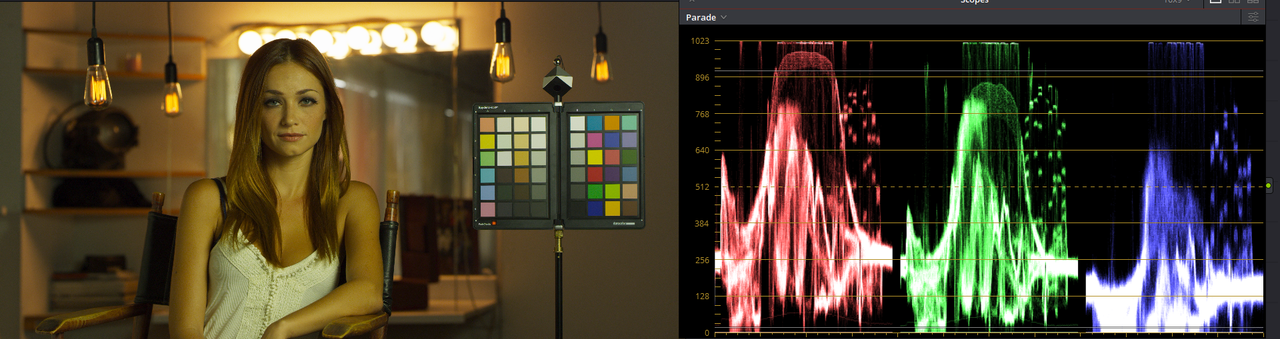
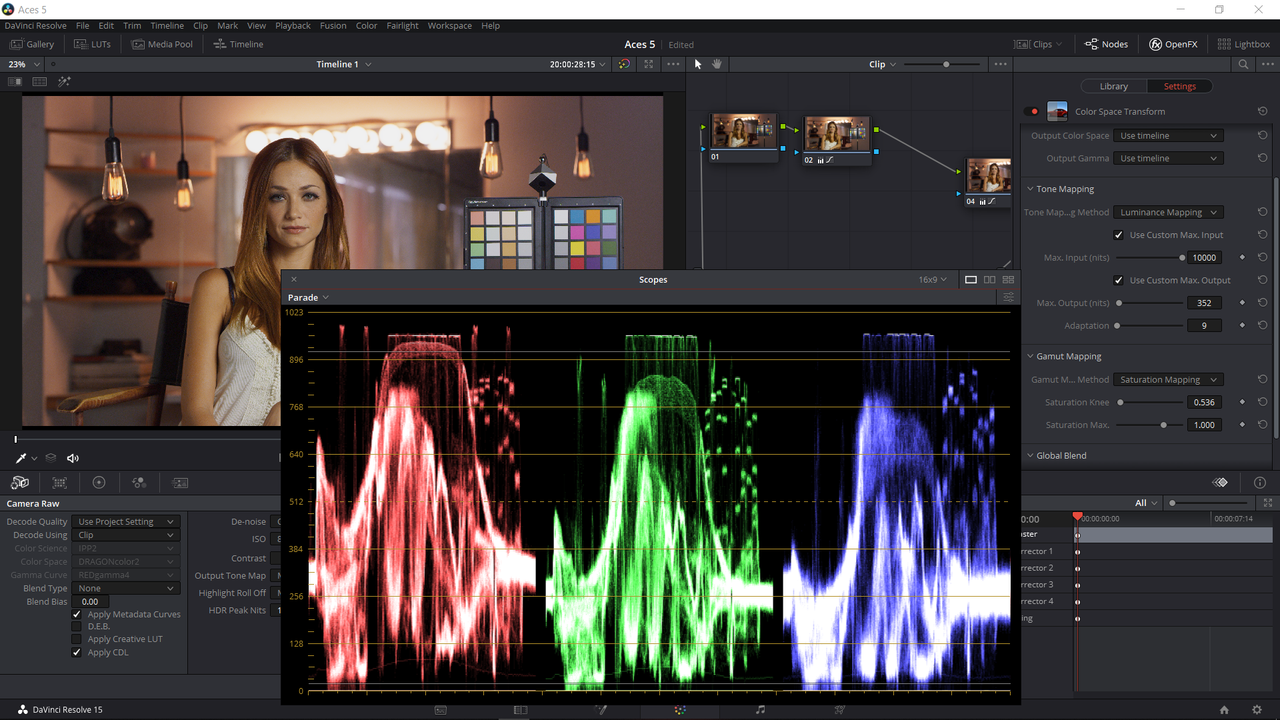
In the next example, I simply had to add an "OFX" "Color Space Transform" to bring in the Highlights a little bit. I didn't really see the highlight clipping/Almost clipping in this image necessarily being a fault of ACES, just the hot vanity mirror lights. The beauty of IPP2 is that Red gives you, in the Output Transform Luts, various Hightlight Roll-Off options that you might not other wise have in other conventional color grading workflows. If you have a timeline of all red footage, I would use either a Resolve Color Managed workflow with "Red Output Gamut Mapping" or an IPP2 workflow adding Output Transform Luts in the Last Node of your grade. I'm only using ACES in these examples to give you another option to possibly choose from to grade footage from different camera companies on the same timeline.


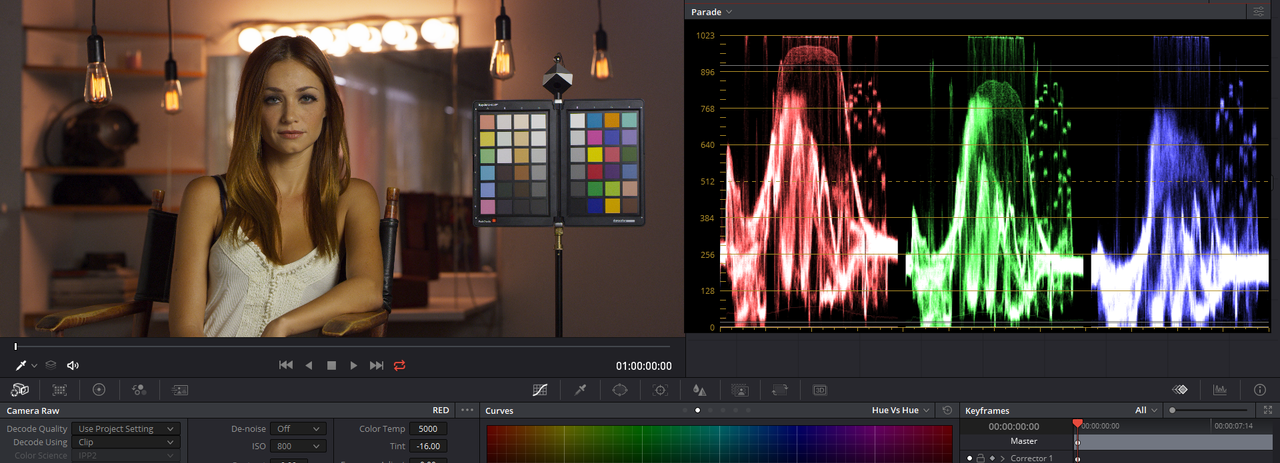
Here is the .R3d brought into resolve with no corrections. The Highlights are already hugging the 1023 IRE mark.

Screenshot-786.png


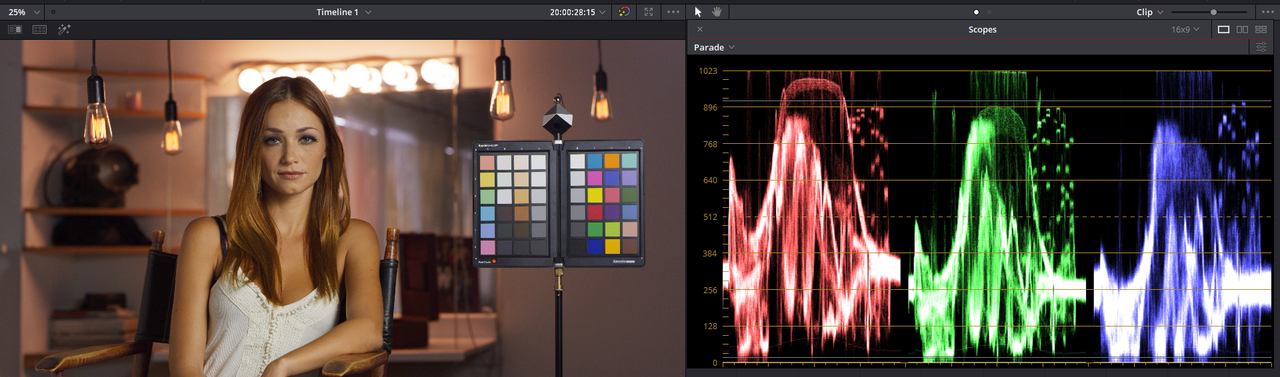
Here I changed the "TEMP" to 5000K and "Tint" to -16.00

Screenshot-787.png


Here where I added a little Midtone Brightness it really took the highlights over.

Screenshot-788.png


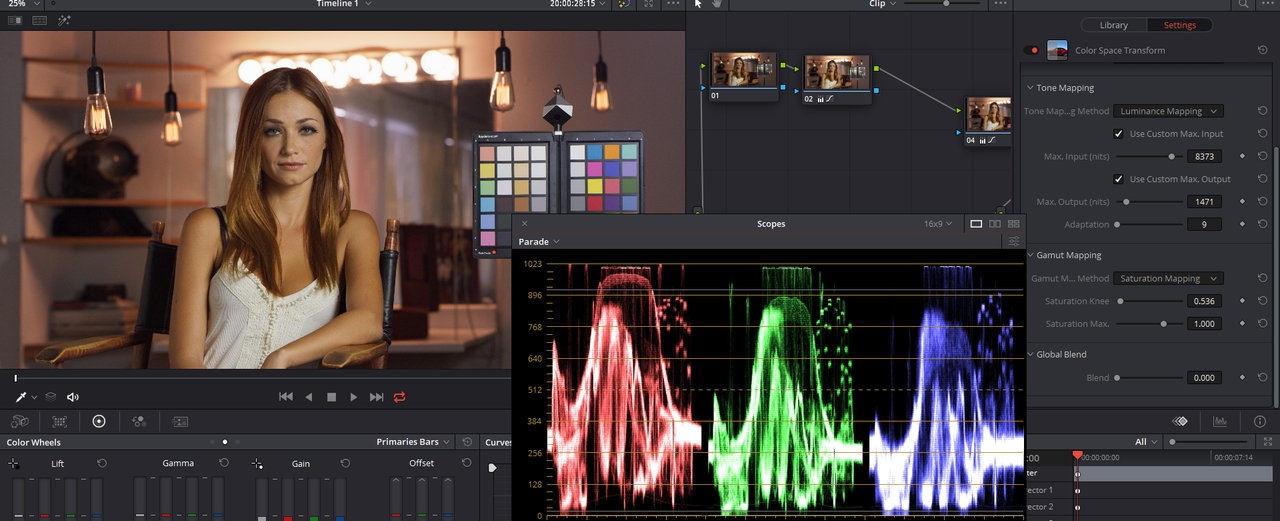
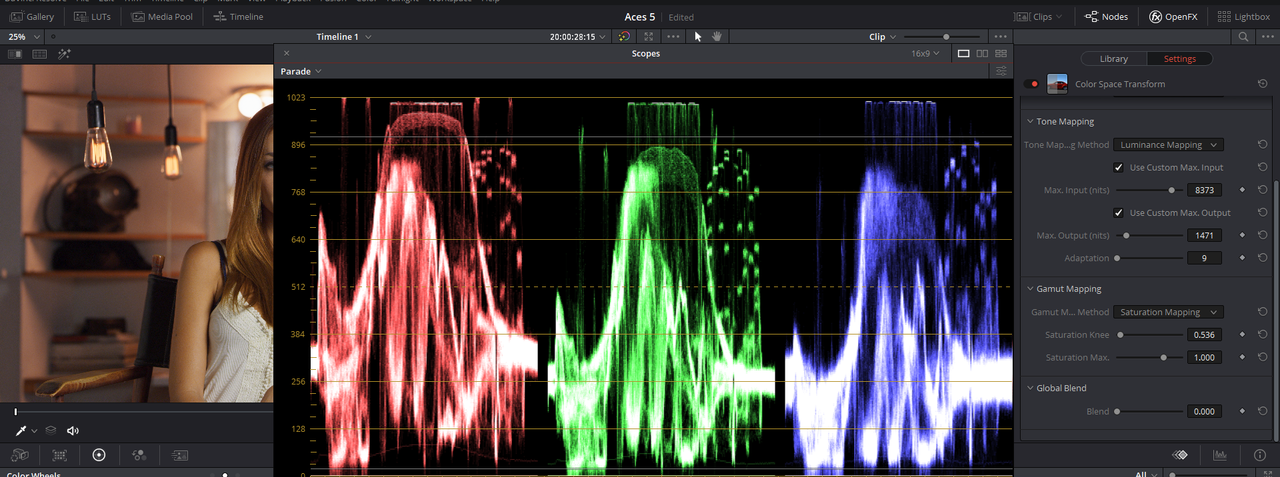
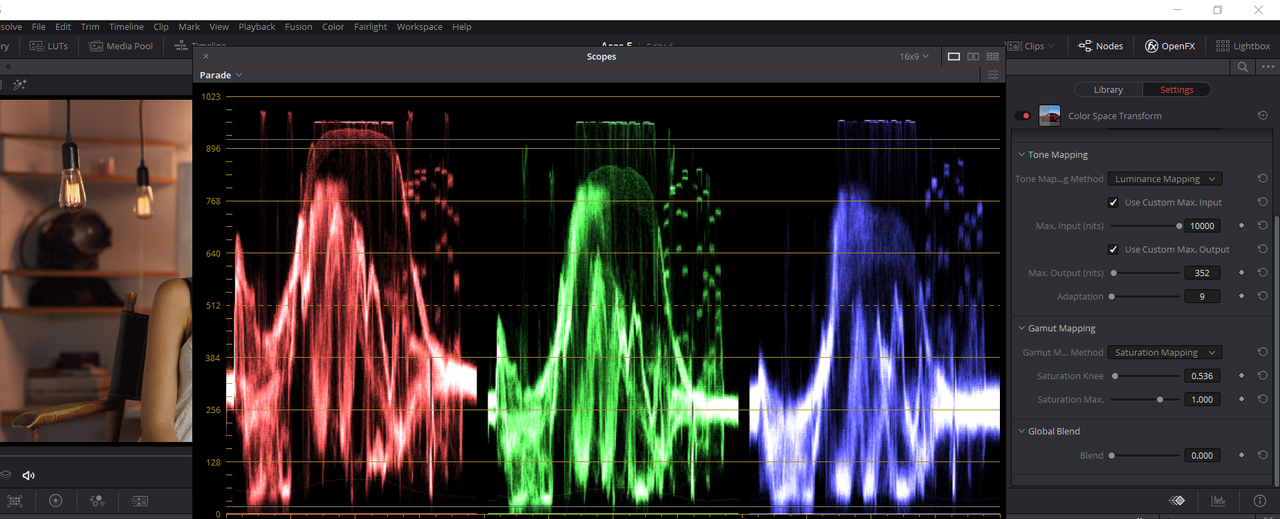
In these last two examples, I used an "OFX" operator "Color Space Transform" and under the "Tone Mapping" setting I used the "Luminance Mapping" and I also chose the "Gamut Mapping" "Saturation Mapping" method to both bring back/ control the highlights and to make sure that no colors went out of range. I could have brought the highlights down more but this was just to give you an example.


Screenshot-789.png


Screenshot-790.png


Highlights further controlled.


Screenshot-792.png


Screenshot-793.png
 
Last edited:
Does anyone have any insight for the best way to work with nested sequences and cmlips I've sent through to After Effects for a round trip back to Premiere? I really want to start doing my entire grade process through Resolve. I just need to know the best way to 'clean up' my Premiere timeline.

Rand - the advice on the colourspace front is invaluable. With regards to IPP2, what's the process for the output transform? Am I still best applying and IPP2 output transform LUT to the final serial node? Or is there a global setting that comes after all the creative grading within the nodes window?
 
Lucas,

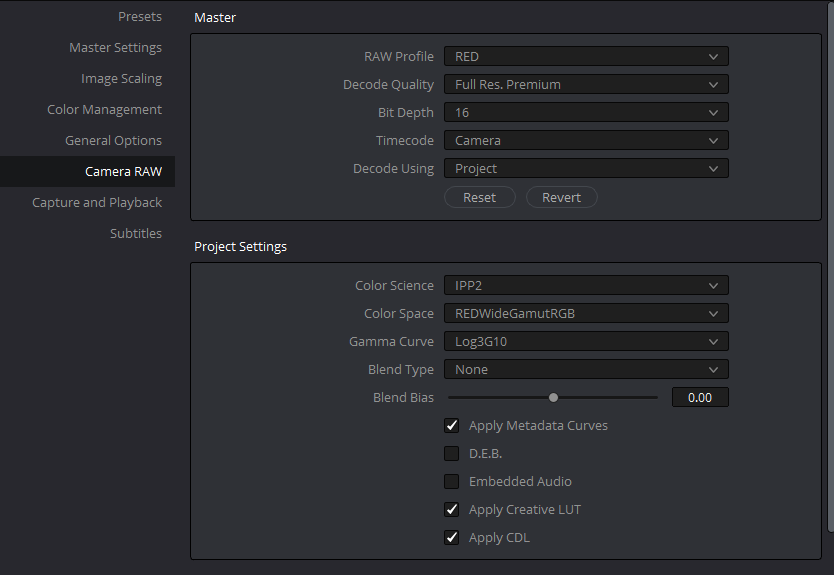
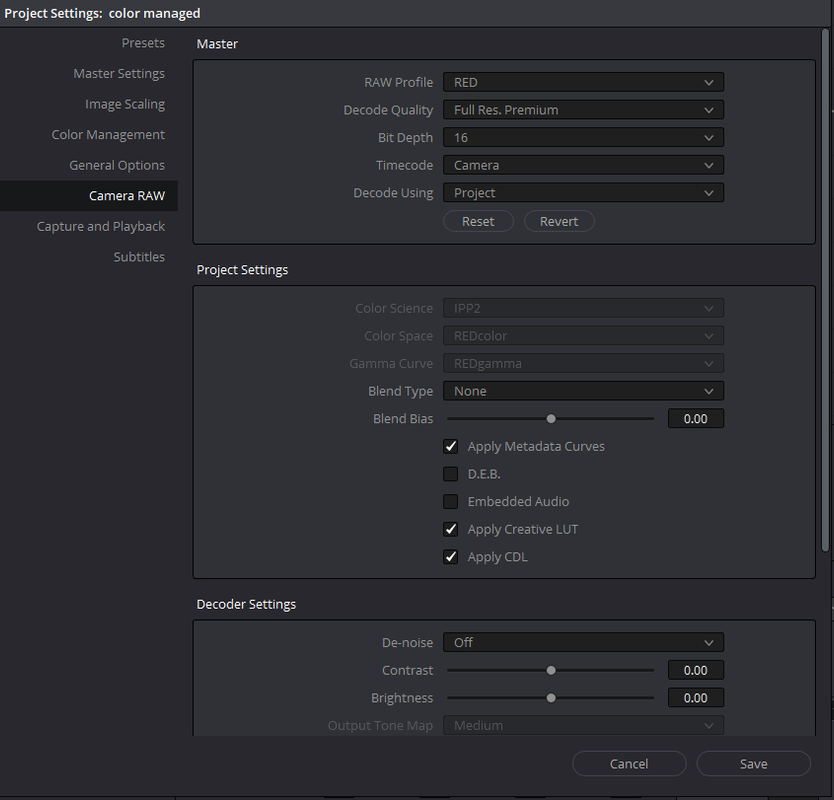
In "Camera Raw" you can use these settings below.


Screenshot-671.png


1) Decode Quality- You can chose a lower quality while you are editing high resolution footage then, Before you export your final edit, change this back to "Full Res. Premium".

2)Apply Metadata Curve-If you want to bring into Resolve a curve you made in Redcine-X or other method.


3)Apply Creative Lut- If you want to bring in a Creative Lut from like Phil Holland's "PhilmColor" Lut Pack you added in Redcine-X.


4) Apply CDL( I believe this was added in Version 15.2)- If you want to bring in the CDL grade from Redcine-X into Resolve


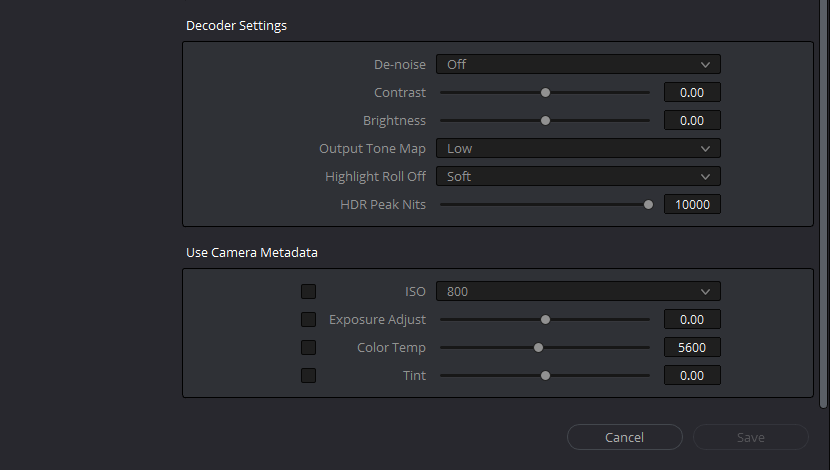
Screenshot-673.png


1)ISO- the default ISO you use most

2)Color Temp- I just leave this at the default 5600K

3)Output Tone Map and Highlight Roll-Off- these will have no affect inside Resolve since you will basically be using Output Transform Luts at the end of your Node chain or a "Color Managed" workflow.


Screenshot-674.png


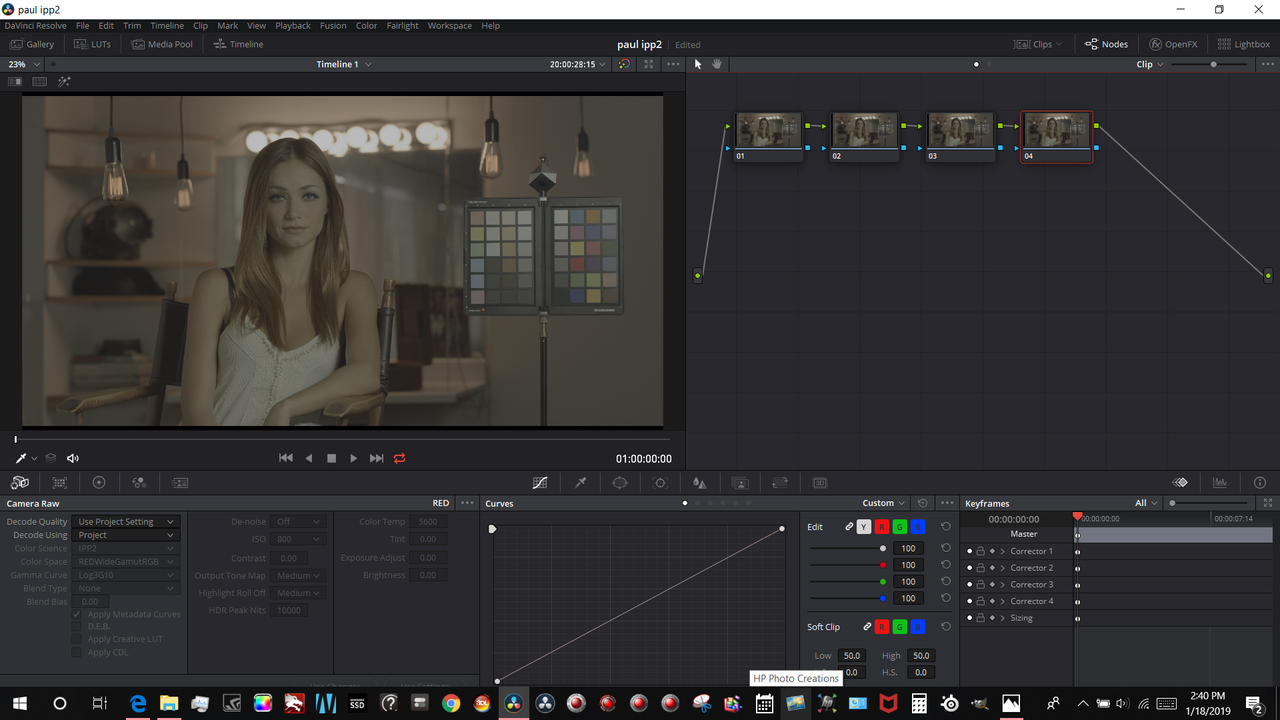
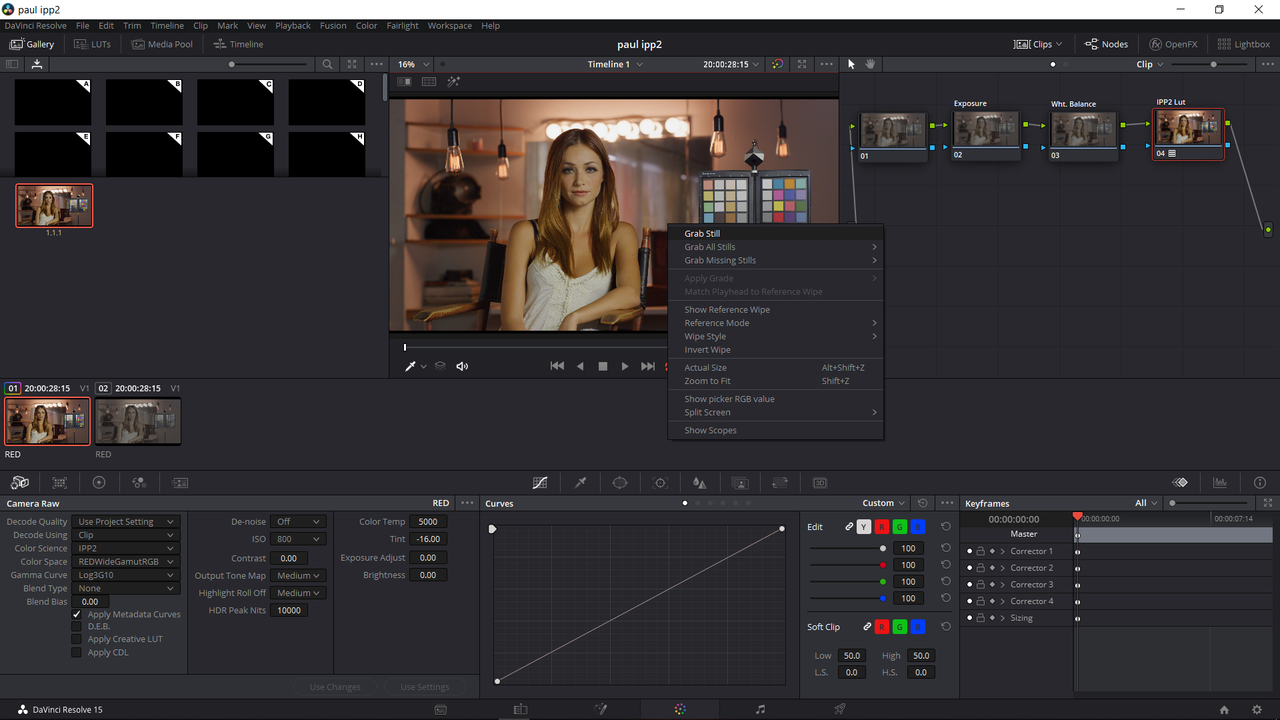
1)Inside Resolve import you clip into the timeline then go to the Color Page. In the screengrab below I disabled the "Clips"View to gain more real estate on the screen. I added 4 blank nodes as a default I will create.

Screenshot-794.png


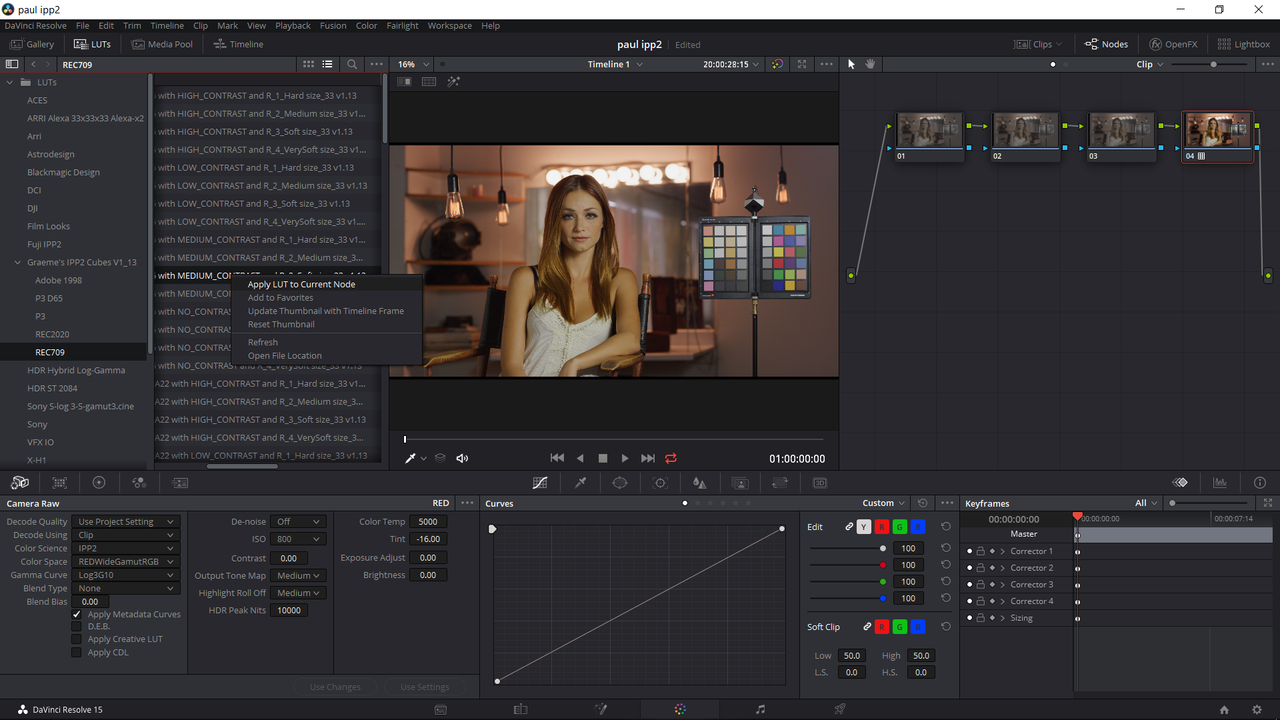
2)Next, to enable the ability to further change some of the "Camera Raw" settings, I changed "Decode Using" from "Project" to "Clip". I then changed the "Temp" to 5000K and the "Tint" to -16.00 in the "Camera Raw" settings. And finally, I added a Rwg/Log3G10 to Rec709/Bt1886( Gamma 2.4) Medium/ Soft Output Transform Lut From Graeme's IPP2 Lut link to the Last Node of the grade. You can change this anytime

Graeme's IPP2 Luts download link

https://www.dropbox.com/sh/7meziyar4vmps1s/AADxJILYDZYF9fbEOSPuTx_Oa?dl=0

Screenshot-795.png


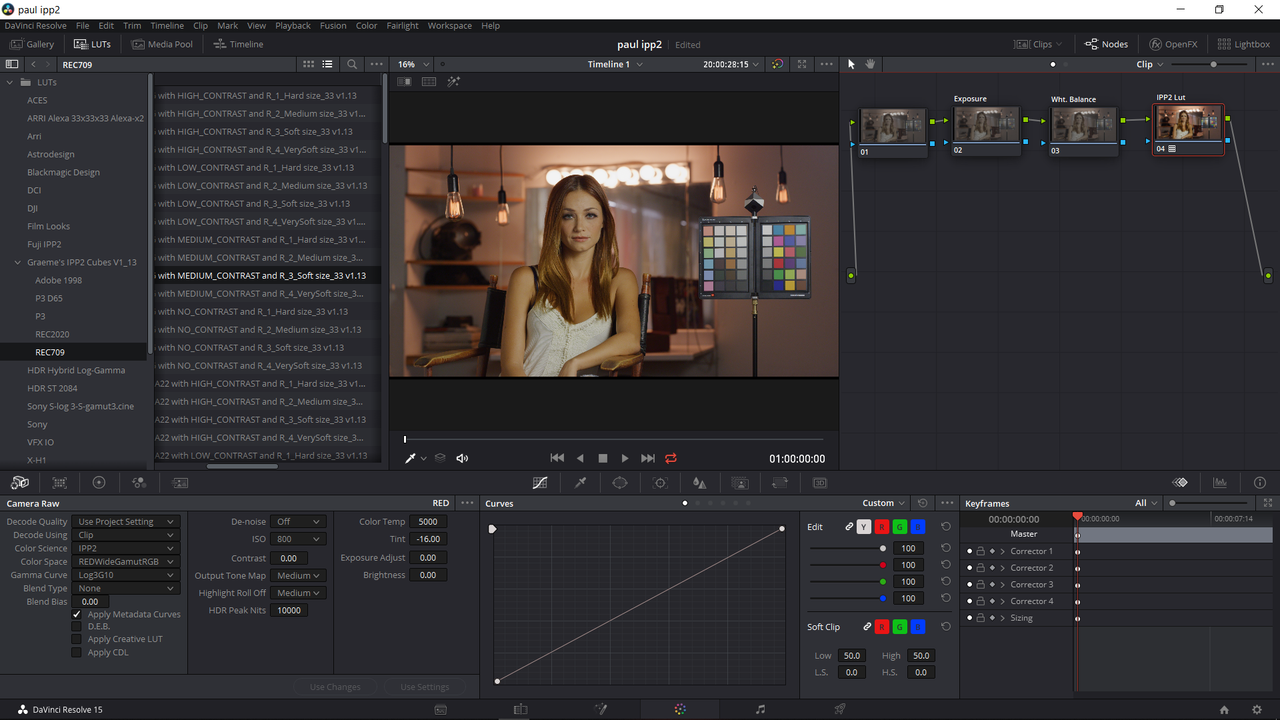
3) Next, I labeled the two Nodes before the "IPP2" Node, which I also labeled, for "Exposure" and "Wht. Balance". You can add more nodes to your default Node tree like "Skin tone" or "Secondary" if you want.

Screenshot-796.png


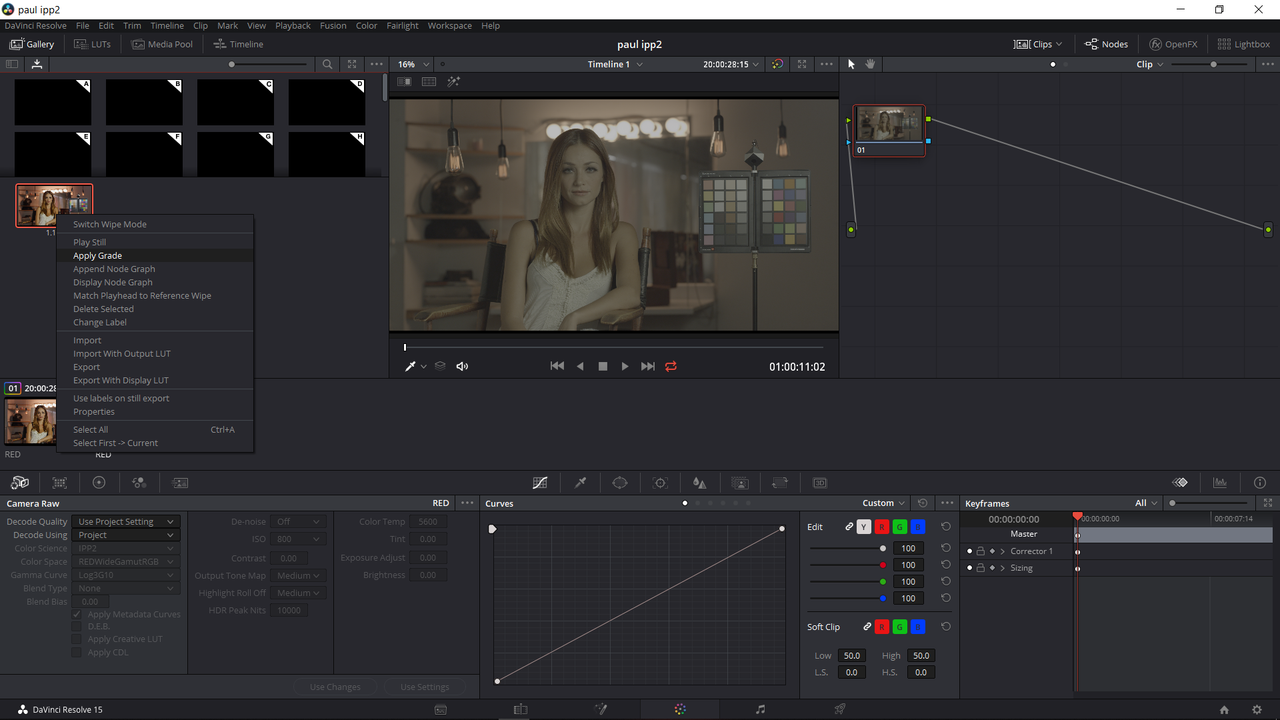
4) Further, you can save that default Node tree from above by "right-clicking" inside the viewer window and selecting "Grab Still". This will save it in the "Gallery" window.

Screenshot-799.png


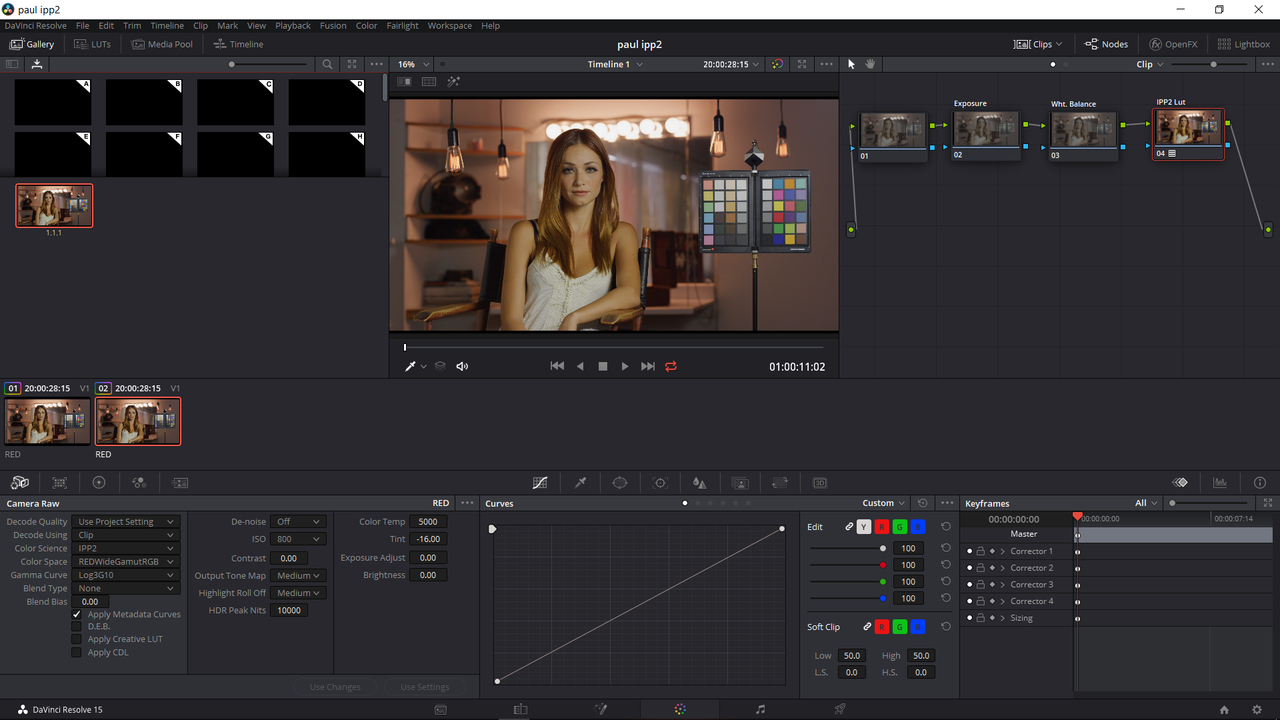
5) Finally, on another .r3d file , I'll use the same image again unprocessed, you can go to the grade in the "Gallery Window", right-click, and choose "Apply Grade" and this will apply the default node tree along with IPP2 Transform lut in the last node, which you can change to another IPP2 Transform lut if you want.


Screenshot-797.png


Screenshot-798.png


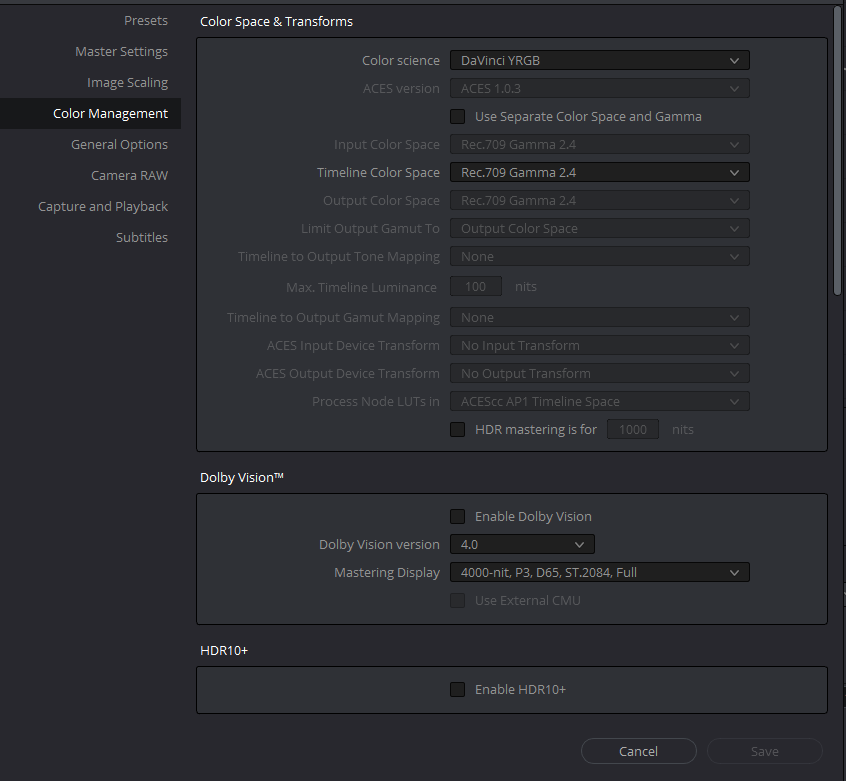
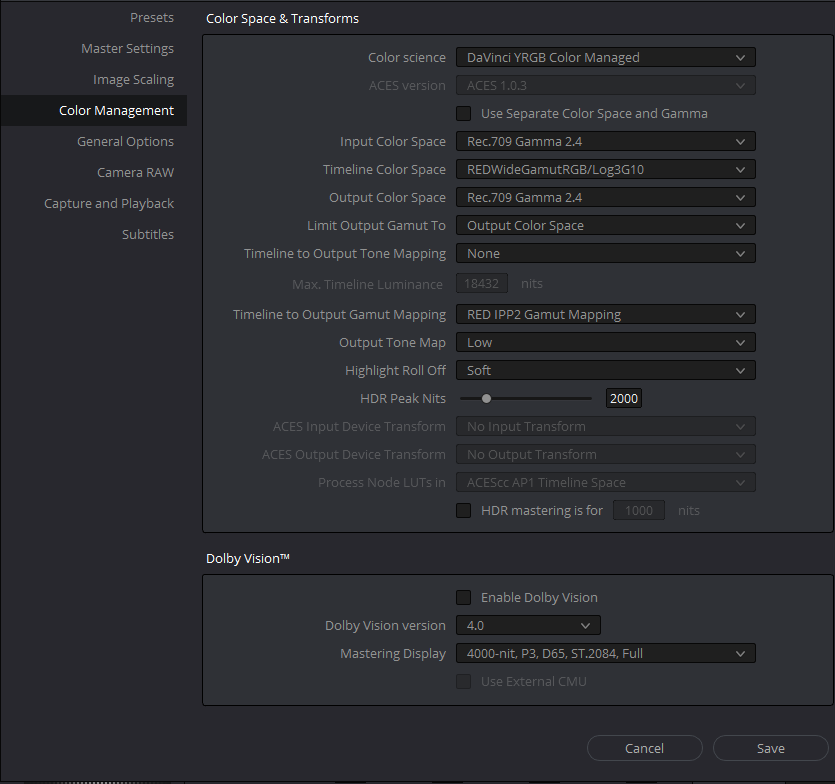
Color Managed Work Flow


This will completely negate you Camera Raw "Color Science", "Color Space" and "Gamma Curve" Settings.

This will also completely negate your need to add an Output Transform Lut at the end of your clips node chain.


As Per the Settings of Peter Chamberlain of Blackmagic Design

Screenshot-670.png


1)Output Tone Map and Highlight Roll-Off- Use this here if you know you will only be using one Output Tone Map and Highlight Roll-Off for the entire project. Choose this carefully because changing these settings will fuck up your entire project.

2) I chose "Low" and "Soft" because I believe these are the new "Default" settings Red is going with, no longer "Medium/Medium". You can change this to whatever you want. Be sure to chose these settings wisely because you will have to develop all of your R3Ds from these setting, no matter how bright or underexposed they are. So I would get a good sample selection of all your clips in the project you are about to start from the most under exposed to the most over exposed and decide which "Output Tone Map" and "Highlight Roll-Off" works as the best "starting point" for all of your clips.


Here are the "Camera Raw" Settings in a Color Managed Workflow.

Screenshot-675.png


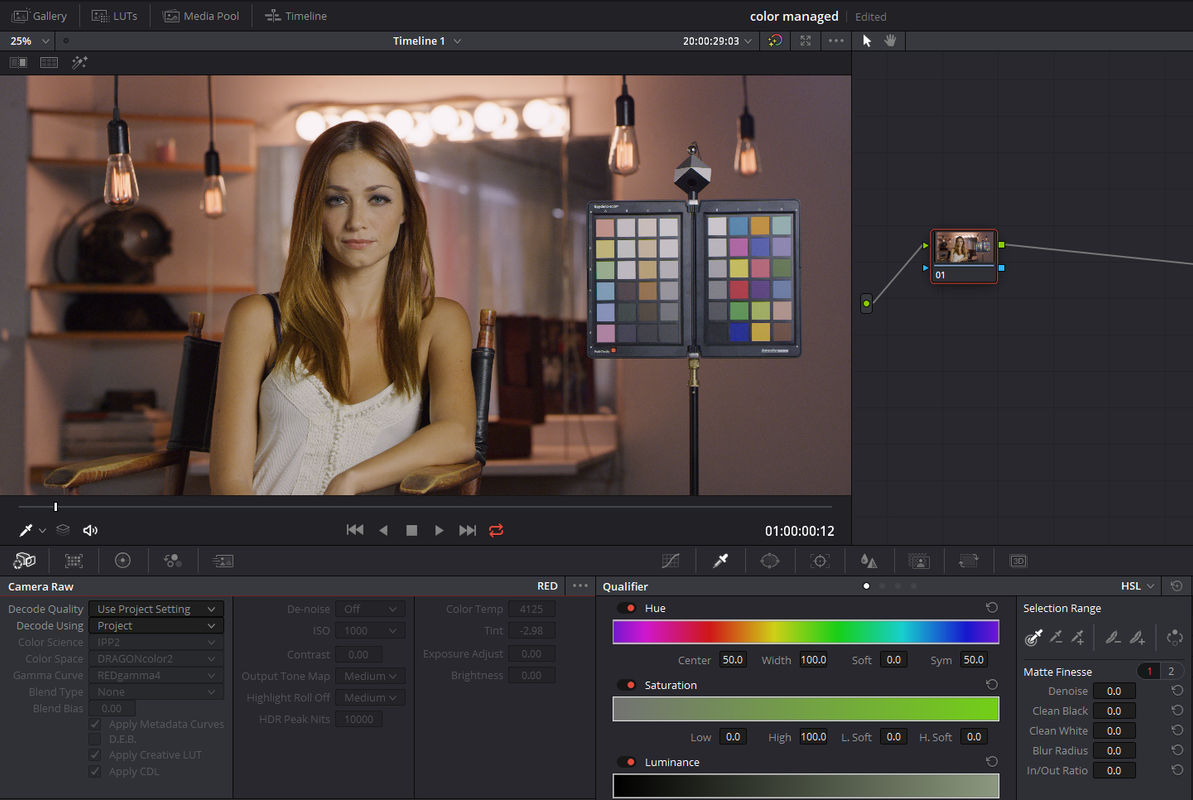
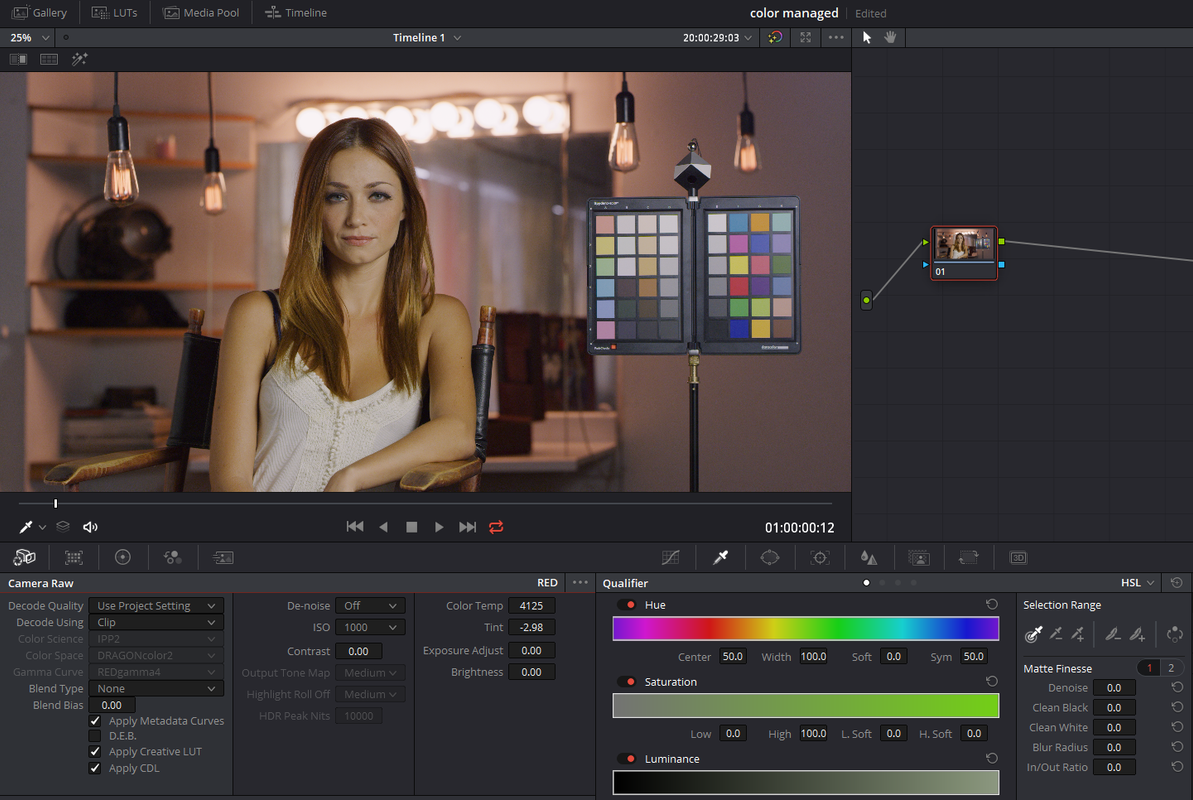
Here are the "Decode Using" "Project" and "Clip".

"Project"

Screenshot-676.png


"Clip"

Screenshot-677.png


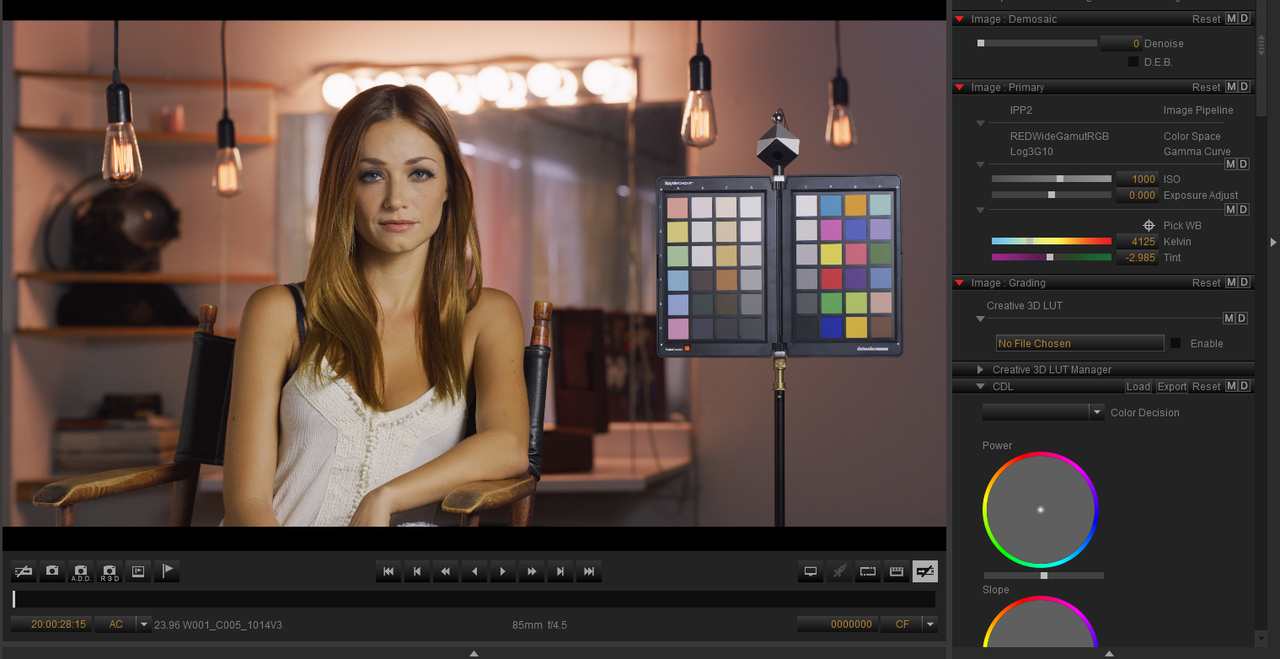
The Color Managed Workflow also brought in the "Iso=1000", "Kelvin=4125" and "Tint=-2.985(in Redcine-X) -2.98 in Resolve as well as the CDL Grade, when using the "Decode Using" "Clip". But you could see those settings "greyed out" even using "Decode Using" "Project".


Screenshot-678.png


Screenshot-680.png
 
Last edited:
Back
Top