Welcome to our community

Be a part of something great, join today!

  • Hey all, just changed over the backend after 15 years I figured time to give it a bit of an update, its probably gonna be a bit weird for most of you and i am sure there is a few bugs to work out but it should kinda work the same as before... hopefully :)

IR on EPIC

John Marchant

Well-known member
Joined
May 4, 2010
Messages
2,168
Reaction score
2
Points
38
Location
Normandy, England
Website
www.kippertie.com
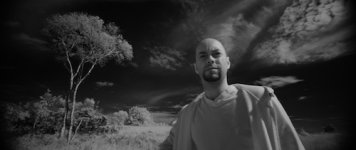
Given that infrared seems to have cropped up as a topic recently, I thought I'd share the little test I shot this afternoon.


This falls very much under 'personal experimentation' as mentioned in passing by Jarred in the Monochrome thread... I'm actually very pleased with the result. It involves some careful work in temporarily removing the OLPF and re-mounting a lens in a cleanroom environment, so its an 'at your own risk' job to replicate. I used variable NDs and IR filters to block visible light.

I shot high-ish shutter speeds and a wide open Tokina 11-16 (stopping down resulted in ugly internal reflections centre frame) I didn't mind the shutter speed as the shots were mostly slow moving or high FPS, or needed warp-stabilising from handheld.

I'd love it if RED could supply variations of OLPF for specialised purposes, for user fitment. Was there mention of this at one time?
 
I was always fascinated with IR photography, to me it feels like whole another planet somehow. Amazing.
 
im sure there is a EPIC IR in the pipeline ;) ..yesterday i tested some epic handheld stuff and came up with two problems 1. a sliding lcd mount would be great 2. a mobile redbrick to redvolt charger would be really nice to change the setup really fast from cinerig to handheld
 
It's simple to achieve, - remove lens mount, remove four bolts retaining OLPF plate, lift out OLPF/flare guard assembly, refit lens mount, adjust back focus.

Doing all this without causing dirt ingress or damage is simple in the right environment and with the right tools,care and attention.

If you know what you're doing you don't need a step by step guide- if you feel you need the guidance perhaps leave well alone :)
 
lift out OLPF/flare guard assembly

This sounds pretty straightforward, and I would like to try it...my main concern being, how do I know this when I see it and are there any cautionary notes to pulling it? I've never explored the interior of my EPIC beyond the OLPF plate. a video tutorial would be great. I'd pay to download it.

Your shots looked beautiful, John.
 
Thanks Meryem.

Removing the OLPF is very straightforward. Once the lens mount is removed and the small OLPF retaining frame is removed you'll need a pair of fine tweezers or just very clean fingers with a little helpful fingernail to lift out the OLPF - its a transparent rectangle held in a soft rubber frame. You can just pinch carefully at the edge of the soft rubber frame, and lift it out - I place it directly into a sealable box without touching it. Most important then is to be diligent about dust etc. getting directly on the sensor. I have the lens mount at hand complete with body cap to place back on immediately.

Take a look - if its out of your comfort zone, just don't do it ;)

I'm away from proper technology til midweek next week now, but if there's interest and if Red don't warn us all of any pitfalls I'm missing, I'll post a video how to on my return.
 
Amazing John, thank you for being so bold to do this.
I was wondering how much more sensitive do you think the camera is at this setup?
I would love to see some night stuff and if you have the chance some shot with an IR light. I would be really curious about that, as I do a lot of IR work with those smaller cameras.
Thanks again.
You should re shoot your avatar in IR:-)
 
Thanks Russ.

I'll certainly be looking much more at IR - I have a plan in mind for an arts project related to my local area for which this example served as a test. (Funding still to be fought for... :( )

Nobody needs to see me in IR - its not a good look... I caught myself on camera here though, having been checking the lens while still rolling. Lazy!
 

Attachments

  • jbmir.jpg
    jbmir.jpg
    37 KB · Views: 0
This is so sick! Cool you took the risk to mess with your epic's internals, the results were well worth it
 
Cheers Carlos.

I'm trying to get my hopeless broadband to upload a 4k version to youtube... in the meantime for anyone who wants to pixel peep the original quality, here's a link to a bunch of stills from the footage on my flickr:

Flickr set

Be sure to right click and select to view 'original' to check things out 1:1. Bear in mind the original is still JPG compressed to make my upload faster.
 
As you'll notice, the optical combination of heavy filtration, wide aperture and cheap and cheerful Tokina 11-16 means the image is soft at 1:1... but this is probably a life saver in the absence of the OLPF. With expensive filters and a top quality prime I might actually have been running into issues.
 
In a funny little turn of events you can now vote for this little 1 minute piece at Festival do Minuto, where they have it as a featured video... if you like it of course :)
 
I need to test further re: sharpness. At present I've only shot with average to soft glass, so I've really seen no benefit or detriment to sharpness... I can't believe its as simple as that though. More investigation to come now I'm back from foreign parts :)
 
Back
Top