Welcome to our community

Be a part of something great, join today!

  • Hey all, just changed over the backend after 15 years I figured time to give it a bit of an update, its probably gonna be a bit weird for most of you and i am sure there is a few bugs to work out but it should kinda work the same as before... hopefully :)

Exposure 101...

Was this replaced with a new one or did adding much more light just make that dramatic a change to the appearance of it?

Also, did you use any filters to add a "haze effect" (or perhaps something done in post)? There is something about the second image that feels more authentic as far as scattered light / atmosphere goes.

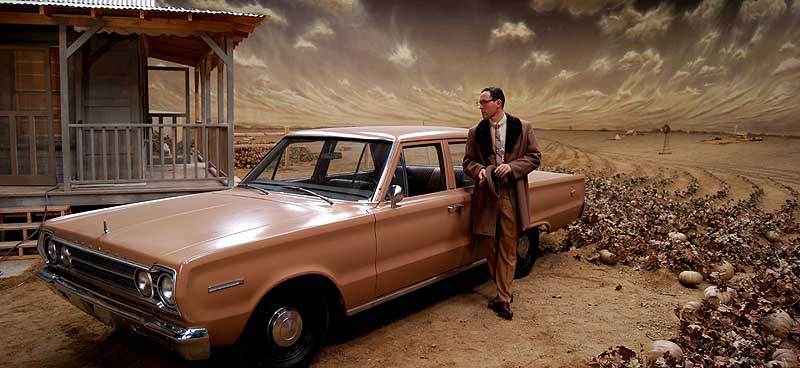
It's the same backing but every couple of days a painter would go in and make touch-ups, so it got better over time, less stylized.

Both versions used a Smoque #1 filter on the camera, though above you are seeing an unfiltered Nikon snapshot of the first version but an actual RED frame of the second version with the Smoque filter. But I also added some light smoke to the set on the second version, which is the main thing you are seeing that helped sell the false perspective (that and the fake lines of crops on the background ramp leading to the backing, basically dark dirt from a bucket that was dropped in rows.)
 
Why do you think your 2nd units tend to underexpose compared to you?

Because they aren't as afraid of underexposure as I am...

Over the years, I have been more burned by underexposure than overexposure, particularly with film, but even with these new RAW and LOG cameras, just less so. But color negative film really likes exposure.

But I've probably also been burned because personally I like dark moody images and low-key lighting, so my natural tendency is to go dark, so using a lower ASA rating is sort of my safety net. Other DP's use higher ASA ratings and never seem to have a problem with underexposure, so I guess it's all how we use our meters to some extent.
 
Thanks, David.

The subtle additions of the line of crops, smoke, and changes in lighting really do sell it. This is a great example for anyone studying the craft.

Outstanding work.
 
This was my first test, without the full lighting package or crew yet, during prep:
manure3.jpg


So you see how the approach evolved. On the other hand, the movie was intended to look stylized otherwise why else shoot the whole thing indoors against paintings? So I had some leeway here in terms of realism.
 
David, thank you very much for being so honest when sharing your experiences... I love AC magazine but I often miss that quality when reading their articles... trial and error stories are much more interesting and insightful... you learn so much more from them... and they don´t take away anything from the quality of the final work... for me the opposite is true... I start to cherish the work even more if I know to what length the artist went to achieve the images he had in mind...
 
Yeah that's one problem I always have with Magazines in general. It's like everybody magically arrives at the correct conclusion on the first try. Helpful to hear what a good solution to a problem was but you have to remind yourself that they probably got to that correct conclusion by trying a few wrong ones along the way. I wish they would cover failures in depth a bit more and why they didn't work.

"At first we tried doing X but after about 3 hours decided that the results were too noisy. After a half hour of testing we also concluded Y wouldn't maintain the look we were going for but Z delivered a noise free and ABC." I think that provides a lot more insight (if it wasn't mumbo jumbo) than just hearing that Z was the perfect solution. It creates a richer understanding of the problem and possible solutions.

That Cyc wall example is a great. If we just read the "I overexposed the wall a bit to make it look more natural" bit but didn't see or hear about what it looked like previously I don't think that statement would have nearly the same impact.
 
false color legend

false color legend

Would be nice if the false color diagram shows somehow, somewhere the legend in percents or steps from middle gray. Perhaps directly in each color here and there.
 
Question about histogram

Question about histogram

I have a question about the histogram.

I have been running exposure tests and cant work out when im actually clipping or maxing the histogram. (putting the headlights aside)

Whats confusing me is the little tiny vertical (brownish green but sometimes red) bar that fluctuates on both sides of the histogram. So is the limit when that vertical bar disppears off the top or am i avoiding the vertical bar all together?

In some of my tests i noticed the tiny vertical bar dispapeared off the right top where i was realling pushing it but I didnt always get a warning from traffic lights?

Also does the metadata store lense fstops info in post anywhere? I couldnt find this in either redcine or red alert?

Cheers
 
This was my first test, without the full lighting package or crew yet, during prep:
manure3.jpg


So you see how the approach evolved. On the other hand, the movie was intended to look stylized otherwise why else shoot the whole thing indoors against paintings? So I had some leeway here in terms of realism.

David do you know if this film has been released on DVD?

thanks
 
false color IRE

false color IRE

I love to see false color based on RAW but also charted to IRE values or Ansel Adams Zones.

just reading through this thread and happened to have this data laying around from some tests I did. Build 20, monitored using REC709. False colors and their IRE values....
 

Attachments

  • Haase_False_Color_IRE Build20.jpg
    Haase_False_Color_IRE Build20.jpg
    10.4 KB · Views: 0
No, ...non-technical reasons that are being worked out.

Hmm sounds like Lawyers. Your stills blew me away. As i was looking at them, the RetrRoamer Walked by and said, "Wow those are beautiful Pictures!"

David, that has never happened in 20 years of knowing and teaching photography/video to her.</sidebar>

Digital exposure. When you remove one bit, it is removed from the left, as the Most Significant digit. So every T stop = 1 bit resolution = Doubles the resolution.

You should be able to see this by closing and opening the lens one click at a time, and observing the waveform, er, histogram.

In a teaching situation, it is worth mounting a nice fat f1.4 and giving students a hands on.

in the same lesson, leave a constant f stop and vary the exposure time.

in reading various threads, i see mention of fill light to pull black detail out of the mud, but have not heard much about bias lighting. The availability of cheap RGB LED bias lights as a feature of any lens mount would give us another tool against noise. Additionally, this would give the DP another tool to create mood.

When I am shooting, i try to fill the recording medium, if my image blacks are still dancing in the snow, i add fill. In the real world, Nothing is "black" so you can always get clean blacks by adding fill. See Blondy's "heart of glass" video if you can find it.

When speculars crunch your R3D files, consider flagging, dulling spray, etc.

REMEMBER: the only controls that effect black level and white level are IRIS and SHUTTER SPEED. If bias lighting is available, you can push black level out of the noise floor, otherwise use fill light or white (?) dot filter.

Of course if you WANT noise.... happy TNXVG
 
I like Casey's suggestion too. Would also like to keep the green or some sort of indicator for 18% grey or have an option to toggle it in such a mode. Possible?

By the way, if I am aiming at a 18% grey card with a correct exposure setting and use a spot meter built-in the R1, the reading of the spot meter should be IRE 50. Am I correct about it?
Thanks in advance.
 
18% grey equals 50IRE - maybe. Some prefer to use a percentage of D-max that places 18% grey at 50% exposure referenced to clipping. I typically use 43IRE as the same as 18% grey and 50% exposure based on observing scopes. YMMV.

If anyone cares to do a proper test I would be curious to see the results, especially with MX and the newest tools.

Cheers - #19

thanks for your reply. I wonder what D-max is. Can anyone tell me more, please?
Thanks.
 
In film, D-Max stands for maximum density, basically when you've created as much potential density on the negative as possible with exposure and adding more exposure doesn't create any more information. In digital, the clip point would be a similar concept.
 
The Stop Lights next to the color bar are from the RGB path! Don't let them fool you. Sometimes they are on and you still have detail in the highlights. We are likely to change this in a future build to represent RAW and not the RGB path. Thoughts?

Has this been updated in recent builds? I'll be purchasing the scarlet, and researching these threads to know any pitfalls in exposures i'll need to be aware of.

Thanks! ~D
 
By the way, if I am aiming at a 18% grey card with a correct exposure setting and use a spot meter built-in the R1, the reading of the spot meter should be IRE 50. Am I correct about it?
Thanks in advance.

false color for 18% grey is green, which falls between 43-46IRE on Build 21.
 
This topic has been covered before. Many of you know all this stuff. But there are new RED shooters everyday and some that are still struggling with exposure. Buried in this post is a question for the community. We'd love your opinion.

There is plenty of DR in a RED ONE to make great images... many have proven that. But the range is limited enough that you can easily miss the window if you are not careful. Let's recap a very simplistic starting point for exposure to keep you out of trouble.

Under-exposure leads to noise. Over-exposure leads to clipped highlights. So... don't do either, unless you really want to.

1. Make sure your monitor/LCD's brightness is set correctly. The RED LCD's need 4 or 5 clicks down from full bright in most circumstances. If set too bright... it seduces you to stop down and under-expose.

2. ETTR. Expose to the right. Just under the point of clipping. That keeps you away from noise in the shadows and keeps detail in the highlights. In a dark scene you may choose to allow some specular highlights clip. See False Color or Zebras below.

Use your tools.

Quickly set approximate exposure by looking at the LCD.

Check the color bar next to the histogram (which corresponds to False Color colors and originates from RAW). Turn out the top red box. That is the equivalent to clipped. Don't worry about the orange, yellow or other colors... they are probably supposed to be lit.

The Stop Lights next to the color bar are from the RGB path! Don't let them fool you. Sometimes they are on and you still have detail in the highlights. We are likely to change this in a future build to represent RAW and not the RGB path. Thoughts?

Use False Color. Red means clipped and purple means super dead. I set my top left LCD button to False Color in User Prefs. If it (something in the scene) is red... it is dead (clipped). There are time when you might be OK with that, but False Color tells you exactly what is clipped. You choose instead of guess.

Use Zebras. They will tell you exactly which highlights are blowing (you need to know)... you can also set them for the shadows, they "buzz alert" when you are likely to encounter a lot of noise. You can set the top and bottom limits to each of them.

If anyone cares to add... please do.

Jim


Thanks you Jim for taking your time to take care of the none big shot DP like me and some of the rest in here. As alway you guys are doing a fantastic job over there at RED! Cant wait for FEB 13.
 
First:

Jim was looking for feedback about whether we would prefer exposure tools like the barber pole and the stoplights to be based on RAW or RGB values. IMO every meter/scope should default to the RAW data - including the histogram. I am comfortable judging the RGB image by eye and its always a derivative value anyway.

Second:

D-min and D-max denote the maximum and minimum densities on a film negative. In video world IRE units are a standard measure of "density" that IIRC are based on voltages. In digital camera world I often think of "full well" as max exposure and define relationships between luminance values as percentages of that level. Many photographers think in terms of stops, which are a doubling or halving of exposure values. Now let's mix in signal to noise ratio, which is the crux of how the new MX sensor tech is changing the usable ISO without actually changing the sensitivity (photons/voltage).

Why is 18% gray the middle exposure and not 50% gray? Why is 50% exposure 43-46 IRE not 50 IRE? WTF! More to the point, how do we best apply that information to exposure and lighting choices.

In terms of modern digital cameras like the RedOne it could be argued that the salient metric is signal to noise ratio. FWIW I like to use the Ansel Adams zone system for determining exposure levels as any scale can be mapped to the 10 zones. I also believe it is a useful level of discrimination for making lighting and exposure decisions.

Just my 2 cents.

Cheers - #19
 
Back
Top