Welcome to our community

Be a part of something great, join today!

  • Hey all, just changed over the backend after 15 years I figured time to give it a bit of an update, its probably gonna be a bit weird for most of you and i am sure there is a few bugs to work out but it should kinda work the same as before... hopefully :)

Ask David Mullen ANYTHING

Thanks very much David as usual concise and informative answers - with images too boot!

I very much love looking at storyboards of movies I have seen and seeing how it was brought to life on the big screen. I had a look through my copy of Shot to Shot by Stephen Katz the other day and rediscovered the storyboard for the opening of Blade runner by Sherman Labby that was never shot or used in the film. Looking at it and reading it I could very much conceive of how it would have looked in context to the rest of the films style. It also reminded me of fx shots used in Minority report.

Do you keep the original storyboards as a souvenir for movies you have DP'd on?

Much appreciated.

Paul
 
Thanks David,

Storyboarding is essential in my opinion, to convey the visual palette and stylisitic goals of a film before it even starts filming. Well, your storyboards don't look so bad so if I am ever fortunate enough to hire you as a DP, I'll make sure to get you for a few extra weeks and to hole you up in some remote location :-)

Thanks again for your insight,
 
On my last movie, we were in the same location for a month, so we took still photos of stand-ins to create a photo storyboard, put together using a comic book software (Comic Life):

photoboards.jpg


But even that was time-consuming -- we would spend six hours at the location and maybe get through two to three shooting days worth of scenes each time, and then I needed hours in the evening to edit and label the photos and write the descriptions, and someone else put it all together in Comic Life, taking hours of her time. So we needed three solid weeks of this sort of work just to plan out a month of shooting!
 
Ask David Mullen anything... what a wonderfull thread.

So, do you have a standard fee? Who decides that? Your agent? do you charge the same per week if the film budget is $3M or $30million?

Are we alone in the universe? Why do girls go together to the restroom?

Best,
Mac
 
Hello David, I am about to shoot a commercial for a soap that 'moisturizes the skin making it soft and silky'.

I intend using all white interiors. The talent is dark skinned and she is wearing a white top and white skirt.

The idea is to make her skin 'glow'. I have access to 2 x 1.2K HMI's, 3 x 2K Tungsten some 800Ws, etc.

Any tips? Thanks in advance.
 
Ask David Mullen anything... what a wonderfull thread.

So, do you have a standard fee? Who decides that? Your agent? do you charge the same per week if the film budget is $3M or $30million?

Are we alone in the universe? Why do girls go together to the restroom?

Best,
Mac
LOL!

It's the girls going together to the bathroom I never get..
 
Generally the approach to lighting skin (young, smooth skin, that is), especially darker-toned skin, and get it to "shine", is to reflect a soft source over the surface, with the light coming at a good angle for that reflection, sort of a soft "kick" off of the surface.

In terms of the white clothing and white background, I'd use a camera with a wide exposure latitude, but the main thing is the expose the clothing to be just below the "clip" point so there is detail (if shooting digitally). The white background I assume is sort of limbo-like so some clipping is OK there. It might help to slightly "tech" down the white clothing to a very, very light grey, although it has to be done well (evenly) and it has to be subtle in order to not look like the clothing is dingy/dirty.

Hate to say it here, but a lower-contrast 35mm color negative might be the best thing to use in this scenario, though I've seen HD-shot white-limbo stuff that works fine. But digital can have trouble with shiney, wet skin sometimes because of the bright highlights.

"Glow" tends to imply halation, but that's not really going to work well for dark skin against a white background. Real halation (a foggy glow) works better against a dark background. In this case, glow really means that the skin has a certain luminosity from the reflection of a soft light source.

----

If I ever got offered a 30-mil movie, you can bet I'd try to get a bigger salary than usual...
 
With a new high power Camera like RED, what are the top 3 important adjustments you would made compare to previous filming in films ....David Wong (DigitalCinemaSociety, Hong Kong)
 
David,
I just realized that this is the most watched thread in the reduser.22,545 with this one.
Great,
babu
 
With a new high power Camera like RED, what are the top 3 important adjustments you would made compare to previous filming in films ....David Wong (DigitalCinemaSociety, Hong Kong)

I'm not sure I understand the question. If you are talking about lighting, that tends to be based more on the style and look wanted, as long as the camera/format choices have a reasonable amount of latitude. I think the biggest change will be in how we think about exposure, and of course, workflow.
 
A question... David (or anyone else reading this thread), what do you think about 3-D? Do you feel that it changes (the approach to) cinematography and opens up new possibilities?

My opinion...
A week or two ago I saw a screening of some songs from the upcoming U2 concert film. With 3-D, I like the layers of everything in depth. Certain framings and camera movements work very well in 3-D, others not so well. If the camera is just above the level of the crowd, I don't quite like that framing so much since I expect the crowd to surround/envelop my field of view... but it doesn't (because the FOV of the projection is not that big). But if the camera is higher (in relation to the crowd), that shot sells better.

One shot I really really liked from one of the songs is a close-up of Bono reaching out to the camera. You can almost touch his hand.... that's a powerful shot in 3D.

One of the aspects that bugged me was that the blacks aren't that black... so the back of the venue appears to be a milky black wall/veil... it doesn't look right. But if there are some bright objects there (side lighting or whatever), that sells the shot. 3-D might be a medium that really loves some side/backlighting of background elements.

2- I find the frame rate (24p) and ghosting distracting (not immersive / takes you out of the experience). Granted, the version I saw was not ghostbusted yet. (As I understand it, ghosting refers to a ghost image of the other eye that you see. The glasses presumably aren't filtering out the other eye perfectly, and you spot this if there's high contrast.)

Hopefully the frame rates get higher.

3- No headaches. :) Interestingly enough, I saw a Broadway musical (A Chorus Line) that same trip and I find theatrical lighting really stressful on the eyes... the contrast is a little much.
 
3D is fun, and I'd love to see some ordinary dramas or comedies try it in a subtle manner, ala Hitchcock's "Dial M for Murder", which is one of the best 3D movies I've ever seen, really uses 3D to accentuate the suspense. Or imagine an art film like "Assassination of Jesse James" in 3D? That might be an interesting experiment.... Someone on the CML said that "Citizen Kane" would be a good candidate for 3D conversion because of the way it was shot.

But I don't see 3D becoming more common than 2D. For most projects, it's one headache too many to deal with...

"Dial M for Murder" has some interesting 3D effects -- there's a scene with a purse in the foreground that the husband has to get into to steal his wife's housekey so he can leave it for the killer. In 3D, the foreground purse becomes very important visually. And during the attempted murder, Grace Kelley reaches back towards the camera lens as she is being strangled, just before she finds the scissors on the desk. Very powerful in 3D.
 
1) With RED camera, if DP is not sure of the exposure level for the required effect and wants to alter in Post
which of the following method is safe bet to go.
a)Underexpose by 1 stop
b)Overexpose by 1 stop.
In other words, which one is easily correctable in Post.

2)How do you measure the properties of light on a set.With LightMeter I get the exposure level, but I am trying to understand the Luminance, intensity, color temperature, flicker cycle and atmosphere temperature etc.
For example, as we know HMIs loose color Temperature by 1 degree Kelvin, after 100 hours of use, Instead of guessing & setting my camera to 5600K, I would like to set it for 5500K, (provided I know the exact temperature of the light).
Is it necessary to measure such light properties exactly. OR am I thinking too much out of my head?
 
Could some moderator please move this excellent thread into the new Cinematography forum?
 
If you're not sure, then get as close to the correct exposure for the look you want. As to whether to favor over or underexpose, that depends on scene content and whether you want to give yourself more highlight detail in post to play, or more shadow detail. Since the camera has more low-end detail than high-end detail, you're more likely to be favoring an exposure to hold bright information than dark information, but you don't want to overgeneralize by just underexposing everything.

There are meters for color temperature, usually used by the Gaffer. I don't have to deal with them myself and most color temp issues can be seen with your own eyes, so I only occasionally ask the Gaffer to double-check something on his color temp meter.

The thing is about cinematography is that you want to get to the point where you use a meter less and less, and light by eye more and more. Real life has a mix of color temps, especially in ever-changing daylight, so 5600K from an HMI may not always be ideal, and variations may not be noticed all the time (except for green problems, which are more annoying.) When an HMI is too warm or blue to be a problem, you can usually see that with your own eyes.
 
David Mullen's own RED test

David Mullen's own RED test

David, if you'd indulge me yet again...

Following all your posts on this thread and others, I find myself echoing many of your thoughts on the digital vs. film tirade, artistic, practical and professional choices, etc, and not to worry, there is a point to this and it is presently coming: your opinions are not only highly illuminating for many of us but also helps us form a blueprint of things of importance when on a job, which is why, I suspect, this thread is the most popular on the forum. Being that whatever the acquisition format, the camera is and will always be nothing more than a tool to tell a story, let us assume that you were hired for a feature and RED was the tool of choice. Prior to commencing principal photography, they send you the RED camera for a week or two so you can get comfortable with it and run some tests.

What tests would you run, what are your thoughts as to what situations and conditions the camera may or may not be good for? Would you try and decide whether to shoot preserving highlights or shadows, primes vs. zooms, natural light with fill, controlled artificial light, what? I mean, what would be your initial steps towards testing this particular camera based on whatever posted footage you've seen on this site, which I'm sure, to some extent, has already helped you form an opinion about what the RED strenghts and weakeness are?

Just a hypothetical list of tests that David Mullen would perform based on what he feels are points of interest/importance for this particular camera based on what he knows/feels about it? For whatever is worth it, my feeling is that I will buy 2-3 RED's (will put a deposit down for 3 next month) and use them for all future projects, but as far as things stand right now, I am still a bit concerned about the way the camera handles highlights on daylight exteriors, so that's where most of my testing would be focused on...

But whatever directions someone with your experience would follow, would be of no small importance for people like myself when testing this tool, so any input would be greatly appreciated.
 
Just so I don't get bogged down, I tend to base tests on the specific project and certain things I want to try out beforehand, although I'm usually shooting on a format I've already tried before.

So with the RED camera, any broader tests would partially depend on whether I hadn't actually tried out the camera beforehand.

I would test a bright daylight scene, a normal interior scene, and a low-light scene to determine an optimal ASA rating to work with. I'd test to see how non-standard shutter speeds looked. If I needed some slow-motion shots, I'd test that, especially if it has to be in 2K versus 4K for the rest. I'd do some basic lighting contrast ratio and over/underexposure tests, using the lenses I planned on using.

The main thing would be to test and plan the daily workflow, and then make sure that a D.I. house was involved to test the film-out stage and whether they can work with an EDL and the original 4K RAW files and do the conversion to 4K RGB, or whether the production (editor, post-supervisor) had to do that REDCINE conversion and deliver 4K RGB files, etc. That part is a little unclear to me.

It would be important to me to be able to take my tests into a D.I. theater with a large screen and do some color-corrections, see how well I can manipulate the footage.
 
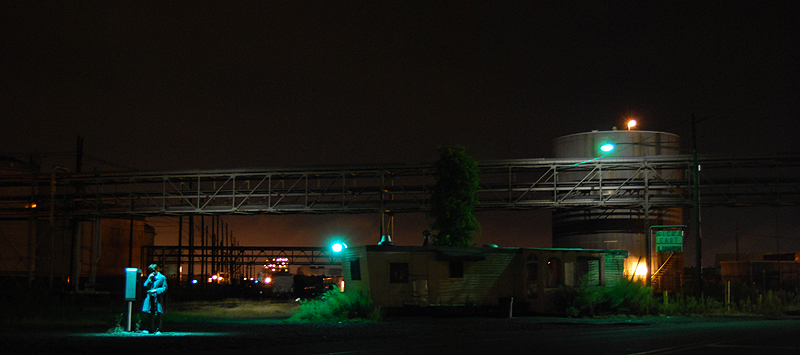
On the movie I'm shooting right now in New Jersey, I did a night exterior shot on Fuji Eterna 500T pushed one-stop (and rated at 640 ASA) with the new T/1.3 Zeiss Master Primes, shot wide-open. It was lit with just four 1K PAR's on a 40' Condor (plus I added a mercury-vapor practical to the abandoned diner we found), and those had scrims in them to get the level down to a T/1.3 so that I could capture the ambient streetlighting and glow in the horizon. This is a digital snapshot taken with my Nikon of the set-up:

night3.jpg


Now of course the 35mm version is a little grainier, but it also has more detail due to the wide dynamic range of Fuji Eterna. But it's an example of where a camera like the RED would come in handy -- I probably could have done the same shot on the RED with the normal T/2 lenses I was carrying, maybe even had lit to an even lower level and get more exposure from the real streetlamps.

Very cool shot. If I'm understanding this the pars on the condor are lighting the phone booth (gelled?) and the sodium vapor light is the yellow pool of light on the right. Where are the pools of green light coming from? The street lights? If so, are they gelled? Seems like such a dramatic color. The streetlights in the distance are very warm.

Hey David, I guess you overlooked joelnet's question and as I'm also wondering it, I thought I would quote his question. Thanks.
 
The condor had three or four tungsten 1K PARCAN's (with spot globes, or VNSP) in it. The main one -- pointed down at the phone booth -- was gelled with Rosco CalColor Cyan 60 to create a pseudo-mercury-vapor color, though the spotlight is spottier than a real streetlamp would be.

Now the remaining PARCAN's were just there in the condor bucket to be tried-out for sketching out the background detail. They were ungelled, so 3200K (white). One was pointed at the tressle across the top and another at the water tank on the right. The others were aimed deeper. Now technically, they should have been gelled to either match the blue-green mercury-vapor lights (like the one in front of the water tank) or orange to suggest a sodium-vapor streetlamp (like the horizon is lit by, and the base of the water tank.) But since those lights were not planned, just switched-on and panned around until I liked what they were doing, I didn't have gel on them and I didn't have time to gel them. I also, probably, was thinking that it would be good to have some neutral 3200K light in the scene.

I added an extra mercury-vapor practical to the left end of the trailer. You can see that the real mercury-vapor color is somewhat greener than the Cyan gel I was using overhead, but I actually prefer the color of the gel.
 
Back
Top