Welcome to our community

Be a part of something great, join today!

  • Hey all, just changed over the backend after 15 years I figured time to give it a bit of an update, its probably gonna be a bit weird for most of you and i am sure there is a few bugs to work out but it should kinda work the same as before... hopefully :)

Ask David Mullen ANYTHING

I don't think I'd even try to fill a large area from a distance, I'd rely on the film stock or digital camera to hold enough dynamic range... it's not like the old days of 1960's color television productions where you'd see dozens of shiny boards being used to fill a wide shot outside, mainly to compensate for the harshness of film chain transfers from prints. So yes, I'd worry more about when the actors got closer to the lens when I needed to see their eyes better.

But if I had to throw a fill light quite a distance, then I'd need something pretty bright like reflectors or an 18K HMI, etc. Sometimes you can use silver lame on a 12'x12' or 20'x20' frame.

As for dolly moves or Steadicam shots, it's generally easier to just walk the fill light, so I might have the grips walk a 4'x4' beadboard with the actors, or even a larger 6'x6' or 8'x8' Ultrabounce or muslin... or walk a light, like a 1200w HMI PAR with a Chimera on it. Or a 800w HMI Joker. I might even have a little LED light on the camera, but that wouldn't do much in bright daylight, but it can help in a daytime hallway or something during a move.

Or maybe you can set-up a long row of bounces from farther back, like a couple of 12'x20' Ultrabounces in a row. Sometimes you can throw some white bedsheets or muslin on the ground.

These days, with the wide dynamic range of film stock, or some modern digital cameras, it's better to not go overboard with the fill light unless it is for a special look (like an overlit musical) or to balance against something very hot in the background, like the sun glaring off of the ocean.
 
Night Scenes

Night Scenes

Hi David
I have an exterior night scene coming up.
I'd appreciate any comments you might give on this type of work,
philosophy of approach etc.

Thanks,

Bill
 
Hi David
I have an exterior night scene coming up.
I'd appreciate any comments you might give on this type of work,
philosophy of approach etc.

Thanks,

Bill

That's pretty vague, you have to start with the needs of the scene, the location, the intended look, etc. -- not to mention the budget. If I had a general philosophy, it would be to get whatever practical sources are in the scene to do as much work for you as possible, but even that doesn't address the needs of the scene (perhaps the characters turn off all the practicals, or there is a power failure in the story) nor the style.
 
Night Scenes

Night Scenes

Sorry David, popped that question in a hurry.
Two Characters leave an industrial building for a smoke and a short conversation.
I have the location.
The view I like shows some parking lot lights and misc building lights in the distance
Location of characters contains no practical light. I need to supply the look.
I have a few (4) 1.2 hmi pars and a 4k hmi par available.
I have one each 9 x12 12x12 and 20x20 kits available. I have tungsten.
I have sufficient prep time to set up.
So I think I have the guns to handle the subject area and hope to balance it to the ambient supplied naturally in the bkgnd.
So, in terms of philosophy, I'm looking for thoughts on blue gelling, rimming or edging and quality of light for the various subject area sources.
Or a description on how you might handle or have handled a similar scene.

Thx

Bill
 
First, I assume you are going to shoot them with the most interesting background behind them, probably the parking lot lights -- or at least one of the angles will have that background, assuming a 50/50 profile 2-shot master and then two singles, so one wide direction, two more tight directions (which can be faked in a close-up.)

And I assume you want a naturalistic look, not a slick noir look with lots of kickers and strong backlights, or maybe you do?

Just to simplify things, I'm going to say that for lighting your 50/50 2-shot that your choices for the main light on them is either a backlight or a top light (or in between, a toppy backlight...) as if from a streetlamp. If you are suggesting a streetlamp, as opposed to moonlight, you at least don't have to light everything from far to near, you can have pools of light, it can fall-off into darkness and then another source can pick up things even farther, etc.

So that light can be soft or hard, though if a far backlight, it's harder to make it soft and it probably should be too soft, but if a toppy backlight or a dead top light, it can be either hard or soft -- I often put lights downwards through an 8'x8' frame of light grid w/ a black skirt for a softened streetlamp effect.... often I used Coops or some other tungsten light I can point straight down, with either orange gel for a sodium look or cyan gel for a metal halide look.

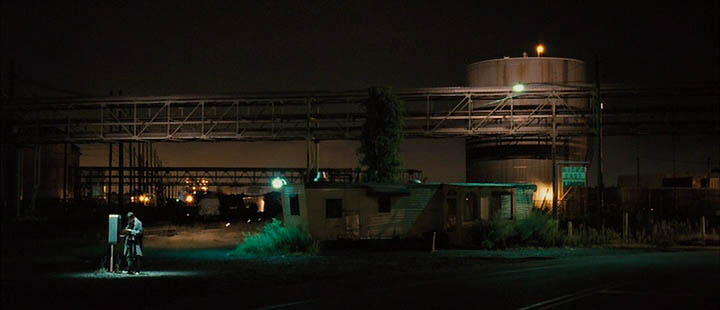
Here's an example from something I shot, "Assassination of a High School President" -- the first one had a 5K tungsten with 1/2 CTO I think as a warm top light, the other used a 1K PARCAN with Cyan 60 gel for a top light over the phone booth:

assassination15.jpg


assassination16.jpg


The thing with colored lighting is you have to decide which is better for the mood of the scene and whether you want it to be similar to the far background lights or the opposite, and which color you want to see on the faces for the close-ups.

Now you can use HMI's for a toppy backlight since the heads won't be pointed straight down, but angled out slightly. And they are closer to the metal halide color, you just need some gel combination to get there -- probably 1/4 CTO + 1/2 Plus Green is a fairly close match to that color, which is similar to Cool White fluorescents, but you can vary that for effect if it doesn't have to be a dead match to some lamp in the shot, you can have more green or no green at all, etc.

The thing is that to get the top light or backlight unit into place, you're going to need a condor of some kind, though for overhead, a 45' condor may be enough. If that's out of your budget, then you could work much closer to the actors and build a menace arm with a 1.2K HMI on the end of it, armed out, or two of them armed from each side of the frame for a crosslight effect. Or maybe there's a convenient thing to mount a lamp to, like the arm of a streetlamp above frame, but then, you'd need a lift just to rig the light anyway, though a scissor lift may do. But then, if you can work closer to the actor, sometimes a Chinese Lantern or a Kino on a menace arm will also work. Trouble with smaller lights closer is just that it "feels" like a practical source near the actors rather than one from much farther and higher.

Now for the close-ups, it's not unusual to work closer and softer with the lights.
 
Last edited:
Hi David

We have to light this building at night starting out as a medium pulling back into a wide to include the statues at the top. Not for drama I might add. The biggest lights we have are 2 x 2.5K HMI's, plus a 1K and and 2 x 1.2K HMI. Would you say that's doable or insist on something bigger? There are night practicals but mostly rather orange sodium based I think. We are thinking of mounting individual smaller lights behind each pillar too to light the wall behind them.

007173_e0aa1bec.jpg
 
Probably you could do it with those lights but it might look a bit crude.

I think you have to decide how you want the building to look at night. You sort of have two general choices, one is multiple up-lights on the building that looks like architectural lighting, the other is a big side rake on the whole building. I guess third would be a mix of the two, a bunch of individual architectural spots plus a dimmer rake on the whole building.

The other question is color, is HMI lighting the correct approach -- since it is bluer than the streetlamps, you are either suggesting it is moonlight (which would be hard with small units rather than a big HMI on a condor up high) or it is from metal halide / mercury vapor industrial lighting. Which may be fine, but you're back to the idea of architectural lighting, so you have to think like an architect, how would he mix the color temps of different sources for the most attractive look on the building.

Maybe he (and thus you) would have a series of upward spots from the ground that are blue-greenish, and then warm tungsten light behind the pillars. So maybe what you need are a lot more HMI's but smaller, like eight 575w HMI PAR's for example, on the ground pointed upwards with a black box around the sides to hide the unit from camera. Maybe three in a row for each side of the building, and then a 1200w PAR spotted on the triangle at the top from off-camera, then warm tungsten lights behind the columns.

Or maybe you can get the 2.5K HMI's up high enough for a good side rake on the whole building -- I'd put both of them together in one scissor lift or parallels off to one side and try raking the whole building, from far enough away that the building is slightly underexposed, and then have a series of tungsten spots from the ground shining up on the building to provide some highlights. That way the HMI side-light doesn't have to be full exposure.
 
assassination16.jpg


Hi David,

Two-ish questions considering this still from the film you shot. Firstly, did you use a separate condor to light that background silo-looking thing? It looks as though the direction of the light source could be from around where the top light for the character is positioned. Also, is that just a bright haze from actual city lights in the far off background?
Also, on another note, I was curious if for this top lights (the 5k and 1k Par Can respectively); when moving into close-ups and mediums, do you just lower or adjust the same light? or manipulate it with a smaller unit closer? Like replace either of those with a china ball per-say?

-dan

It was one condor with multiple PARCAN's in it. The glow in the horizon is from the city. I think in the close-ups at the phone booth, I floated a 4'x4' diffusion frame (probably an Opal or 250) over his head to soften the top light (not 100% sure, we were working so fast out there).

It would have been hard to switch to a Chinese Lantern because of the Cyan 60 gel on the light -- if it had been a white light, I probably would have done that.
 
David,
I watched 'Se7en' last night really enjoyed how rich it was. Not only the blacks, but even the whites had such a heavy nice feel to them. My friend told me it was because Darius Khondji used a resilvering process on the negative. I am unfamiliar with this term and process. Have you used it before? Second, and this may be blasphemous, are you aware of any digital plugins that approximate it? Or are there DI tricks that can almost replicate it?

No, "Seven" did not employ any resilvering to the negative, that was for the prints. So any of that look is due to digital color-correction from the original negative -- the early Criterion laserdisc version did use a telecine print stock that was run through a silver retention process, creating a very high-contrast and dark transfer, but later when Fincher re-did the transfers, he decided to use the original negative so that look had to be added digitally in the color-correction.

Silver retention to a print basically increases the contrast in the shadows, deepens the blacks, slightly desaturates the colors (especially dark colors), and adds silver grain. Most of that can be simulated in a telecine color-correction except for the additional grain, that would require some extra work but so far, most silver retention movies don't bother, they just live with the grain of the original negative.

Now a few movies did do silver retention to the original negative, which adds density to the highlights, increasing the contrast there instead of in the blacks (because silver is where highlight detail is, a black area is mostly clear on a negative), reduces color saturation as well, and adds a lot more grain -- mainly because the silver grains in camera negative stocks are much larger than they are in print stocks or intermediate stocks, because camera stocks range from 50 ASA to 500 ASA, whereas lab stocks are in the 5 ASA range.

"Minority Report" is probably the most extreme example, they did a skip-bleach process to Kodak 800 ASA stock (a product that was discontinued) for a number of scenes. But Deakins did a partial silver retention to the negative for "Jarhead" and "Assassination of Jesse James" to get a bit of that silver grain texture into the image.

Other than "Minority Report" however, most of the Kaminski-Spielberg movies with that silver retention look did it to the prints, not the original negative.

Like I said, when you do a silver retention process to the negative, there are some key differences because the silver is mostly in the highlights on a negative, mostly in the shadows on a print. I did a short film once where we skip-bleach processed both the negative and the prints, which was pretty extreme.

Most of the look of "Seven" on the negative was just good lighting. He sometimes either used a lower-contrast 320T stock for a few scenes, and a few others he flashed with a Panaflasher, to counteract the build-up in contrast and blacks on the printed image once it used the silver retention process. But other shots, he push-processed the stock to increase contrast -- he had a pretty elaborate system based on his earlier work on "Delicatessen". But it was all tied into the printing process, so modern transfers have to recreate that effect digitally since they aren't working from prints.
 
Hello David,

On your average non-anamorphic movie shoot what is the widest lens you would normally use? 18mm???
 
It's a stylistic decision... once you start to embrace a wide-angle style, then the wide end of the working range becomes a shorter focal length. When I worked on "Jennifer's Body" the director (Karyn Kusama) liked wide-angle lenses, so close-ups were often shot on a 35mm or 50mm at the longest, and a lot of shots that were wider were in the 18mm to 25mm range. But when I work with director Charles MacDougall (Chicago Code, Good Wife pilots) we often used the 24-290mm and he generally was happiest when even the wide masters were shot above 100mm when possible. Of course with steadicam shots or wide sweeping crane moves, we'd go to the wide-angle end, that 18mm to 25mm range.

But knowing how Kayrn likes wide-angle lenses, I sometimes wondered if I should have embraced even shorter lenses when possible, that 14mm to 18mm range, though I think Karyn didn't want things to get too distorted either by going too wide-angle. It's just not a habit I normally get into, super wide-angle photography, my natural tendency is to like a natural human perspective on the scene and work in the middle focal-length range.

But wide-angle lenses can be fun -- I just did a wide, low-angle tracking shot through a big train station and used the 15mm end of the 15-40mm zoom to show off the architecture... I had in mind how Spielberg shot those banks in "Catch Me if You Can".

So often an 18mm is the widest-angle prime I usually carry, but if I have the budget, I will toss in a few shorter focal lengths just in case I need them. It's just that when the budget is tight all of your low-usage items on the rental are questioned, you get asked to drop something to save some money. So often it's the 14mm-ish and 300mm-ish lenses that get dropped, to be day-played if needed.
 
Mr. Mullen, have you used the Duclos 11-16? It has totally changed the way I think about wide angle lenses due to the extreme angles of view with an extremely flat image. It's something we are not used to seeing.

Nick
 
Thank you David!
 
Mr. Mullen, have you used the Duclos 11-16? It has totally changed the way I think about wide angle lenses due to the extreme angles of view with an extremely flat image. It's something we are not used to seeing.

Nick

I've played with it -- it's a very good wide-angle zoom. However, it doesn't get around the fact that the field of view is much wider than what would accurately recreate the size of a space, so it definitely falls under the category of a stylized effect in my opinion, even if the distortion is low.
 
David,
I watched 'Se7en' last night really enjoyed how rich it was. Not only the blacks, but even the whites had such a heavy nice feel to them. My friend told me it was because Darius Khondji used a resilvering process on the negative. I am unfamiliar with this term and process. Have you used it before? Second, and this may be blasphemous, are you aware of any digital plugins that approximate it? Or are there DI tricks that can almost replicate it?

If David doesn't mind I can answer part of your question. Both Magic Bullet Looks and Tiffens plugins have versions of a bleach bypass set up. I also remember there was a plugin that emulated most (13) of Kodaks neg and pos stocks from Genarts Sapphire called FilmEffect.
 
Hi David.

Im just finishing up my film degree at the u of Winnipeg in Canada. When I first started, I hated the small redhead lighting kits that were available to us because I found the light uneven and harsh, even with usuing the limited softening modifiers we had. I assembled an alternate inexpensive kit minly of 3 Lowel DP lights, which I much prefer but I still find the light harder to control compared to the fresnels which I have limited access to.

Long story short, do you have any tips on how to even out hotspots and control these small open-faced lights, especially when used in location shoots where throw distances are short and unevenness or harsh shadows are difficult to tame?
 
Back
Top