Welcome to our community

Be a part of something great, join today!

  • Hey all, just changed over the backend after 15 years I figured time to give it a bit of an update, its probably gonna be a bit weird for most of you and i am sure there is a few bugs to work out but it should kinda work the same as before... hopefully :)

Re-celling a Redvolt XL battery that is failing?

Marc D

Member
Joined
Nov 6, 2014
Messages
6
Reaction score
0
Points
1
I have a few Redvolt XL batteries which started to fail so I picked up a few more knowing the same thing could happen with any others I purchased. One of them failed yesterday so I am delving into re-celling them. I have not found any documentation or videos describing the method used to take them apart or what type of battery they are using inside. I am hoping it's a multiple cell type of configuration.

I did find an old video on another type of RED battery and it was using multiple Sony cells but he did not describe taking it apart. Before I learn for myself, I am looking to see if anyone has taken them apart and can provide any information on disassembly and type of batteries inside.

I am aware of the connect and disconnect method which will work in some instances, I believe that method will not work for at least two of the batteries I have because of the 2 led blinking indication.

Using V-mount batteries are an option in the future for some applications but the form factor of the Redvolt XL works well with my gimble and when I am not using anything for support.

Thanks for any assistance you can provide.
 
Hi, Marc. I have considering doing this too. At one point a few years ago, I actually managed to take one apart relatively undamaged. It’s locked with a series of clips that is not accessible from the outside, so it was a painful process. I can send you a couple of pictures of how it looks disassembled. My plan stopped however shortly after this because I had a hard time finding the exact same cells to replace the bad ones. I’m not an electronics expert, so I’m not sure if you can mix different brands in the same battery.
 
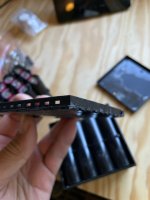
Metal front is just a cover plate and is glued on - pry this off and you will find the actual lid of the battery. I found that the easiest way to get it off is by cutting away approx 2 mm of the lid edges on both sides, leave the top and bottom untouched. You should the be able to release the clips by prying the edges on all sides out.
 

Attachments

  • IMG_6676 (1).jpeg
    IMG_6676 (1).jpeg
    55.1 KB · Views: 24
  • IMG_6677 (1).jpeg
    IMG_6677 (1).jpeg
    55.4 KB · Views: 22
  • IMG_6678 (1).jpeg
    IMG_6678 (1).jpeg
    102.6 KB · Views: 21
  • IMG_6679 (1).jpeg
    IMG_6679 (1).jpeg
    61.2 KB · Views: 21
  • IMG_6680 (1).jpeg
    IMG_6680 (1).jpeg
    63.1 KB · Views: 24
  • IMG_6681 (1).jpeg
    IMG_6681 (1).jpeg
    73.8 KB · Views: 24
Just saw this post, thank you for posting your experience and results! This will help a lot in taking them apart. I was involved in a project and had to put down the re-celling for a bit. I did find out who makes the batteries. I would advise not mixing cells unless it's absolutely necessary. You want to keep the type and capacity of the batteries as similar as possible. From what I heard the manufacturer is CoreSWX. I contacted RED and someone confirmed the name once I mentioned the name first. Hope that helps. Still need to identify the specific battery.
 
Hi again. Thanks for the new info Marc. I had a bit of progress after we started this discussion. The battery name is UR18650E, manufactured by Sanoy. After a deep google search, to my surprise, I found a lot of 50 used batteries with a good capacity rating, in a danish webshop (convenient for me as I live in Norway). https://batteriservice.dk/vare/sanyo-ur18650e-brugte-battericeller/. Im currently searching to find a Nickel strip that fits the original battery holder, but struggling to find something that's just right, so I'll probable end up modifying one. Looks like this one has close enough dimensions to be cut to fit. https://www.aliexpress.com/item/1005006002464244.html?spm=a2g0o.detail.0.0.56f6CL9aCL9aVm&mp=1. Also ordered a small spot welder able to weld trough 0,15mm nickel (the original strips are 0,15mm). Will hit CoreSWX an email and check if the have any leftover stock of the Nicke strips.
Anyway, the recent findings have given me a boost to continue on with the project. Will keep posting.
 

Attachments

  • IMG_7349.jpeg
    IMG_7349.jpeg
    64.2 KB · Views: 6
  • IMG_7350.jpeg
    IMG_7350.jpeg
    42.1 KB · Views: 7
  • IMG_7351.jpeg
    IMG_7351.jpeg
    39.4 KB · Views: 7
This is good news and great work with the fabrication. I am going to try to source a few and see where I stand. I am in the states but commerce is worldwide now, so it should not be too difficult with your information. In the meantime, I picked up a v-mount adapter for my RED and a few v-mount batteries. I can have a more extended shoot without A/C power now, until I can get the Redvolt XL's back to their former glory. The time I was getting out of them made it difficult to use on long shoots.
 
Hi again. It’s been a while since the last update, but I finally got around to actually doing the re-celling.

I ended up rebuilding four REDVOLT XL packs using professionally tested used cells, generally around 2200–2400 mAh. I matched them as closely as I could by capacity and internal resistance. The packs are 4S3P.

The actual cell replacement went surprisingly well. The interesting part is what happened afterwards.

The first battery I rebuilt was completely dead before I started. After the rebuild, it actually works. It powers the camera and the charger recognises it normally. The only odd thing is that the reported runtime/capacity is lower than I would expect from the new cells.

The other three batteries were still working before I rebuilt them, although they had significantly reduced capacity/runtime. All three now behave almost identically: the charger recognises them and reports them as fully charged, the four series groups measure correctly and appear balanced, but the camera reports a battery error and gets no power from the pack.

This made me start suspecting the BMS rather than the cells.

What I find particularly interesting is that the completely dead battery is the one that worked after the rebuild, while the three batteries that were still functioning beforehand are the ones that now appear to be locked out.

I contacted CoreSWX about the BMS and asked whether there was any way to reset or reinitialise it after replacing the cells. They said that what I'm seeing is consistent with a BMS-level lockout, potentially related to things like cycle count, imbalance history or safety flags. They also said there is no supported way to reset or reinitialise these packs once the BMS has entered this state, and they don't provide replacement BMS boards.

This makes me wonder whether the state of the BMS when the cells are disconnected might be important.

Perhaps the completely dead battery was already in a different state, while the other three were still active when I disconnected the cells. I wonder if keeping the BMS powered throughout the cell replacement could prevent this — although I have no idea if that actually makes technical sense. Doing that safely would also be considerably more complicated than the actual cell replacement, and is beyond my comfort level with lithium battery electronics, so I'm not going to experiment with it. For now I'm putting the project on hold. I could try replacing the BMS with a generic 4S BMS, but that would obviously lose the original RED battery communication and functionality. Four batteries rebuilt: one working, three apparently locked out at the BMS level.

If anyone here has experience with smart battery BMS systems, I'd be very interested to hear whether the initial state of the battery could explain this difference.
 
Back
Top