Welcome to our community

Be a part of something great, join today!

  • Hey all, just changed over the backend after 15 years I figured time to give it a bit of an update, its probably gonna be a bit weird for most of you and i am sure there is a few bugs to work out but it should kinda work the same as before... hopefully :)

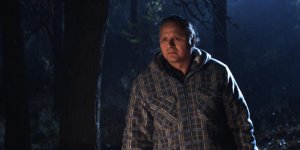
Ext. Forest - night

I Bloom

Well-known member
Joined
Jan 5, 2007
Messages
2,195
Reaction score
0
Points
0
Location
USA
Website
www.ianbloom.com
I'm shooting a film this summer that has maybe 10 scenes with this slug-line. I haven't alway been happy with what I've ended up with in the past. A few scenes involve camp fires and other things like houses in the distance with lights on, so day for night isn't always possible. I'm also hoping to do some very wide landscapes with characters in them. I have some budget to scale up my G+E for these dates, but it's still pretty limited.

So in any case, just curious about your experiences and how you've approached this.

IBloom
 
There are no easy solutions when you want to light a wide expanse at night. Besides, how wide can you get in the woods unless you are at the edge of the woods?

Basically you have to work backwards from what you can afford, which will determine the area you can light -- if you really need to light it.

And beyond a certain point, really wide, you are talking about day-for-night, dusk-for-night, or not lighting the expanse for moonlight, or visual efx, or a mix.

Inside the woods, in summer, the problem is that a big single light on a crane simulating moonlight will be mostly blocked by foliage. On the other hand, this allows you to get away with multiple smaller lights at different intervals, as long as it feels like it's coming from one source.

You can't see very deep into the woods at night anyway, so it helps to pick a location where there is an open field or a roadway in the background, maybe a 50 yards or more away from the camera -- then you can backlight the woods from the open area. In fact, the ideal space is a strip of woods with a field on both sides, one side for the camera to dolly around in, the other for lights on cranes, with the woods in between.

When you can't get high enough with your backlights, then it's easier to establish the moonlight as coming from the side, half-lighting everything.

For foreground action, you can get a softer effect with kinos in the treetops or a string of Chinese Lanterns with daylight bulbs in them. I've wanted to try it with daylight compact flos since they've come out.
 
Maxi Brutes my friend. Best bang for your buck. You can get a 12 light Maxi for about a 1/3 the price of a 12K or an 18K HMI. Consult with your gaffer during tech scout if possible, and order enough cable to not only get to set from gennie, but go deep past it. Make sure you have at least 3 & 3 in the G&E team... big power and lights with less is not fun or recommended... oh and be sure you have radios so you can dial it in without too much pain.

What I've done in the past is to send a Maxi or two into the deep background, and to use them to cross light the trees in background and deep background. You don't want to light everything, just pick some interesting swathes to create different levels of depth. The side light will etch out lines of branches and trees, and look moody. I think I usually order them checkboarded with MFL and VNSP globes.

Then light the set where the actors play appropriately with smaller heads. If using campfire, you will probably come across those Magic Gadget flicker generators (which I think are rated for 2K and below) get a few of those, and randomly/organically have them do what fire does. But hey, best results I've had was actually using a flame bar and propane tank to generate actual usable flame to light the talent. I think we also used mirror boards and hard side shiny boards to direct this light somewhat.

If the scene is just in the woods at night with no practical lighting source, I take one of those Maxi's and use it as a 3/4 backlight across talent, and then use a few mirror boards or shiney boards to serve as a bounce return for fill instead of flying a rag or adding a light.

Also... order one of those light panel Minis that can ride onboard camera as an obie light. You can have your talent in complete shadow, and as long as you get a glimmer in their eyes, you've got performance.

Oh right... if you go with Maxi's - they are in fact 3200 K heads, I found that using an 80C on the camera helped give us that nighttime ambience that 1/2 CTB gel would give, and it saves on expendables and time.... also it helps feed the sensor something more to its liking which helps reduce noise. My last EXT. Night/Forest was on Build 16 and the 80C really helped combat the noise.

So if you are in a truly hard spot where you have to see wide vistas at night... and there is no way in hell you can afford to get enough cable, lights or juicers to light the background... Those self contained highway worklights are handy. You know the ones that f'ing blind you when you drive by them at night on the highway? You can rent those guys for cheap at tool rental places, and you can pretty much always find them even if you are on a distant location in rural surroundings. They can be towed by a small car, and they have their own generator in there to power the lights, some even have courtesy 20 Amp Edison outlet. The lights themselves are on a boom you can stick up about 18'. But... meter the color temp as they tend to go way green. And the generator won't be crystal, so be on the hunt for any sort of flicker problems. But for deep background they do the job cheap.

Another thing I've found is that if you lump all the money for extra equipment and personnel for night exteriors and look at it... often times it is about on par with rental for something very useful like a BeeBee or a Musco. If you are in a location not too far from a place that rents them... I did the math on what it would cost to rent 2 18K's, extra electricians to run them, and a 60' condor to fly them in.... and it was less than renting a Mini Musco for the night. Granted this was in the LA studio zone, but these guys show up, and have 6 6K HMI's up to 80' in the air and each one being controllable.
You don't lose electricians in the bucket of the condor, and you can concentrate on lighting the set and not the background. Seriously from dark to lights up is like 5 minutes... especially useful if you have company moves scheduled for the evening.

I can think of about 20 more little tricks, but I tend to run on. So good luck!

Michael Hardwick DP/Steadicam
IATSE 600 1st AC
 
The side-light idea that David mentions has been effective for me in the past. A few Maxi-Brutes on crank stands about 30 yards away can cover a fairly big area with a decent punch, if you can keep some open space in front of them. This, with a 4K helium balloon over near camera, gave me a nice look in the trees and was pretty easy on the budget. But you'd have to be okay with tungsten sources, the HMIs get pricey really quick.

The big wides with characters are a lot tougher... on a picture I shot last winter, it was much cheaper to shoot day-for-night locked off, and do sky replacement in post, than to try and light the area practically. I was a bit nervous about it but it turned out fine, even with the (bare) trees swaying slightly.

You'll most likely end up doing a little of everything (practical, day-for-night and VFX) because so much depends on the scope of each shot.
 
Hi David

Daylight CFL bulbs in china lanterns? What a great idea... do you have any concern about flicker with those guys? Can't dim them I guess, but they might be cheaper than those daylight photofloods, as well as running way cooler.
 
Another thing I've found is that if you lump all the money for extra equipment and personnel for night exteriors and look at it... often times it is about on par with rental for something very useful like a BeeBee or a Musco. If you are in a location not too far from a place that rents them... I did the math on what it would cost to rent 2 18K's, extra electricians to run them, and a 60' condor to fly them in.... and it was less than renting a Mini Musco for the night. Granted this was in the LA studio zone, but these guys show up, and have 6 6K HMI's up to 80' in the air and each one being controllable.
You don't lose electricians in the bucket of the condor, and you can concentrate on lighting the set and not the background. Seriously from dark to lights up is like 5 minutes... especially useful if you have company moves scheduled for the evening.

I can think of about 20 more little tricks, but I tend to run on. So good luck!

Please, run on :)

Didn't fully understand, are you saying that 6 x 6K Muscos ended up cheaper than the 2 18K's on Condors? How many seperate instrument positions was that?

Thanks David, Steven, Michael for the replies. David I especially like the idea of running a string of China balls with photofloods. Though I fear you'd be changing alot of bulbs throughout the course of the night. I actually use china balls with CFL bulbs to light my office, but they are nowhere near the brightness of photofloods.

This is fairly realistic drama, so I'm trying to avoid an overly backlit look and looking to be as low-con as possible. I was going along the idea of shooting in the woods near a field and was actually thinking it would be great to fog up the deep background by placing foggers along the edge of the woods, but how many and what kind of machines to get was a whole nother question.

IBloom
 
It's mainly a power distribution issue -- sometimes it works out cheaper to rent a self-powered night light than use a condor and a gennie, not if your work is so spread out that there will be multiple generators needed, or if you need to move the big light at some point, along with the power.

HMI's are more power-efficient than tungsten but more expensive to rent, so it's also a question of where to best spend the money. If you have a limited amount of power, it may be better to get a few HMI's for the output, but if you need a lot more units, it may be better to start out with tungsten.

There are fairly bright daylight CFL's -- besides, the more Chinese Lanterns you string across, the more overall level you get, so you may want to use more lanterns with smaller CFL's for the level you need, rather than fewer lanterns but brighter CFL's.
 
Yeah believe it or not when I did the math -
(2) 18K HMIs, (2) Elelctricians (1) 60' Condor+ fuel and delivery charges...and an additional gennie to run the lights - then I called Musco and inquired, told them what I had - they come in under what the other option would have cost. Granted, I think they were doing me a favor, but it made life so much simpler. Check it out...

I think they even have a prerigged softbox you can attach to the end of the boom arm for a less "Backlight"y look.

http://www.musco.com/temporary/minimusco.php

Each head is fully adjustable in terms of pan, tilt, flood, spot.

In regards to foggers. If you are trying to fill a forest, you are probably going to be looking at those Igeba (sp?) type foggers - you know the ones they used to use on navy patrol boats to lay down a layer of fog. Typically they have to be run by SPFX guys, and fire marshals do not like them at all. But they work. you'll need something heavy duty to create a layer that won't blow away outdoors, and a Mole Fogger or a Rosco 1500 really aren't up to the task. They sound like a chainsaw - but if you position your guy upwind and have him blast a layer just before take, it kind of rolls in magically and looks great.
 
They are like hand-carried leaf blowers, just louder. They rev them up, blow fog around, then shut them off. They put out a LOT of fog very quickly.

For a wooded scene, it sometimes works better to use the Tube of Death method, a long plastic tube with holes poked into it, leaking smoke from a smaller fogger. These can give you your base ambience and you can use portable foggers for quick fogging up of other spots.

http://www.specialefxunltd.com/sfx_specialty_equipment.htm
 
Airstars are great.

The gaffair gives you balloon light with out the helium charge and time. I certainly would recommend it if the light dosen't need to get too* high.
 
Who knew you need so much light to make it look light night?

Who knew you need so much light to make it look light night?

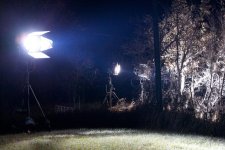
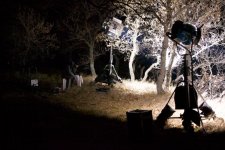
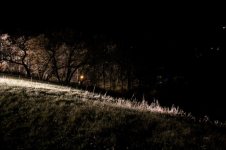
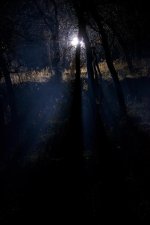
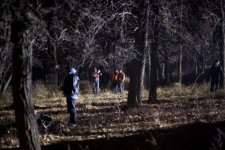
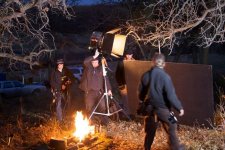
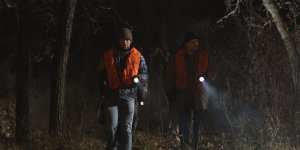
Here are some behind the scenes of a shoot from November 2009.

- We used several large HMI's (I believe) and were 6k's or so. We shot when most of the leaves had fallen, in a little wooded area so we could punch the light through the branches and not be obstructed by any residual leaves that may still be on the trees. We purposely put those lights up above us about 30 feet at the peak of a little hill and shot downward to simulate moonlight. At the base of the hill we had a little scenario with some fill light, don't know the wattage there (someone will probably recognize the lamps).

- We used the tube of death method, with a cheap $49 fogger bought from a party supply store. It sat about 12" behind a fan that was pumping the fog into a 50 foot tube with intermittent, small cuts to let the fog escape over the distance. This provided a nice "fill" or haze to catch the simulated moonlight from up the hill. We had a sheltered area, so wind blowing the tube of death around wasn't too much trouble. However, it would take 3 or so people to operate the fog system alone. One guy also had a hand-held fogger to fill certain areas just before a take. That was a little fogger, similar to what you might use to fog your back yard for mosquitos.

- for the campfire, we used a barbeque tank, with about a 15 foot hose to a special "campfire" apparatus with fake logs on it that don't burn. For interest and to liven it up, our fog team would throw on some leaves to get smoke off that flame and some rising embers.

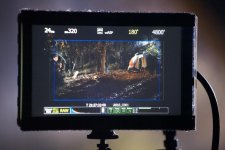
- the behind the scenes photos were taken with the Canon 5D Mark II, and show the illumination our eye could see. The Red One historgram is stacked to the left, but that worked out fairly well with one-light color correction in Red Alert. What you see on the Red LCD is a very good starting point for color correction, and we were happy with that. It would have been nice to have the upgraded MX sensor, but I don't think anyone had them at that time.
 

Attachments

  • 01.jpg
    01.jpg
    97.1 KB · Views: 0
  • 02.jpg
    02.jpg
    98.8 KB · Views: 0
  • 03.jpg
    03.jpg
    74.8 KB · Views: 0
  • 04.jpg
    04.jpg
    57.1 KB · Views: 0
  • 05.jpg
    05.jpg
    98.7 KB · Views: 0
Who knew you need so much light to make it look light night?

Who knew you need so much light to make it look light night?

Part 2...

Last 3 images are Red stills at 4K, with one-light color correction in Red Alert.
 

Attachments

  • 06a.jpg
    06a.jpg
    99.5 KB · Views: 0
  • 07.jpg
    07.jpg
    68.5 KB · Views: 0
  • 08.jpg
    08.jpg
    48 KB · Views: 0
  • 09.jpg
    09.jpg
    40.4 KB · Views: 0
  • 10.jpg
    10.jpg
    91.6 KB · Views: 0
I shot a forest campfire scene last month... and we actually used the campfire for light. Biggest trick is trying to keep it burning at a consistent level. Get a dedicated person with a light meter to just tend the fire, so you don't have to worry about consistency. I also had a single KinoFlo 400 for soft moonlight. However, I'm a student, and my budget was about $0, but it turned out really well. I did visual effects for the wide shots, but that's what I do. There are obviously other options. There's some ungraded stills from the shoot here if you want to check them out: http://sleepersvfx.tumblr.com/stills
 
... On the other hand, this allows you to get away with multiple smaller lights at different intervals, as long as it feels like it's coming from one source...

I don't know if you have it in the US but the RLS (Reflecting light system) is a great tool to light wide spaces. You can split the light beam in different light strips and qualities and it is extremely power efficient.


http://WWW.KACZEKVISUALS.COM/RLS_A5_E_screen.pdf

Patrick
 
Man, I wish there was some way to organize all of this type of RedUser content for reference.

-michael zaletel
 
Back
Top