Welcome to our community

Be a part of something great, join today!

  • Hey all, just changed over the backend after 15 years I figured time to give it a bit of an update, its probably gonna be a bit weird for most of you and i am sure there is a few bugs to work out but it should kinda work the same as before... hopefully :)

DESISTI REMBRANDT 12K HMI LAMP REPAIR

Robert Hart

Well-known member
Joined
Feb 26, 2012
Messages
1,258
Reaction score
3
Points
38
Some folk may recall my skewed adventure from times past when I bid on a 1.2K HMI which turned out to be a 12K HMI. I did not have much of a technical understanding of what I was dealing with at the time but it all turned out allright in the end. It was a bit of a struggle and grunt picking it up from Fremantle in a Commodore wagon.

Over winter, the lamp has been in storage. This year there has been a rat infestation which proved impossible to control by non-chemical means until an electric rat trap which actually worked was discovered. Poisons are not an option due to endangered wildlife being collaterally poisoned from eating the dead rats which stagger outside looking for water

Unfortunately the beasts managed to get inside the lamphouse and have eaten the woven heat-shield around heat resistant cabling and two inches entirely out of the small cable to the door switch.

Whilst I am about pulling the whole thing apart just to get at the damage, I am minded to replace the thick lampholder cable shield material as well. One piece was entirely missing on arrival when I first received the lamp, maybe a prior misadventure with rats in its former home, the US.

Replacement materials are proving hard to locate unless one wants to buy entire commercial sized reels of the materials offshore.

Any advice as to sourcing smaller quantities of woven heat resistant wiring sleeves and heat tolerant 18AWG cabling would be much appreciated. The original wiring in the lamphouse is old-style woven fabric insulation which was discontinued out here very many years ago.


Footnote. I don't know what I did to break reduser's text inputs system so apologies in advance if this white background thing becomes contageous.

Furtur footnote. It looks like it fixed itself when I changed the text colour. The web moves in mysterious ways..
 
Last edited:
THE 12K LAMP SAGA CONT'D.


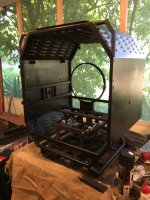
So here's the rub. The lamphouse was made by Desisti. It is put together around a metal frame. Internal panels are fixed with screws. Light-trap vents are fastened with screws. The outer skins are attached with rivets. Superficially it represents the way aeroplanes are put together.


I really don't like to take on things unless I do them properly. However, do I drill out 40 mongrel rivets, remove the skins, neutralise the rust in the contact faces like a good airframe engineer?


Next, refasten with new rivets, or just leave it and paint over it to entrap the oxide floaties, which may yet still escape to get on the quartz bulb and shorten its working life if the joints are disturbed in transport?

The lamphouse appears hand-built. Except for some generic components and louvre slots, it is something you could put together in your shed with a welder and tin-snips.


However, that said, the Italian manufacturers of the times and maybe still, had a passion for their engineering doings.


There are nice little touches like hand-threading all screwholes in the metal frame instead of using speed screws which cut their own threads with sometimes haphazard results.


Then there was their practice of through-bolting a sub-assembly to the frame by threading the holes in the sub-assembly and adding a locknut on the end of the bolt.


You won't see this thoroughness in Chinese knockoffs.


A final cautionary note. If you import a pre-used large appliance, there are requirements that it be treated for vermin and insects. There were residues inside the electronic ballast and the lamphouse. I think that the people may have used aprocarb as the taste began to ermerge in my mouth when I started cleaning, sanding and wiping out the rust in the lamphouse.


So take care humble peons. Wear gloves and long sleeves and a dust mask if doing up appliances sourced from offshore. Also, if anything electrical on a circuit board looks matte-finished and white, treat it with intense suspicion. Don't fracture it or cause it to make dust. Some older heatsink materials of the vintage of this lamp contain beryllium oxide which is a potent carcingen.
 
THE 12K LAMP SAGA - CONT'D


Sometimes negative happens-chance has its upside. Yes I am vexed about the rats shredding the wiring. It is a major-league p---off. However in the lowest innards of the beast I found three foreign objects which are not lamp parts.


One is a thrust bearing, another a brass wingnut which fits nothing, the last is a small 4mm x 40mm machined shaft. My guess is somebody used the top of the lamp as an emergency workbench and the small parts fell in through the top vent.


There were smokey signs that sometime, something went across via one or the other of these metal intruders. I have been intrigued by some outward-facing dents in the rear cover. The cause is now apparent.


Somebody in the past appears to have tried to stop the hour meter or get a stuck one working again by giving it a smack or three or four through the guts of the lamp-house with something thin, hard and heavy.The lamp used to be a Panavision rental.


Maybe if the Hobbs meter has become stuck, the user can then haggle over an estimation of the burn time. But then again, I may be unfairly ascribing deceitful behaviour.
 
where are you located? I had a LTM super light 12k fresnel that i refurbished. i was able to source parts from them in cali. i also had a desisti 2500w head. i was able to send it to galaxy lighting repair outside of LA for check ups. i have refurbished a dozen mole tungsten fresnels. i was able to get high temperature wire on eBay pretty cheap. but with HMIs the theres not only some heat but UV light and thus wires are super specially made. the main power leads on the 12k that run to the bulb where like $200 per wire, #6 gage wire, high temp insulation and a UV protective sleeve.
 
I vaguely remember PS in Toronto having a lot of Desisti lights. If you call PS or Sim in Toronto, I believe you'll find a good lead on fixing the problem.
 
Michael and David.


Thank you for your kindly responses. I am in Western Australia, very distant from outfits which fix lights or stock materials to fix them. Since my posts, I have been able to find cut lengths of the necessary materials vended on eBay from China. Whether they meet standards may be another matter.

I was recently given links over on dvinfo to vendors in the US who also supply cut lengths or small wire rolls. I have put in orders to them so will wait in rapt anticipation for father Christmas to deliver.

No source thus far including Galaxy, has either been able to respond or furnish a circuit diagram for the Desisti wiring. Gilbert at Galaxy has been very helpful in the past. If he had it, I am sure it would have been forthcoming.

It will be to a fixed standard but all wiring being the same colour makes for a matchup requiring extreme care. The electrical box is handmade from red phenolic board complete with scored marks laid out for centering drilling of holes.

The transformer is resin-encapsulatd into the phenolic box. Unlike the material used in the automotive industry which turns to treacle, this material has withstood the test of time, a testament to the original build quality perhaps. The serial number is 019 which makes it an early example. Any diagrams might be dusty hand drawings in a basement somewhere, made well before scans to .pdf were even dreamed about. In those days, I don't think there were even postscript .prn files let alone document scanners.

It appears to have a substituted socket installed which is a US industry standard with seven pins. The adaptor plate over the original larger mounting hole is a little "rough". If anyone knows the industrial name for this socket this would be appreciated.

The retention of wires into their pins is by crimping, not clamp screws. For sake of tidiness, I would like to install the replacement wires directly to the pins rather than adding more connections into the path. It can be done with the existing pins but only with difficulty. The pins are free to rotate a half-turn in their fixture which suggests it may be possible to remove them and that they might even be replacable items.

If they are not re-usable I could make new pins but I don't have the tech for plating them. How the pins are retained in the socket body remains a mystery. I imagine it may be some sort of wedged staking method.

Fortunately, the main power leads from the electrical box to the lamp-holder are in good condition, even through the fabric sleeve has been removed from one in the past. Going by the speed in which moths and flying ants do their phoenix thing and come out as instant smoke, it must be a very severe environment in there.

Any knowledge will be muchly appreciated.
 
Last edited:
THE 12K LAMP SAGA.


Cometh the time to deal with the heat shields. They're made of some sort of woven fibre and resin stuff which looks like munted printed circuit board on roids.


They are a bit tatty and being a little asbestos-paranoid, I don't really like the look of free fibre here and there on perished edges. For sake of re-assurance it will be finished over with high-temperature heat resistant automotive paint.


I shall have to shove a bunch of industrial lights inside the thing to cook it off before I light up an expensive quartz globe in it. If there are any lighting guys out there who see me making a craven fool of myself, please feel free to convey advice, which will be much appreciated.
 
The lamp has the Lightmaker 6,000w-12,000w electronic ballast, which is why I want to be extremly careful about insulation breaking down and power going across. Apparently the Lightmaker ballasts are an earlier generation of electronic ballast and do not have inbuilt protections that some modern products may have.

The lamp and ballast are ex-Panavision via Visual Products and before being used as a rats nest, worked fine and were very quiet.
 
David Collard.


Thank you for the lead to DS in Toronto. They came through with a circuit for the lamp, which they had drawn up themselves as original diagrams were not available.

I have since found out that the connector into the back of the lamphouse is branded VEAM, ( ITT Cannon ), the reference is 28-10 and entire pieces and smaller parts remain available.
 
There isn't anything inherently wrong with lightmaker ballasts, I have a few. Here's some good info on them -

Why does the Lightmaker Electronic Ballast have such a bad reputation?

"The Lightmaker name has been given a bad reputation due to the physical abuse almost from the very beginning (from when it was first manufactured), mainly by renters from Rental Houses who continually mistreated the equipment simply because it did not belonged to them. Since the Lightmaker is a Solid-State Electronic Ballast and does not have a great input or output power protection, any mistreatment of the ballast, such as dropping or banging of the unit would cause internal damage creating extensive damage when trying to use the ballast. One of the reasons (when electronic ballasts were first introduced) was because most of the people in the industry were using magnetic ballasts with the same type of abuse treatment. A magnetic ballast is like a tank (iron and copper) which could take more abuse because it does not have solid-state electronics, like the Lightmaker ballast. The education for the change from magnetic to electronic ballasts was never there. Since the Lightmaker ballast was one of the first Flicker-Free HMI Electronic Ballasts in the Entertainment Industry, everyone treated the Lightmaker ballast like a Magnetic ballast. This was like treating your cell phone like a basketball. The Lightmaker ballast has been used, and still is, by many popular Studios such as Warner Bros., Paramount, Universal, 20th Century, Sony, Raleigh Studios and many others with great success. So remember no matter what Brand of Electronic Ballast you use, treat it like you would your cell phone (a big cell phone!), with great care! and always remember; " a magnetic ballast is like a tank, but an electronic ballast is like a BMW " gn

Note: Remember that the Dimmer Control on the older AC/DC Lightmaker Electronic Ballasts (Model II) controls the color temperature. So when you turn it clock wise (thinking you are turning up the brightness), you are actually dimming the brightness (footcandle) down and bringing the color temperature up, so to get full brightness you need to turn it counter-clock wise. A lot of people do not know this, so they end up miss-using the ballast by not getting the full output power (1200w) to the lamp and ending up with the wrong color temperature (sometimes over 9000 Kelvin).

Fact: Many people do not know that the Lightmaker Ballast received a Technical Achievement Award from the Academy of Motion Picture Arts & Sciences (A.M.P.A.S.) for the development of the Lightmaker HMI Flicker Free Electronic Ballast. They have also received an Outstanding Achievement in Engineering Award from the Television Academy of Arts & Sciences (T.A.A.S.) in 1991."
 
Nick Gardiner.


"There isn't anything inherently wrong with Lightmaker ballasts"

I would concur with that. They may well have been a victim of the "hoik-heave-drop" method associated with single-person moving of heavy objects.

My abundance of caution arises out of being so far away from product support here in Perth, Western Australia. When things break, they are a long and expensive way from home. This is one reason for a do-it-yourself culture here. I also try to take a ittle more care to avoid knocking stuff about.

On receival, the pallet was foud to be crushed. I took the ballast and the lamp partially apart to check for transport damage and found the insecticide residues which I cleaned out from where they might do harm.

There also was a bit of fine grass seed and small stalks inside the Lightmaker case. I am told there is something called prairie grass over there in the US and that is likely what it was and that the fans probably took it inside the case.

The lamp and the ballast have been fine since.


Slightly off-topic. The Chinese are making a 6,000-12,000 watt electronic ballast. It turns up on eBay. There are two versions it seems, one each for different power standards. The plugs and sockets appear unique. I imagine that it would have to be re-worked with ITT Cannon fittings for the US and Australia. If there is not enough panel space to fit large plugs, then add-on box adaptors would be a big pain.

For curiosity's sake here's the links.

http://www.ebay.com/itm/HMI-Electro...439723?hash=item3f31ccb82b:g:PPcAAMXQ4cVR6NBh

http://www.ebay.com/itm/90-125V-600...190820?hash=item33ac4f00e4:g:bgAAAOxyeBpR6M4B
 
Last edited:
I would stay well well away from the chinese ballasts. I Worked on a SHow I think in israel where the rental house sent out chinese HMIs. They sent out twice as many as I ordered because they only worked about half the time. Much later I ordered a chinese 1.2 and the ballast crapped out after a couple of days. I had them send me new electronics and replaced them. Crapped out again in a couple of days. The third ballast electronics they sent me were so banged up from shipping I just threw them away. The head wasn't all bad, but the ballasts were junk. I used Desisti HMis a lot in Lithuania. I like them. Good lenses, nice throw. They are made out of stainless steel and take a licking and keep on ticking. I have a 4k desisiti fresnel with a lightmaker ballast. I like it a lot.

Nick
 
I have Chinese 1.2K HMI ( Steven Studio ), which I bought in after the 12K debacle. It is on its second globe with no serious issues but there have been small cosmetic things. I checked the lamphouse for shipping damage and found it. It had suffered a solid thump. The inside of the shipping case was damaged where the heavy yoke had moved around. The rear reflector had come loose. The flood/spot carriage movement had to be adjusted.

In use, the screws which retain the front and rear ends tap directly into aluminium extrusions. These have to be checked and tightened. To comply with double-insulation standards, the frequency select metal knob on the ballast is fastened to a nylon shafted rotary switch. It is retained by a curious collet arrangement. On a metal shaft it would last forever but on a compliant nylon shaft eventually works loose. It is not a biggie to fix but vexing the first time it catches you.

I also have a 2K tungsten fresnel and small 650watt fresnels. The 2K tungsten fresnel has been good but melts/cracks the spotf/flood knobs pretty quick. I'm using household stove knobs on it now.I don't think the 2K or the smaller lights would last long in a rental environment.

This Desisti light is an old one. It uses a double-ended globe. A DP friend likes the light it sends out pretty much. The panel metal of the lamphouse is thin steel sheet, not stainless. It seems to have been repainted a few times but the overcoats had come off and creeping rust was beginning to show.

On re-assembly I had a bit of a setback. The hinge bolts for the yoke fasten through from the inside via a captive nut welded to the frame. One seized solid part through being screwed through. It seems that in past the welded nuts have stripped, been bored out and threaded sleeves inserted. One of these came out with the bolt and it was damaged.After using a bit of heat and two pairs of vice grips I managed to extract the bolt from the threaded insert.

Interestingly it appears to be an old repair technique. A threaded sleeve carrying the old bolt thread is fed into a widened hole. I may have been misguided as to whether this thing tapped its own thread inside the original stripped captive nut.

After cleaning it up and carefully restoring the threads on the bolt and the insert which had become galled and deformed, there were to be seen four little square-cut channels of about 0.7mm. In each of these was a sheared off miniature woodruff key.

It seems that once the threaded sleeve repair was screwed in, the woodruff keys were driven in to lock the sleeve, a form of "staking".When the original repair was done, the bolts were installed through holes drilled through the resin/fibre heat shields on the side walls. The downside of welding ordninary nuts onto frames as captive nuts is that they both soften with the heat and shrink narrower. If a tiny dag of weld flies in and fuses, then as the bolt is screwed through against what is thought to be the resistance of shrinkage, the threads on both will be permanently modified.

The bolt and nut will continue working but only as a matched pair. The bolt heads in the original repair had been pulled down onto the heat shield material which is not metal-hard. Use has fretted it and the bolts have become loose enough to wobble but fortunately not enough to turn. I have re-assembled it as original with hardened shoe tacks as wedge keys and tightened the bolt head firmly down onto the inside of the frame where it should have been in the first place. That arrangement seems to be holding tight. There is a tiny dose of Loctite in there for good measure.

The bolts are in effect fixed studs through the frame and facing outwards. I imagine that in original assembly the yoke went on before the bolts were inserted and pulled down from the inside. Getting it on and off by springing it over the "studs" is grunt labour but it can be done. If the threaded sleeve eventually works loose again, I'll capture it with a small spot weld.


Thanks to you all here and at dvinfo for the helpful information and leads. Except for the wiriing, it is the home stretch. It has become more of a vintage restoration as much as a repair.

Now if I was a faithful restorer, I would try to get hold of the Desisti decals for the sides and rear but that can wait for another day.

Getting it up onto the crank up stand is a bit of a struggle and grunt.
 

Attachments

  • 12K IN BITS..jpg
    12K IN BITS..jpg
    87.4 KB · Views: 0
Last edited:
THE CONTINUING 12K HMI LAMP SAGA

THE CONTINUING 12K HMI LAMP SAGA

The latest in the adventure. There was a dead shutoff switch. The switches in the back of the lamphouse are momentary triggers. One is normally open and connects when operated and signals the ballast to strike the lamp. The other is normally connected and opens when operated to signal the ballast to kill the lamp. It is wired in series with the door safety switch.


The second switch is proving to be a mission to find a replacement for. For the meantime I have taken the broken switch apart and repaired it.


Set iT all up and tested again. The old globe is really old, as in well past use-by. The envelope is full of dust holes, the gap is wider than it should be and the internal conductors have begun to crack the envelope near the ends. Obviously it should not be used. It strikes but is too much of a burden on the ballast which will drive it for a while but eventually will trip, not a good way to be treating an electronic ballast.


So having got the test out of the way, with everything nice, clean, shiny and well connected, the new globe could go in. - Wrong move. The new globe was gassy, went black in a heartbeat and would not strike at all.


When I bought it, I thought "GE, a good reputable US brand". Yep. Let's get this one. Then I discovered the globe is by an outfit called Koto. Any warranty is way expired as the globe has been stored for three years. Any chance of getting a replace by good grace is also gone. The Outfit "Koto" appears to be no longer making the item. No prize for guessing why.


So, any recommendations on 12K HMI double-ended globes, which are not about to lay down? They are a bit too expensive to be buying as garden curios or cute pretties to park the mantle shelf as novelty ornaments.
 
The reflector did not look quite right. The four tiny screws which hold it to the frame are 3mm. One screw on being unfastened turned and turned and turned and turned but come out it wouldn't. The reflector looks a bit dented and gouged, so may have been straightened out after a bulb explosion. The dodgey screw turns out to be a something from somewhere else. It seems it was forced. Out with the 3mm x 50 thread tap and four new screws later. Add two 6mm dome nuts to the back of the spot-flood carriage where uncovered sharp screw ends had worn through one of the old cable sleeves. Some stove window gasket to remount the fresnel glass and a lick of paint and the door's done. Lots of evidence of past hasty patchups and gettum-goes. I guess that happens over thirty years of use.
 
THE 12K HMI LAMP SAGA. CONT'D.


There was an apparently insoluble problem encountered and one knew not which way to turn. It looked like being expensive. However the guru of all things "Lightmaker" branded, Gilbert Navarro of Galaxy Repair Service in the US west coast, generously put me right on track to getting it fixed.


So it lives again to burn moths another day. A double-bonus. A breeder rat has been hanging around this past two weeks or so. It has been trying to eat its way into the lamphouse through sheet metal to get at the nice new glassfibre cable sleeves for nesting material. It met the electric trap last night. What sort of bizarre world is it when one ends up using a 12K lamp for rat bait?


As another bonus, the three years old G.E. globe, which was thought to be a dud from new, apparently was just a hard starter and has also come good after a fair few tries to light it up. The hard start in combination with the other glitch is what caused it to be apparently moribund. So fair's fair. It should be said, the G.E. globe has turned out to be okay.
 
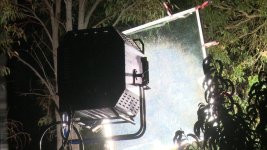
Final installment. The lamp went out on some useful work without catastrophe. A implied non-disclosure obligation means that details of an independent project being shot here cannot be cast around but these images can do no harm.

Thanks again to folk here and at dvinfo who provided information and advice which brought this restoration to a successful outcome. All the best to you all for the New Year.
 

Attachments

  • DESISTI 10.jpg
    DESISTI 10.jpg
    101.4 KB · Views: 0
  • DESISTI20.jpg
    DESISTI20.jpg
    97.5 KB · Views: 0
Last edited:
Back
Top