Welcome to our community

Be a part of something great, join today!

  • Hey all, just changed over the backend after 15 years I figured time to give it a bit of an update, its probably gonna be a bit weird for most of you and i am sure there is a few bugs to work out but it should kinda work the same as before... hopefully :)

1st 1,2,3...

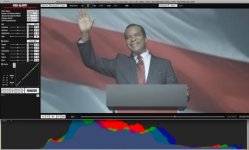
1. histogram, histogram, histogram - thick neg
2. use zebras to check both highlights and shadows. decide precisely what information in the frame that i'm exposing for...
3. toggle back and forth between RAW and redspace, usually make an adjustment that stops down from clipping in the RAW space (what's gone is gone...) but pushes the underexposed redspace, to get more info into the histogram
4. if exposing for faces, check false color, if i have an unresolved question (usually 1-3 are enough but not in every lighting situation)

the ongoing, accompanying question that inflects 1-4 is: "do i need a filter" or "do i need more light" to get the iris where i want it (deep focus or shallow DOF)
 
1: Look at the opinions, answers and suggested solutions to Jim's original question
2: Research all the big words i've never heard and try and learn stuff i don't yet know
3: Wait for my Scarlet and then practice, practice, practice the top 3 methods (there is never 1 correct answer to a problem such as this!!!)
 
1. ISO is ALWAYS set to 320. I've never gotten bad results from it.
2. Histogram and traffic lights
3. False color is there when I'm not really sure, it's the absolute last step. I rarely use it.

I've done so much post with R3D files now that when I shoot, I really know what I can push out of the image. It's very rare, unlike the early days, that I'll get a bad image...Most people on this board probably know how to do the same, I'm comfortable with ISO 320 and DPX output :)
 
If I'm in a situation where lighting is controlled, I do this:

1. ISO to 320 on camera and light meter
2. RAW meters and RAW view, False color to double check skin tones, etc..
3. Monitor histogram, watch the traffic lights. Strive for that nice "thick" histogram without tripping the lights.

I personally don't like to change the camera ISO away from 320, with the exception of shooting outdoors in bright sunlight or very high contrast scenes. In that situation, I may sometimes set the camera ISO to 400 or 500 to help "protect" those highlights. For me, the camera always seems to perform best right around the rated 320 ISO. When shooting tungsten or similarly colored lights, the ISO does seem to bias itself more toward 250 and this probably has a lot to do with the lower sensitivity and luma response in the blue wavelengths when there is a lack of blue spectrum in the lighting used.
 
1. Set ISO 320 (everage contrast) or to 400 (high contrast)
2. Switch to RAW metering
3. Expose to the right just before traffic lights go on

l:

same here. the onboard metering shows whats hitting the sensor. That's the bottom line.

4. I check the false color in high contrast situations.
 
I've been on the other end of RED more than behind the camera but my digital exposure process is pretty much exactly the same for everything.

1) Choose what in my scene I am willing to let clip. Clip it using Zebras then back off a half stop.
2) Check my histogram to see where my mid tones and shadows are falling.
3a) If mid-tones and shadows are too noisy then find a way to bring down the hot source, bring in more light, or compromise on white point.
3b) If mid-tones and shadows are above acceptable--evaluate whether I would actually need any more headroom. If so then reclaim a little headroom. If the white point is fine as is then do nothing and be happy with the extra clean image.

#3 is the big subjective one. Just because the RED can see it, doesn't mean it's acceptably noisy. Especially green screen which should be flirting with over-exposed.
 
1. Take a greet card, position it in the center of field of view
not so far from the camera and hit AUTO WHITE BALANCE button.

2. Work always with ISO 320 that is anyway just metadata,
watch/check in RAW - REC 709 - REDspace
A: In studio you can design your own lighting
B: At available light try to accommodate
to the situation as much as you can
that means in both situation turning lens aperture ring to get control of contrast.
Also you can add filters like a ND, Hot Mirror, Polarizer,...

3. Step two that simultaneously works with step three is about using the methodology
of ETTR to go as far right as you can without clipping it
and to watch for the two colors in False Color:
Green = Reference Exposure for 18% Grey Card
Pink = Reference Exposure for Caucasian Skin

Now that you know well how your exposures were made for each shot, make notes and
the rest is to work with RAW files in post to get desired final look.
 
Not to hijack the thread, but what do you use for Noise Reduction?

FOR THE SCENE:
1. ACCEPTABLE NOISE FLOOR - You want this to be consistent shot-to-shot so figure this out first for the whole scene. For greenscreen & FX, you don't want important details too dark & too close to the noise floor. So expose to the right - around ISO 250 on RED ONE. For drama / location work, more visible grain in the end product is OK - eg shoot at ISO 500 if you don't have enough light. If you plan on doing heavy noise reduction in post, then you can shoot with a higher ISO.

2. PROTECT HIGHLIGHTS - How much clipping of highlights is okay? If you have a high-contrast scene, bump the ISO up a notch or expose a little to the left (planning to bring up the midtones in post) to protect your highlights. Use histogram, raw mode, etc to check.

FOR THE SHOT:
3. TWEAK F-STOP - If there's light to spare, set this creatively using ND filters - since shutter speed is usually not flexible (between 1/40 - 1/60 for us, unless we're doing greenscreen & adding motion blur in post).

Obviously there's some juggling & back-and-forth of 1,2 & 3.

Of course we watch for highlights clipping unexpectedly or things getting too dark on a shot-by-shot basis - and adjust for that by tweaking the lighting (if we can), the f-stop, or repositioning the actors. As a last resort, we expose a little to the left or right, knowing we're going to push or pull the midtones of the shot to match the others in post. We generally set the ISO per scene when we're doing initial lighting for the wides and leave it after that. You don't want the noise floor to jump around when going from shot to shot.

Also, I do noise reduction in post on 75% of my footage which maybe explains why I'm okay with ISO 640 etc. In-camera NR is a big reason why other HD cameras seem so noise-free. Film scans often go through a lot of NR. Don't shoot yourself in the foot by not considering it for your RED projects.

ONE SUGGESTION: I'd love an easy visual interface for switching between a set of custom curves / LUTs. It's too difficult right now on RED ONE.

In post I always reset the ISO back to 320 and do a nice S-curve (the shape of the curve depends on where I want to bring midtones to simulate a particular ISO). I don't particularly like setting ISO on RED to 500 because when I'm there it shows clipping when there isn't. But since I can't easily load different curves or LUTs, changing ISO is what we go with - since it gives me the closest approximation of the final image that'll result in post and it's something understood by most DPs and operators.

How about this: since RED ONE is really 320 (and any other setting is just an exposure push in one direction or the other), why not combine ASA ISO & curves?

EG:
choosecurve1.jpg

(curve preview changes on monitor as you select different ones)

or if you can do multiple LUT/curve previews, this would be cool:
choosecurve2.jpg


Histogram would stay RAW, of course.

It says "SELECT CURVE" instead of "SELECT LUT" because that might be confusing (if it's just a basic set of tone curves to approximate different film ASAs, not a whole 3D LUT film print simulation thing).

Bruce Allen
www.boacinema.com
 
I'm not very scientific but what I do works well for me.

I just try to light to the left of the histogram, except for a flare or hotspot that I may want. Once I have it where I think I want it, I pull back 1/2 stop cause I know I have a lot of information in the shadows I can pull later.

On a sunny day I have a different approach. But mainly I like to "live in the green" of the light bar.

Jay
 
I just make wild guesses as to exposure... :smilewinkgrin:

It depends on the set-up because once you start going in for coverage, you generally keep the light levels the same.

So for the first lighting set-up, I have a two-prong approach, which is that I set the camera (if possible to set it up first and run it to a monitor) to the f-stop that I want to shoot at, and want to light to (at 320 ASA so far).

Then I rough-in the lighting using my incident meter and eyes, at 320 ASA, trying to reach the target f-stop.

But fine-tuning of the lighting and exposure then moves away from my meter -- I adjust the lighting by eye and monitor and I glance at things in the camera like the histogram or traffic lights (haven't used false colors much), I play around with the stop to see when things are clipping or getting too dark.

I usually monitor in Rec 709 just because I find that RedSpace makes the image look brighter, and since I'm more worried about underexposure than overexposure, I'd rather not get the false sense that I'm giving the highlights enough exposure. I check the RAW image now and then too.

Outdoors, where I may not have a good tented monitor, or we are running around too quickly, I use my light meter at a 320 ASA base and then open-up a little on the stop until just before clipping appears.
 
Lightmeter rated @ 200 ISO

False Color & Histogram

Finally aesthetic sense based on choice and mood of scene.
 
1. ISO is always set to 320 asa.
2. False Color is a great tool.
3. I always take a look at histogram and especially at traffic lights.
 
1. Set the ISO/asa/EI to whatever is appropriate to the light levels I will be working with. If it's an available light Doc. in a hospital, that would be 640. If it is a night interior on a low budget movie, that would be 400, if it's day exteriors, it's 320.
2.Light by eye.
3. Expose for white. I expose actual white, like a slate, or a white t-shirt, or lab coat at 70 ire. That leaves some room for stuff that is brighter than the white in the frame, and gives a good white reference level. It also keeps exposure levals consistant through out a show.

Nick
 
This is how i do it....

I dont have a RED yet so this is for pro video

1. ISO 320 - almost all the tiem unlesss it just doesnt work
2. Play around with my settings bringing down the really bright areas
3. mess around to tweek the blacks

in other words i just play with settigns till it feels right. my main goal is to get the colors as natural as possible so that i have more flexability to color grade it.
 
1. In well balanced lighting situation - ISO always at 320. When in extremely bright situation - ISO at 400, when is extremely dark situation - ISO at 250. This "reverse" thinking forces me to protect highlights/shadows respectively...

2. RAW histogram is a must and the ONLY thing I trust. Always in RED Space for my monitor. Occasionally check false colors to decide what can be sacrificed...

3. Aiming for widest & thickest RAW histogram that barely touches the right side (highlights). Controlling the scene with light and filters based on my desired aperture. If nothing more can be done with lights or filters (or the lack of thereof), I will compromise on aperture. As a last resort I would play with shutter speed...

:devil: Peter
 
OK. Let's hear it. I want to know your 1,2,3 for getting exposure right. I'm curious how many do it differently (or the same).

Step up.

1.

2.

3.

1. Hold real highlights and let specular highlights blow.

2. Alter the scene with lighting techniques.

3. Do everything else in post.

I've been zenning on exposure the past couple months (after zenning on it the past year and a half with my RED).

Ultimately exposure is a choice, but I think it's fair to say some pretty bright minds believe that you want to bring as much data back to post as is possible and that is the optimal exposure. Then you really make the image in post. Underexposing in camera because you want "moody" is probably a mistake unless you are in love with a particular camera's noise pattern.

To me, the thing that makes the most sense is to base digital exposure off a perfect white reference. Gray (which is how light meters think) in a digital world doesn't make sense like it did in film.

If you had a known value neutral 99% white and you could set your zebras to 100 (assuming the zebras were actually showing you what's truly blowing at ANY ISO and viewing mode) you'd just put that card in the main light of the scene and hold it or let it blow a little on low contrast scenes.

False Color is really cool once you've got an exposure chosen because you can use it to alter the lighting if the scene is not falling into the zones you expect.

From there I think you could match your light meter BACK to the camera. I, like a lot of people find light meters handy.

I'd never use a monitor to set exposure. I'm worried that the monitor is off, signal path is off or my eyes are fatigued. The in camera tools have to be accurate and it's best to use those. I may use the monitor to alter contrast within the scene... but I still believe the False Color concept is better.

To me, the best the guys at RED can do is give us a way to see what is actually and truly clipping and then make the in camera profiles pass through to post as accurately as possible.

There's no way you guys can solve the fact that scenes are lit a million ways and the DP or Director may want a silhouette or super blown highlights. Exposure will always be part art.

(disclaimer - because I've shot hundreds of scenes of RED and still see lots of scenes that are confusing to expose perfectly I started working on an inexpensive perfect white reference solution for myself. I think it would be a really nice little product to sell and I may do that.)
 
1. ISO 320. Aperture for DOF, and to push the bulk of my Highlights to just shy of the far right. ND's if aperture fucks with DoF beyond acceptable limits. Histogram, Histogram, Histogram.
2. Recompose exposure slightly, covering skin-tones and mid-grays. Watch the black, watch the highlights. Nothing too dark, nothing too light. Depending on the scene, I may push the ISO up, but generally try to avoid it.
3. False-Color to verify my highlights are where I think they are. Rinse. Repeat.
 
Outside we set to asa500.

1. Histogram as far to the right as possible. Look for the stoplights.

2. False color when it includes skintones in the picture.

3. Zebra to quickly detect where the hot spots are in the frame, together with the histogram.
 
Exposure from a post point of view

Exposure from a post point of view

TECHNIQUES
Reading all these exposure calibration techniques is awesome. This is one of those situations where it is difficult to identify absolutes, but many of these tactics could easily be considered as "best practices." Everyone can learn from the techniques discussed here and should test each of them in order to define what is not only ideal for your liking, but what may work better in one situation over the other. In the RED One, not all techniques will give you best exposure indications in every situation. That's why this thread is so helpful because if you read back over it, you will see dozens of helpful ways to gauge how your sensor is reacting to a given situation. Know them so when you have limited time or access to your preferred tools, you will not be forced to "expose blindly."

POST EXPOSURE
I am not a trained director of photography by any means, however I fully comprehend the value of understanding the analog and digital components to image acquisition. In my opinion, the truth about exposure in any format is that it doesn't all land on one person's shoulders (which, I agree, may be a double-edged sword), but this logic applies to more formats than just RED. For example, proper in-camera exposure is the first and most important component to achieving beautiful images. But just as many film DPs find themselves working with a specific lab and specific colorist over the years, the second and third steps in exposure are often not executed by the DP him or herself.
There is no doubt the DP's leg in this relay race is the most critical when it comes to overall creative exposure decision making, but consider this: Like film, RED is among the few formats in which all image processing happens out-of-camera. A properly exposed RED sensor or 35mm negative can be accidentally ill-processed resulting in images that appear incorrectly exposed (I am confident that people can discuss war stories of this in film scanning or telecine). Because not everyone has access to a film projector, DP's sometimes rely on a trusted lab to process or transfer their photography with little or no way to verify what is on the actual negative. The same logic can be applied to RED; not everyone has the access to evaluate RED negative, and therefore need to rely on a trusted lab to process or transfer their photography...correctly.

WORKFLOW
In film, roughly 90% of workflows involve a colorist transferring every frame of negative from film's (let's call it a) "raw" state to a calibrated digital environment.
In RED, the complete opposite is true. Probably less than 10% of workflows involved a colorist transferring every frame of negative from the R3D "raw" state to a calibrated digital environment.
By this logic, we can better identify why some DP's may be having difficulty exposing the RED.
First, we can determine that most DP's are likely not evaluating actual R3Ds in their unprocessed or "raw" state
Second, we can determine most DP's are not involved in the image processing step
Third, we can determine that many labs are not putting eyes on every frame of footage and might process footage based on presets that may not start with the raw file (ie: quicktime pointer files or RedSpace transform, etc).

From a post point of view, it is important that DP's become familiar and comfortable with how their unprocessed R3D negative performs, just as they are familiar with how their unprocessed 35mm negative performs. For many DP's, the light meter and good instinct are enough. For others, it takes false color and zebras. Regardless of how one chooses to meter exposure, my professional opinion is this:

For best results in optimally exposed R3Ds, evaluate the results of your preferred metering from the sensor's point of view based on a raw image data path.

EXAMPLE
One of the best DPs (RED and otherwise) that I've had the pleasure of working with is CRASH. Crash has a gift for exposure and has delivered some of the most beautiful R3Ds I've ever seen. Crash's talent along with his DIT, Dino Georgopoulos, demonstrate time and time again how a great team can deliver real-time feedback of raw sensor results. This, in conjunction with a proper post workflow, all but guarantees ideal results in a final product as it moves through the assembly line.

Below is a still from Crash that he shot a long time ago. I use it as an example a lot because it is a perfect exposure example of a very complex situation.

1. RESET all meta-data settings to DEFAULTS - when evaluating the sensor population, one needs to eliminate as much downstream image processing as possible
2. Change your COLOR SPACE to CAMERA RGB - this was more important in builds prior to build 20 as the new color science has changed this a bit. Graeme can weigh in on the saturation changes of B20 and 21
3. Change your LUT to REDLOG - this will map the linear light captured image to an easily viewable log-like representation of the sensor.
4. Enable the HISTOGRAM. Graeme has put a nicely designed, gigantic histogram in RedAlert. In my opinion, this is the easiest way to evaluate exposure and one can setup a shot with these settings in a matter of seconds. Since RedAlert is free, everyone should have it on their computers. Playback is not necessary for exposure evaluation

Through these settings, one can see that the body of Crash's exposure falls just under the center of the exposure index. This image is particularly complex in that David Allen Grier's skin tones are dark, plus he is being back-dropped by a DLP projection screen. The complexity in the screen, front lighting, camera flashes (in the rest of the shot) and his skin tones and contrasting wardrobe make this a very difficult shot to balance out.
With proper metering (ask Crash and Dino about that stuff) a proper exposure can be determined and the RedLog histogram tells no lies.
This image shows compensation for highlights and speculars and enough body to expose the shadows under his chin.

RED sensors expose with more information in the toe that they do the highlights. By this logic, exposing based on the stop-lights or zebras at the high-end is likely not the best practice. Typical results from high-end "clip-style" metering will look more contrasty with less latitude and an often a "plastic" by-product of heavy makeup and an overall more video look. The higher the "body" of your exposure falls, the less overall latitude one has after building contrast to the shot. By exposing in the center or just below the 50% mark, the potential for upper-end latitude increases while the more powerful CMOS low-end delivers smooth, rich and realistic shadow detailing.
Our eyes need to establish a black point more than we need to establish a white point. In other words, you will quickly feel the "milky" look of lifted 15%IRE black but might not even notice a white point clocking in at 85% IRE. In narrow dynamic range situations, it means you will find smoother results in building contrast (ie: more cinematic) by allowing the sensor to expose more evenly throughout a shot. And I have found time and time again when the body of the image is hinted to the powerful shadow end, smoother, more malleable looks will always follow.

Like I said, exposure does not fall exclusively on any one set of shoulders - especially with the RED. Though I am a believe that rules are made to be broken, choosing to break them is typically better than breaking them accidentally (at least in exposure, that is). The best practice is to rely on your preferred metering method, but having true confidence in what your metering will yield after it is processed. Achieving this is made much swifter and easier when post and production sit together around the warm-lit histogram campfire and evaluate what is working and what is not. After that, the talent of a colorist with the guidance of a director of photography can efficiently paint the picture that was intended all along.

michael
 

Attachments

  • CRASH.jpg
    CRASH.jpg
    17.1 KB · Views: 0
Back
Top